A project can be used to manage multiple tasks as one body of work. They can also be used to manage costs and progress against a contract value.
Feature video
This webinar guides you through a comprehensive Projects workflow, from the initial quote, right through to project completion, showcasing the various stages along the way.
There are three ways you can create a project:
Create > Project
Using Create > Project. This method is most common when you want to group multiple tasks (such as ad-hoc service requests) and collate ongoing costs. Typically this method doesn't have an initial contract value.
Detailed Quote
From an approved detailed quote. This method enables you to manage overall progress and invoice against a contract value (the total on your quote).
Project Template
Using a Project Template. This method can speed up the process of creating a project by pre-populating data such as the client, location(s), stages and tasks.
When a project is not linked to an approved detailed quote, the contract values displayed in the Progress tab will be zero.
Duplicate existing project
You can also duplicate an existing project. When viewing the project, click Create and then one of the following options: Project | Project (inc Stages) | Project (inc Stages & Tasks), depending on whether or not you want to include the Project Stages, or the Stages and Tasks. See Create a project from a Detailed Quote for more of an explanation.
Create a Project
The fastest way to create a project manually is by navigating to Create > Project.
You can also create a Project from a Detailed Quote or Project Template.
Create a project from a Detailed Quote
When you create a project from an approved detailed quote, it can automatically transform take-off sheets to stages and top-level line items to project tasks. The quoted values will be displayed as the original estimate (or contract value) in the project's Progress tab.
Learn more
- Go to Workflow > Quotes.
- Open an approved detailed quote.
Acceptance Status
The quote must have an Acceptance Status of Accepted. See Track Quote Status for more information.
- Click the Create button (top right) and select an option under Project.
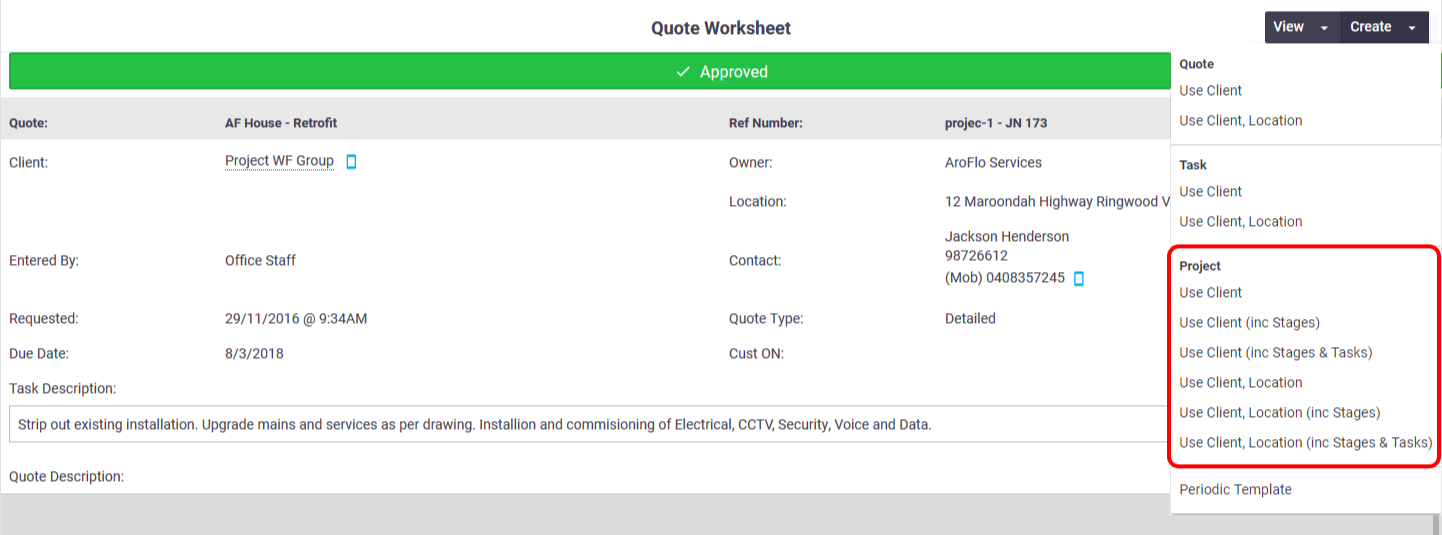
Options
Option Description Use Client
Use Client, Location
Create a Project using details from the Quote. This includes the client, location (optional), contact and quote value (will be the project contract value). Use Client
(inc Stages)Use Client, Location
(inc Stages)As above. In addition, Take-Off Sheets in your Quote can turn into the Project Stages.
See example
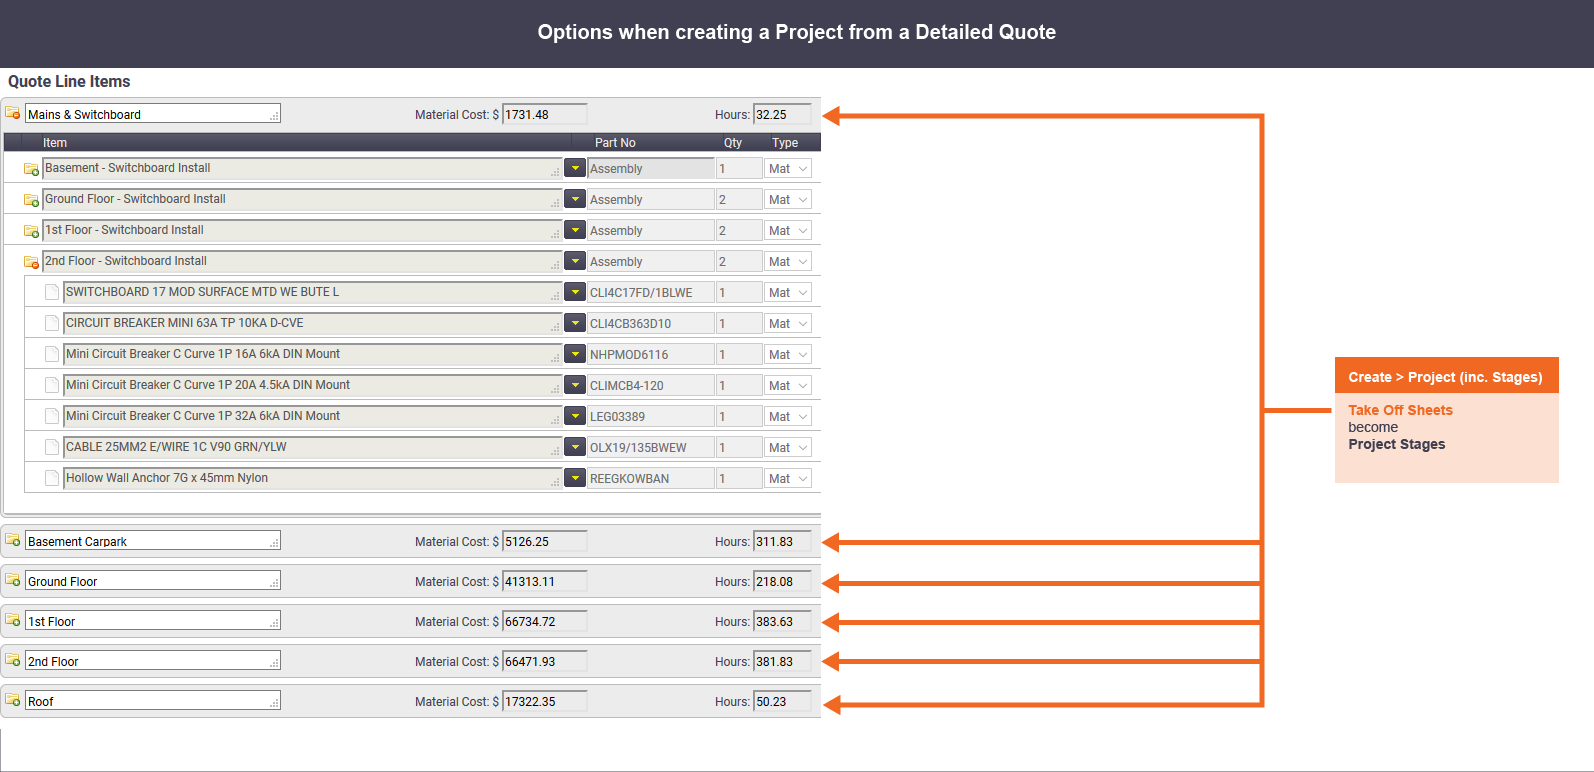
Use Client
(inc Stages & Tasks)Use Client, Location
(inc Stages & Tasks)As above. In addition, the first set of line items listed in a Take-Off sheet can turn into Tasks.
See example
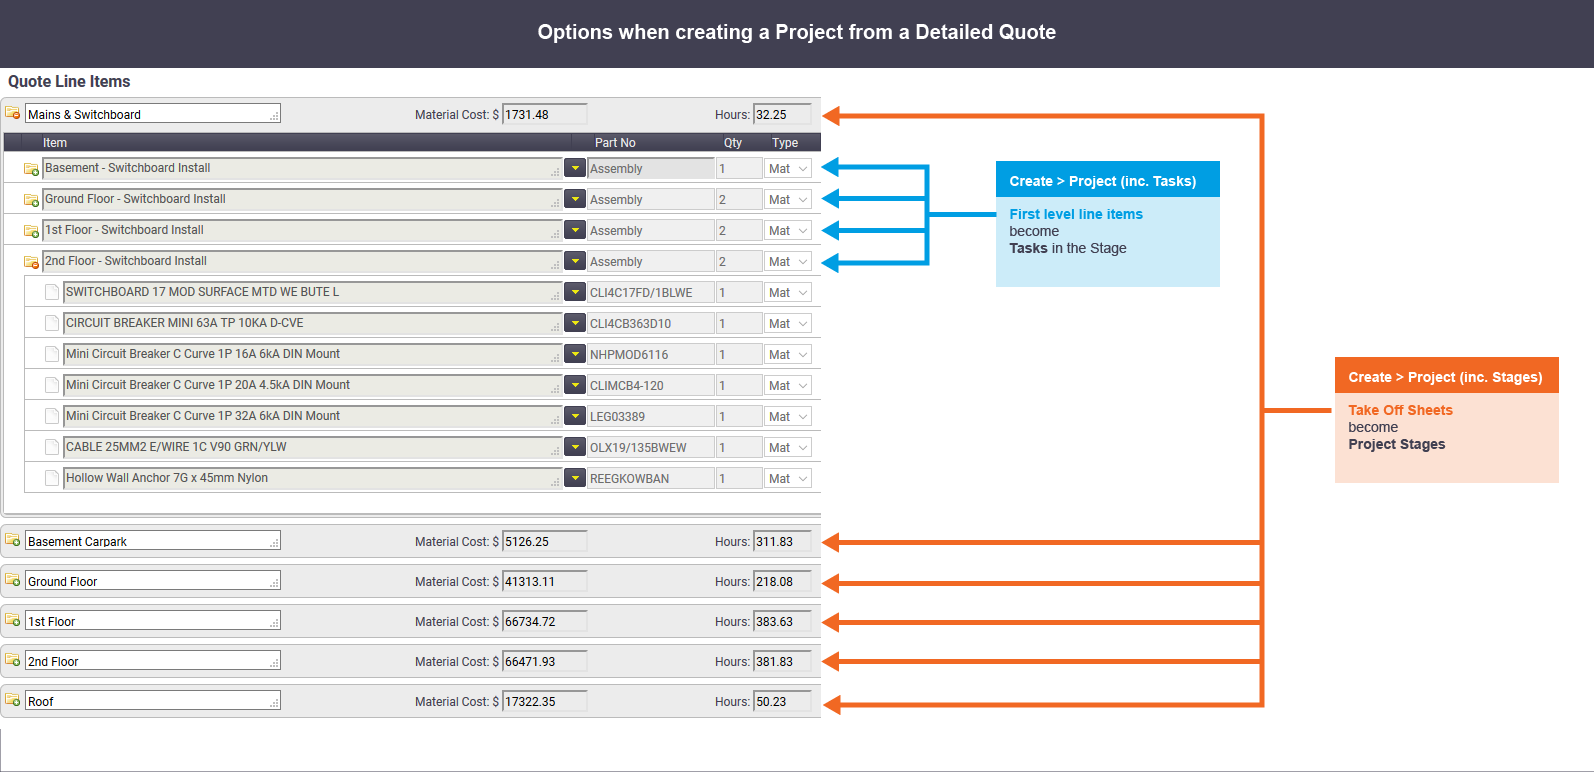
Task Types
When using this option, the task type for each task will be prefilled with that of the detailed quote.
- The Add Project screen will appear. Refer to next section.
Chosen the wrong option?
If you've changed your mind or selected the wrong option, and you've saved your project for the first time, you can start this process again, but you'll first need to unlink the created project from the quote:
- Click the Linked Quote link from your open project, or access it via Workflow > Quotes > Approved
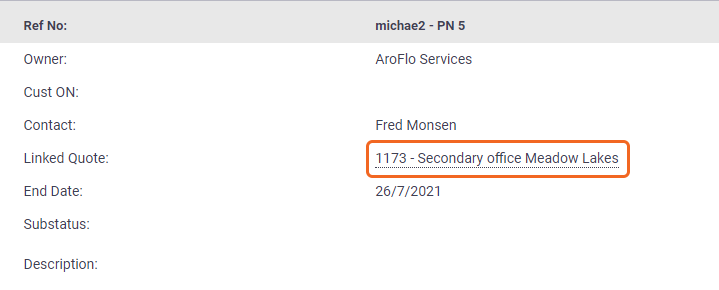
- Change the status to In Progress and Save Quote
- Edit the Quote header (top left)
- For the Project: field, click search
 and from the Search Projects window, select Set No Project
- Save the Quote header and click Quote at the top left to return to your quote worksheet
- Change the status to Approved again and Save Quote.
- Click Create and select the appropriate option as above to generate a project from this detailed quote.
Delete Project
Don't forget to delete your original project if necessary via Edit Project > Delete Project.
Create a project from a template
This method can speed up the process by pre-populating common stages and tasks.
While Creating a Project
You can quickly add common stages and tasks from a Project Template while using different details (e.g. a different client and/or location) to the template itself:
- Click Create > Project
- Click the dropdown under Project Template
- Click a template to select it
- Click Add Stages/Tasks from Project Template in the Tasks area to the right. Your tasks will appear.
- Click Save.
- The Edit Project screen will appear. Refer to next section.
From a Project Template
This method will retain the client and location (if selected) saved on the project template. If the project you're creating is for a different client and/or location, either edit these details on the template first > Save and then follow the below instructions, or alternatively, use the above method.
- Go to Workflow > Projects
- Click Project Templates
- Select a Project Template.
- Click the
 (three dots) next to Save Project Template > Generate Project.
 - The Edit Project screen will appear. Refer to next section.
Set up your Project
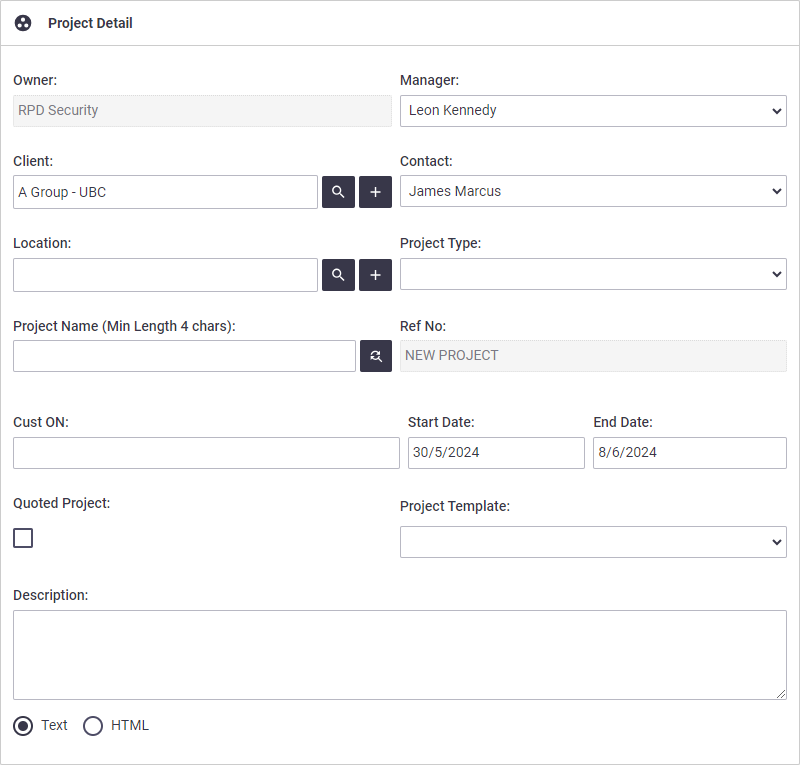
On the Add Project screen, complete the relevant details.
Project Details
|
Start by completing the fields under the Project Detail heading. When creating a Project from a detailed quote or a Project Template, known fields will be pre-populated for you. Don't save your project yet. Wait until you've added all the details you need, including any stages or tasks you want to add. You can add stages and tasks at any stage after project creation, too, but this will be via the Edit a Project function. |
 |
 |
Learn about 'Project Detail' fields
Field |
Description |
||||
|---|---|---|---|---|---|
| Owner | The Business Unit responsible for the Project. This cannot be changed unless the Project is created in a different Business Unit. |
||||
| Manager | The user within your organization managing this project. | ||||
| Client | The company (or individual) for whom the project will be run. This field defaults to the current business unit when creating a project manually. Click |
||||
| Contact | Who your default contact with the client is. | ||||
| Location | This field is used when the project work site is different from the client's office location. The location will appear on any stages, quotes, tasks, purchase orders or invoices created for this project. You can override the default location. Click |
||||
| Project Type | Project types are used to define the different types of projects that you manage for reporting purposes. Project Types can also include predefined stages to create Projects faster. For example, a Project Type could be 'New Build', which includes common stages such as Planning, Rough-In, Fit Off and Commissioning. Selecting a Project Type with predefined stages will reveal the 'Add Stages from Project Type' button. Learn more under Project Stages below. |
||||
| Project Name | This is used to help staff easily identify the Project by name. By default, this field will be pre-filled with either the client's address (or the work site address if a 'location' has been set) and appended with the Project Type. You can always overwrite this name with something more meaningful. |
||||
| Ref No: | Reference number generated by AroFlo. This will update once the Project has been created. | ||||
| Cust ON | The customer order number or contract number for this project. | ||||
| Start Date | An informational field for the start date of this project. The date can be used for reporting, planning and review purposes. | ||||
| End Date | Similar to Start Date, this field is used to record the estimated end date of the project. | ||||
| Quoted Project |
We recommended leaving this ticked. This enables you to select line items from any quote that is linked to the project when invoicing. Therefore this allows individual tasks to access the current quote line items. You may wish to leave this unticked when using a project to track incurred costs only (such as ongoing maintenance work with no quote). |
||||
| Project Template |
Select an available Project Template to use as a base for your project tasks. Selecting a template will reveal the 'Add Stages/Tasks from Project Template' button. |
||||
| Description | Description of the project work. | ||||
Custom Fields Area |
Displays any custom fields you have set up in Site Administration. Can't see any custom fields? Check your permissions!Access to project custom fields is controlled by your permission group settings. Check the following settings to confirm they're enabled, or for more information check out our page on setting up and managing Custom Fields:
|
Project Stages
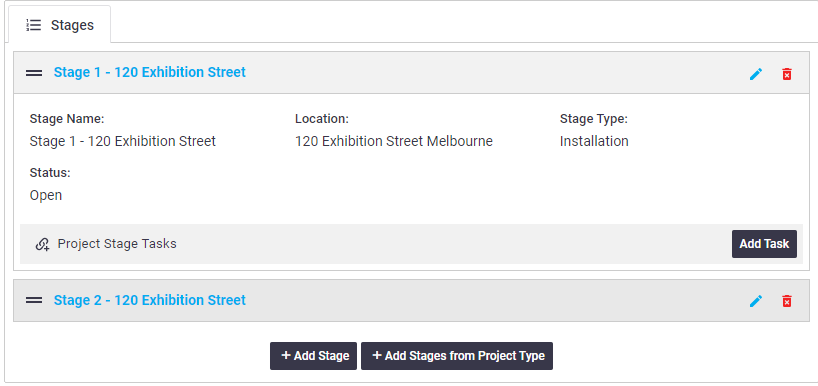
Once the details are complete, you can add stages to manage your Project.
What are stages?
Stages are used to break down big projects into manageable sections. The number of stages that you create depends on how you want to manage the project. For example, some Project Stage Types could be planning, rough in, fit off and commissioning. Another example may be the months of a year.
To add a stage, click + Add Stage.
| On the Add Stage window, give your stage a name, and, if applicable, select a different location and a stage type. Learn more about 'Stage' fields below. | 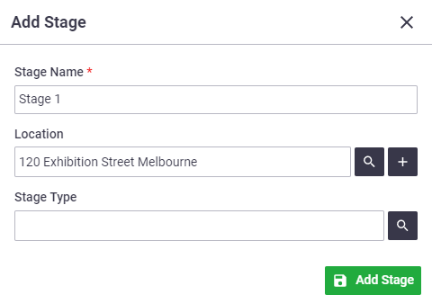 |
 |
- The Project Type selected for this project could also have pre-defined stages. These can save time on manual entry. Click + Add Stages from Project Type to insert these.
- If you've selected a Project Template for this project, you can add the stages and tasks from the template by clicking + Add Stages/Tasks from Project Template.
Project Variations
If your project is from a detailed quote, it's a good idea to add a stage called Variations, so that if you need to deviate from the agreed contract value, you can simply add tasks to the Variations stage.
Learn about 'Stage' fields...
Click the  (blue pencil) icon to edit a stage. The fields described below will be available.
Field |
Description |
|---|---|
| Stage Name | The name of the stage (or phase) in the Project. By default, this will be prefilled with ("Location - Stage Type"). If there is no Stage Type, the name will be ("Stage 1 - Location", "Stage 2 - Location" etc. You can always overwrite this name with something more meaningful (e.g. Rough In, Fit Off etc) |
| Location (optional) | The work site for this stage. By default, this will be prefilled with Project location. This field is useful if the work site changes per stage (e.g. Level 1, Level 2, Level 3) |
| Stage Type (optional) | Project Stage Types allow you to select from a pre-defined list of stages. These can be useful if you want to automate the name of each stage. For example, you could select 'Level 2' as the location and 'Planning' as the Stage Type. The Stage Name will automatically be called "Planning - Level 2" |
|
Quote/Takeoff Only visible if there is an approved detailed quote linked to the project |
If you created your project without a quote (e.g. from a project template) and you now have an approved detailed quote within the project, this field lets you apply the values from a quote takeoff to your project stage. Select the quote or takeoff you want, then click Update Stage > Save Project. The quoted values will now appear on the Project Progress tab for the relevant stage. |
|
Stage Status Only visible after saving |
Set a Stage to be Open or Closed. The Stage Status can be changed throughout the project. |
|
Substatus Only visible after saving |
Set up stage substatuses in Site Admin to provide more detail about the status of a Stage. |
Delete stage |
Click this icon to delete a stage. Once the stage contains any tasks, invoices, or Gantt chart links, the red bin icon is replaced with icons that indicate how many quotes, tasks, invoices or links the stage contains. See Edit a Project for more information. |
Project Tasks
Once the project stages are listed, and before you save the project for the first time, you can also add Tasks (optional).
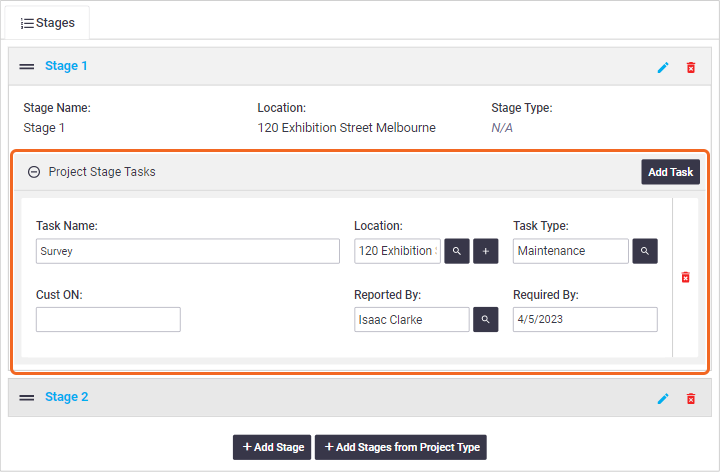
To add a Task within a stage, click the stage to expand it > Add Task.
Do I have to create tasks now?
No.
Once the project has been created, you can:
- create the tasks that are required from the project dashboard
- create tasks as you need them using any of the Create menus in AroFlo. The Create New Task form provides a Project field which lets you link the task to a project and stage (if applicable)
- link existing tasks to a project by editing the task header and selecting the project and stage (if applicable) from the Project field
- import tasks to your project.
Learn about 'Task' fields...
Field |
Description |
|---|---|
| Task Name | Used to help staff easily identify the Task (job) required. This is the same as Task Identification. By default, the Task Name will be prefilled with a combination of the Location and Task Type. You can always overwrite this with something more meaningful. |
| Location | Used when the work site is different to the project location or stage location. |
| Task Type | Defines the type of work being performed and is useful for reporting on work productivity. It also determines the types of checklists, labor charges and service fees that apply to the task. If you're creating your project from a detailed quote and selected the option to include Stages and Tasks, the task type for each task will be prefilled with that of the detailed quote. Change this if necessary, or it can be changed later on. |
| Cust ON | Used when the customer order number is different to that listed on the project or the stage. |
| Reported By | Used for recording the contact who requested the Task. |
| Required By | Used to record the date that the customer needs this Task completed by. This is the same as Due Date. |
Save the Project
Once the Project is set up, click Save Project. The page will refresh to view your project.
If this is a common setup, you can also save it as a Project Template by clicking  (more options) > Save as New Project Template. More on Project Templates.
 (search) to select a different client or
  (plus sign) to create a new one.
 (search) to select a different location associated with that client or
  (plus sign) to create a new one.
 (red bin icon)