Project templates are a great time-saver for quickly generating projects that are common in your business. A project template includes every field that is found on the Create Project screen.
You can pre-set as much or as little as you need. Use project templates to generate new projects whenever you need them.
Duplicate existing project
If you want to use an existing project as a template, when viewing the project, click Create and then one of the following options depending on whether or not you want to include the stages as well and/or tasks. See Create a Project - Create a project from a Detailed Quote for more of an explanation.
Create a Template
A project template can be created in one of three ways:
ManuallyManually, by using Workflow > Projects > Create Project Template. Existing ProjectFrom an existing Project, in the Edit Project view. On the Save Project button, click If the project you're creating a template from contains stages, these will be included in the template, however, project tasks, quotes, and invoices will not. You can, however, set up tasks to be included in your template. See Project Template Tasks, below. Approved detailed quoteWhen creating a Project for the first time from an approved detailed quote (see Create a project from a Detailed Quote). After clicking Create and selecting a project option (i.e. including stages and tasks), on the Save Project button, click If using this option, and your quote contained Takeoffs and line items, these will get converted to Project Stages and Tasks and will be included in the project template. |
 |
|
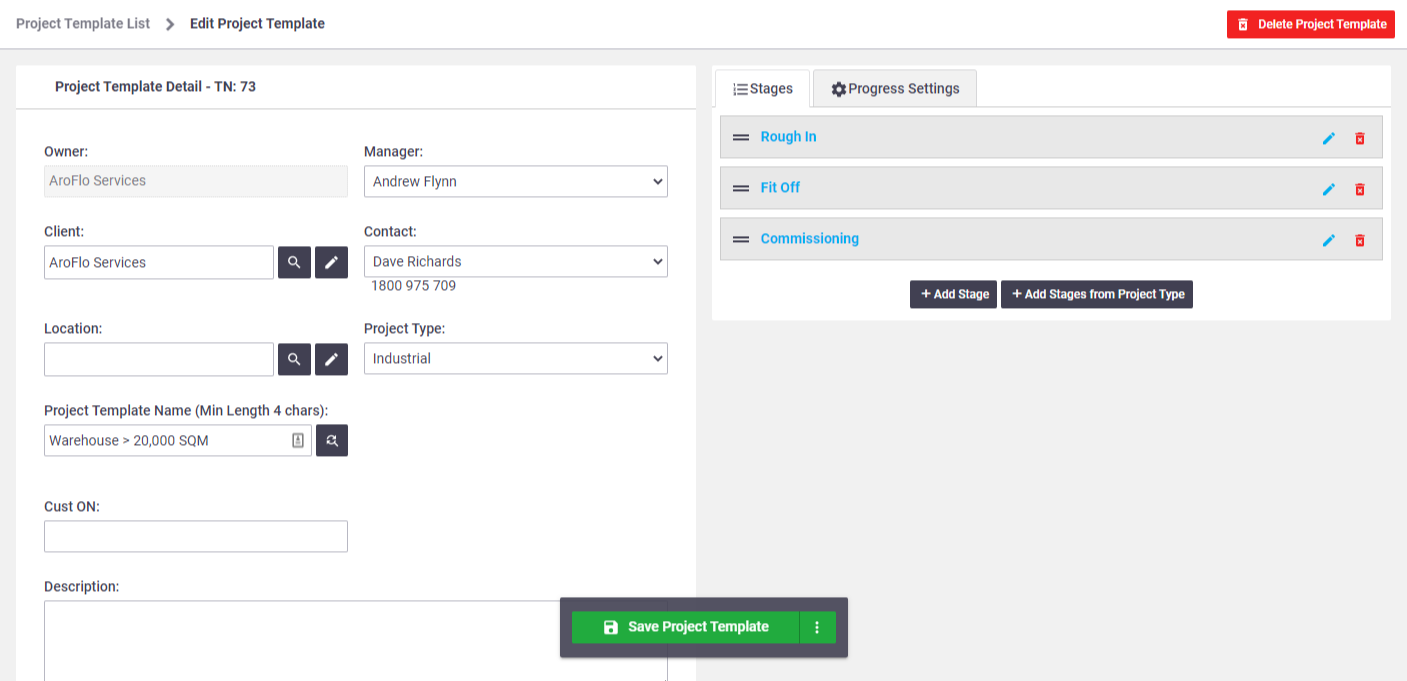
Set up a Project Template
On the Add Project Template screen (or Edit Project Template screen, if you created your template from an existing project), fill in any fields you want to save.
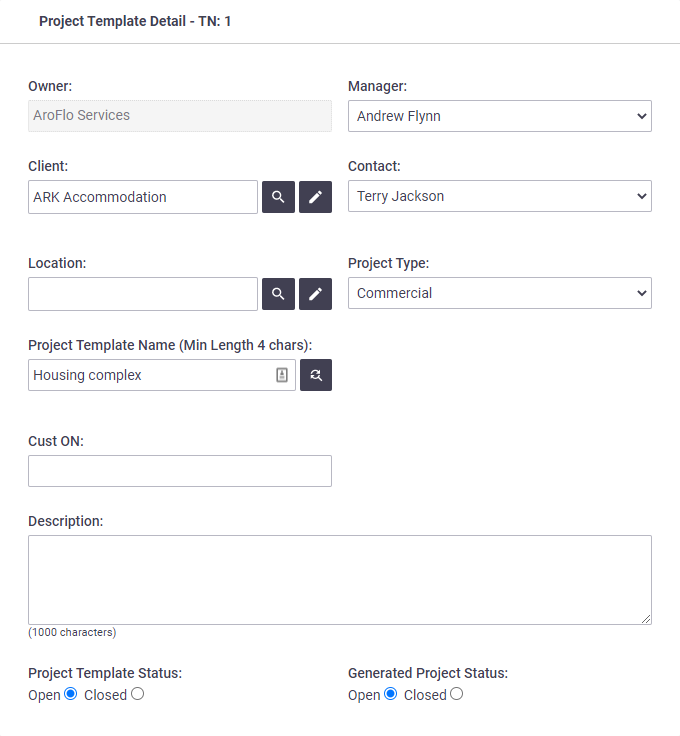
Project Template Details
|
Start by completing the fields under the Project Template Detail heading. When creating a Project Template from an existing Project, known fields will be auto-populated for you.
|
 |
|
Learn about 'Project Detail' fields...
Field |
Description |
|---|---|
| Owner | The Business Unit responsible once the Project is generated. |
| Manager | The user (within your organisation) managing the project, once it is generated. |
| Client | The company (or individual) for the project, once it is generated. Click |
| Contact | The client contact. |
| Location | Used when the project work site is different from the client's office location. The location will appear on any stages, quotes, tasks, purchase orders or invoices created for this project. You can override the default location. |
| Project Type | Project types are used to define the different types of projects that you manage for reporting purposes. Project Types can also include predefined stages to create Projects faster. For example, a Project Type could be 'New Build', which includes common stages such as Planning, Rough-In, Fit Off and Commissioning. Selecting a Project Type with predefined stages will reveal the 'Add Stages from Project Type' button. Learn more under Setting Stages below. |
| Project Template Name | Used to help staff easily identify the Project Template by name. When a project is generated from this template, the Project Name will be the same as the Project Template Name. It can be changed on the project once it has been created. |
| Cust ON | The customer order number or contract number. |
| Description | Description of the project work. |
|
Project Template Status Only visible after saving |
The status of this Project Template once you click Save Project Template. The available statuses are 'Active' and 'Archived'. |
|
Generated Project Status Only visible after saving |
The initial status of a Project which is generated from this template. |
 (search) to select a different client or to set no client.
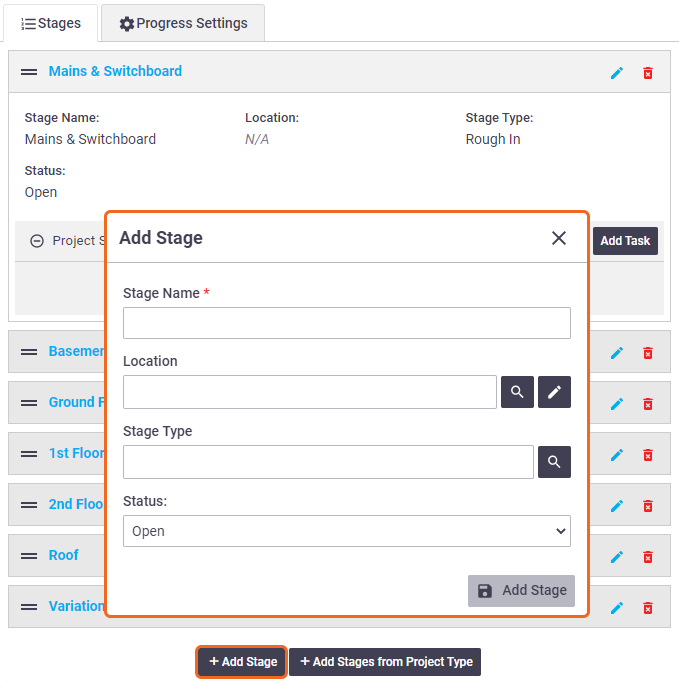
Project Template Stages
|
On the right-hand side, you can add project stage templates, which will create project stages when the project is generated. To add a stage template, click + Add Stage. The Project Type selected for this project could also have pre-defined stages. These can save time on manual entry. Click 'Add Stages from Project Type' to insert these. Click a stage to view the details.
|
 |
|
Learn about 'Stage' fields...
Field |
Description |
|---|---|
| Stage Name | The name of the stage (or phase) in the Project. By default, this will be pre-filled with ("Location - Stage Type"). If there is no Stage Type, the name will be ("Stage 1 - Location", "Stage 2 - Location" etc. You can always overwrite this name with something more meaningful (e.g. Rough In, Fit Off etc) |
| Location (optional) | The work site for this stage. By default, this will be pre-filled with Project location. This field is useful if the work site changes per stage (e.g. Level 1, Level 2, Level 3) |
| Stage Type (optional) | Project Stage Types allow you to select from a pre-defined list of stages. These can be useful if you want to automate the name of each stage. For example, you could select 'Level 2' as the location and 'Planning' as the Stage Type. The Stage Name will automatically be called "Planning - Level 2" |
| Status | The status the stage will have on project generation. |
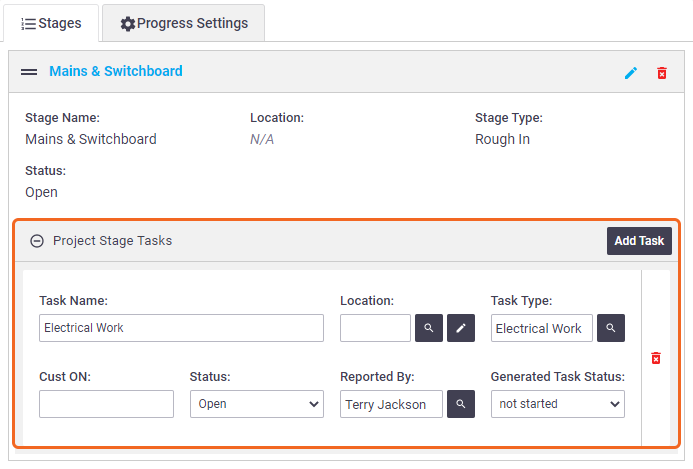
Project Template Tasks
|
Once the project stage templates are created, you can also add Task templates (optional). To add a task template within a stage template, click Add Task and complete the required fields. Once you've saved a task on a stage, instead of the delete icon  |
 |
|
 (briefcase icon) with a number beside it to show that the stage contains one or more tasks. The stage cannot be deleted while it contains any quotes, tasks, invoices or
 Learn about 'Task' fields...
Field |
Description |
|---|---|
| Task Name | Used to help staff easily identify the task (job) required. This is the same as Task Identification. |
| Location | Used when the work site is different to the project location or stage location. |
| Task Type | Defines the type of work being performed and is useful for reporting on work productivity. It also determines the types of checklists, labour charges and service fees that apply to the task. |
| Cust ON | Used when the customer order number is different to that listed on the project or the stage. |
| Status |
This determines whether the task template will generate a task on project creation or not.
|
| Reported By | Used for recording the contact who requested the task. |
| Generated Task Status | This controls which initial status the task will have on creation. The options are 'Not Started', 'In Progress', 'Pending' and 'Completed'. |
Progress Settings
|
The fields found in the Progress Settings tab only appear after a Project Template has been created. These settings let you set the default progress and invoice settings for the generated project. |
 |
|
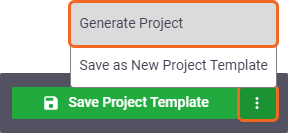
Save a Project Template
Once the Project is set up, click Save Project Template.
You can also:
- Make a copy of the current by clicking
 (more options) > Save as New Project Template.
 - Generate a project by clicking (more options) > Generate Project.
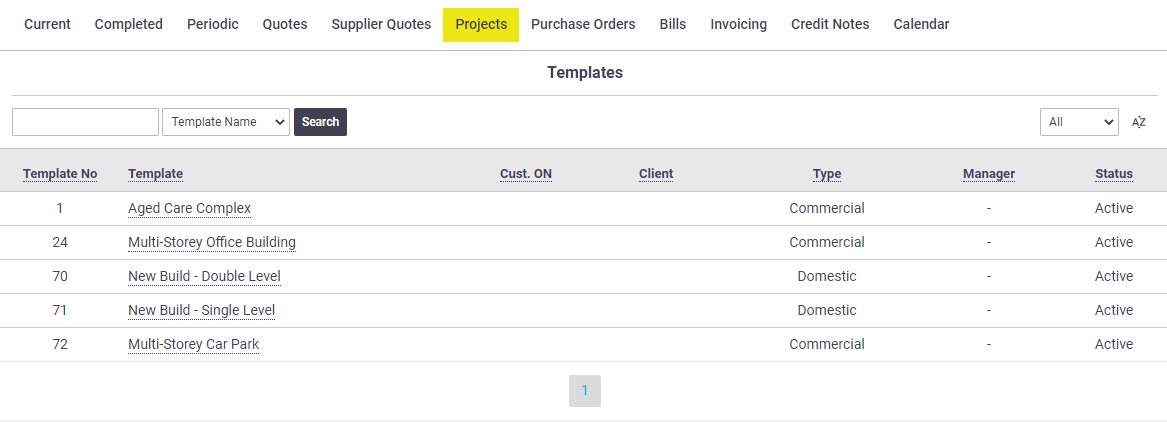
View Project Templates
To view a list of your Project Templates, go to Workflow > Projects > Project Templates.
Click a Template Name to view that template.
Generate a Project using a Project Template
There are two ways you can generate a project using a project template:
Via the Create Project screen
On the Create Project screen, use the Project Template dropdown to select your template and on the right-hand side, choose to Add Stages and Tasks from the Project Template.

Via the Project Template
| You can also generate a project via the Project template itself by clicking the (more options) next to Save Project Template > Generate Project. |
 |
|
Delete a Project Template
|
Delete a Project Template by clicking Delete Project Template (top right). If you want to delete a Project Template, you will first need to delete all linked tasks. |
 |
|