Each month, we bring to you a helpful hint of something you can do in AroFlo that you may have missed or didn't know about.
Feel free to use these to enhance your workflow and AroFlo experience.

2026
January Insight - Easily Locate Suppliers Using GPS 📌
Did you know that you can easily find your nearest supplier to your location when using AroFlo Field?
You can do this while browsing your supplier list, and also when creating a purchase order and selecting a supplier.
Both of these options might come in handy if you urgently need to purchase materials on the go.

See Locate Suppliers Using GPS to learn more.
2025
November Insight - Use custom fields to filter information
Did you know you can use custom fields to filter information in your reports? For Client, Task, and Asset reports, custom fields using the ‘Checkbox’, ‘Radio’ or ‘Select’ field types appear at the bottom of the list of filters.
In this Client report, we're only showing Clients marked as Client Type ‘VIP’.
You can also combine this with other filters to narrow down your results even further.

More on creating Custom Reports | Custom Fields
October Insight - Add or remove columns
Did you know you can add or remove columns in most places in AroFlo Office? Look for the ![]() Columns button to choose which columns you want to display. You can also click and drag the columns to suit your preferred order.
Columns button to choose which columns you want to display. You can also click and drag the columns to suit your preferred order.

Click to see examples
Adding inventory items
When adding Inventory items to a quote or task, easily find the item in question by adding the Thumnail column. This shows each item's default photo on the inventory card.

Calendar Scheduling
When scheduling from the calendar, you can add a Task Type column so you can see/filter the type of task before scheduling to your users. You can also use the Scheduled and Assigned columns to see if tasks have already been assigned or scheduled to users and/or use this information to filter tasks.

Project tabs
When viewing the list of tasks within a project, you can add the Scheduled Date, Last Scheduled Date, and Priority columns.
For the list of quotes, you can add the Acceptance Expiry column.

September Insight - Bookmarking Task List views 🔖
Did you know you can bookmark Task List views? This is useful if you regularly use filters within the task list to only show certain tasks and will save you from selecting the necessary filters each time.
Here are some examples of some views you might want to bookmark:
- Only tasks that are assigned or scheduled to you
- Tasks in order of most recently updated
- Tasks in order of the Due Date
- All tasks for one client (or even a group of clients)
Simply use the available filters and sort options to display the tasks you want to see in the order you want them, and then save this as a bookmark in your web browser, remembering to include a description of the view when saving.

See Current Task List in AroFlo Office for more on the Task List and further use cases for bookmarking views.
August Insight - Use Conditional Fields for Custom Forms
Have complicated compliance forms to fill out? Want to make your existing forms a lot more user-friendly? Try using Conditional Fields! Conditional Fields can guide users through a series of choices as your form fields can show or hide things based on the information being entered into other form fields.
In this example, a tickbox has enabled two items to be checked. On one of them we've seleted a radio option which has triggered a documents and photos field. We've then typed in some text in another field which has then triggered a Notes field containing a reminder to fill out a linked form.

July Insight - Change the default image for Inventory items, Assets, and Users 🖼️
Did you know that you can change the default image that appears for inventory items and assets? On the Inventory item, Asset Card, or User Card, look for the ‘Default’ option in AroFlo Office or ‘Make default document’ option in AroFlo Field.
The image displays as a thumbnail wherever the item is displayed (e.g. within a list, when an asset is added to a task, or when selecting inventory items to add to your quote).

Set a default image (Office) 💻 | Set a default image (Field) 📱
June Insight - Set colours for Task Type Labels 🏷️
Did you know you can customise the Task Types Calendar colours? This is useful for easily identifying the task type of schedules at a glance and works no matter what colour settings you're using in the calendar.
Simply set a background and text colour for each task type and this appears as a schedule label on schedules. Ensure you have the ‘Task Type’ schedule label set up as a 'Header Label'.

Task Types | Calendar Colour Settings
May Insight - Create Default Folder Structures for Task Types 📁
Did you know that you can set default folder structures for different task types? This is helpful if you regularly use similar folders for your documents and photos and saves you from manually creating them on each task.
Set this up in Site Admin for each Task Type you want to have a default folder structure for.
Click to see examples
Installation Task

Renovation Task

Steam Cleaning Task

April Insight - Use Resource Zones and GPS coordinates to automate your workflow
You can use Resource Zones in AroFlo to make it easier to schedule resources to tasks, as well as assign a relevant Contractor when creating a Work Order. In addition, geocoding your client addresses and locations in AroFlo can make it easier to find nearest tasks and view nearest resources to tasks. Click the expands below to learn more.
Prerequisites
Before using these features, you must ensure your client addresses and locations in AroFlo are geocoded. See Create a Client in AroFlo Office and Create a Location for more information.
In addition, for Scheduling in the calendar based on zones and Assign Work Orders to the nearest Contractor, you must:
- Set Up Resource Zones
- Ensure your Users, Contractors, Assets (whichever you're using this feature for) have Resource Zones enabled.
Schedule in the calendar based on zones
When scheduling from the calendar, you can schedule jobs based on their location, and the areas in which your users operate in.
- Follow the prerequisites above, ensuring your users have Resource Zones enabled on their user card
- Click and drag some time out on the relevant user's calendar
- Schedule a task or quote
- Enable the Zone column if necessary. This column defaults to ‘Yes’ which automatically lists tasks and/or quotes matching the selected user's Resource Zones. Continue scheduling as necessary.
- Alternatively, select 'All' from the dropdown to show applicable resource zones for your tasks/quotes so you can choose what to schedule, based on this information.
Contractors and Assets
You can also use the above logic for Assets and Contractors displayed on your calendar. For Assets, resource zones are set on the asset card, and for Contractors, on the contact card for the primary contact.

Assign Work Order to nearest Contractor
When creating a Work Order, you can assign it to a Contractor working in the same areas as the task in question.
- Follow the prerequisites above, ensuring your Contractors' primary contacts have Resource Zones enabled on their contact card
- Create a work order from a task
- When selecting the contractor from the Search Contractor window, enable the Zone column if necessary. This column defaults to ‘All’ which shows the resource zones beside each Contractor, so you can make a decision on who to choose, based on this information.
- Alternatively, select 'Yes' from the dropdown to only show Contractors matching the same resource zone as that of the task address (listed on the Work Order).

Find Nearest Job/Resource
Take advantage of the Find Nearest Job/Resource features. You don't need to have Resource Zones set up or enabled for these features, but your client addresses and locations in AroFlo do need to be geocoded.
- Hover over a task schedule in the calendar to display the Find Nearest features
- Click the building icon for Find Nearest Job or the person icon for Find Nearest Resource.
Find Nearest Job - This feature brings up a search window showing tasks, ordered by the closest to the task you're on. Double-click a task to schedule it immediately after the one you're on.
Find Nearest Resource - This feature requires GPS tracking and shows a search window, with users ordered by the closest to the task. Double-click a user to schedule the task to them.

If you do have Resource Zones set up and enabled for users, you can still enable the Zone column for both of these features, if you like.
Resource Zones | Geo Zone Scheduling | Scheduling with GPS (Nearest Task or Resource)
March Insight - Images for Assets and Inventory 🖼️
Adding images to inventory items and assets is a great way to easily identify most commonly-used items when adding to a task or quote, saving time on searching for the item or asset at hand. You can also upload things like installation guides or product-specification sheets, for easy access.
To view images in AroFlo Office when adding Inventory items or Assets to tasks or quotes, look for the ‘Thumbnail’ column when searching.

Documents and Photos in Office 💻 | Documents and Photos in Field 📱
February Insight - Using emojis in AroFlo 😲
Did you know you can add emojis in AroFlo so you can easily identify key information. For example, including emojis in the names of:
- Tasks
- Task Types
- Substatuses
Use the Windows key + full stop (or semicolon), or Command + Control + Space on a Mac, to bring up the emoji panel, when entering text.
Here are a few examples for inspiration.

January Insight - Custom Fields
Using non-standard info in some aspects of your workflow? Try using custom fields. Custom fields are available in several areas of AroFlo, including on tasks, client cards, asset cards, projects, and task assets. There are several custom field types available, including a text box, date field, select and multiselect, documents & photos, and even a canvas field!
Here are a few examples for inspiration, but you can customise your own depending on your workflow needs. For more information, please see our learning resources below.

2024
November Insight - set up Multi-factor authentication (MFA) for your users 🔐
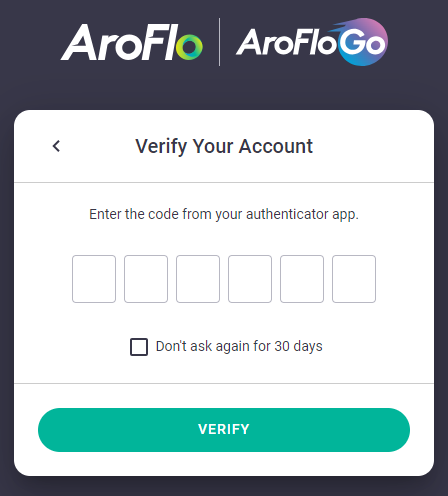
Multi-factor authentication (MFA) offers an additional level of security for your AroFlo site. It requires users to enter a code obtained from an authenticator app (typically on their phone or tablet) before they can log in.
We recommend users with access to Site Administration and/or access to the Billing Portal are set up with Multi-factor authentication.
Managers and those with permission can enable MFA on their own user card in AroFlo Office via Manage > Users > select themselves as a user to open their user card. Site Administrators (who can view and edit other users) with the above permission can also enable or disable MFA for other users via Site Administration > Users > select user to open their user card.

September Insight - Rearrange task list column headings ⬅️➡️
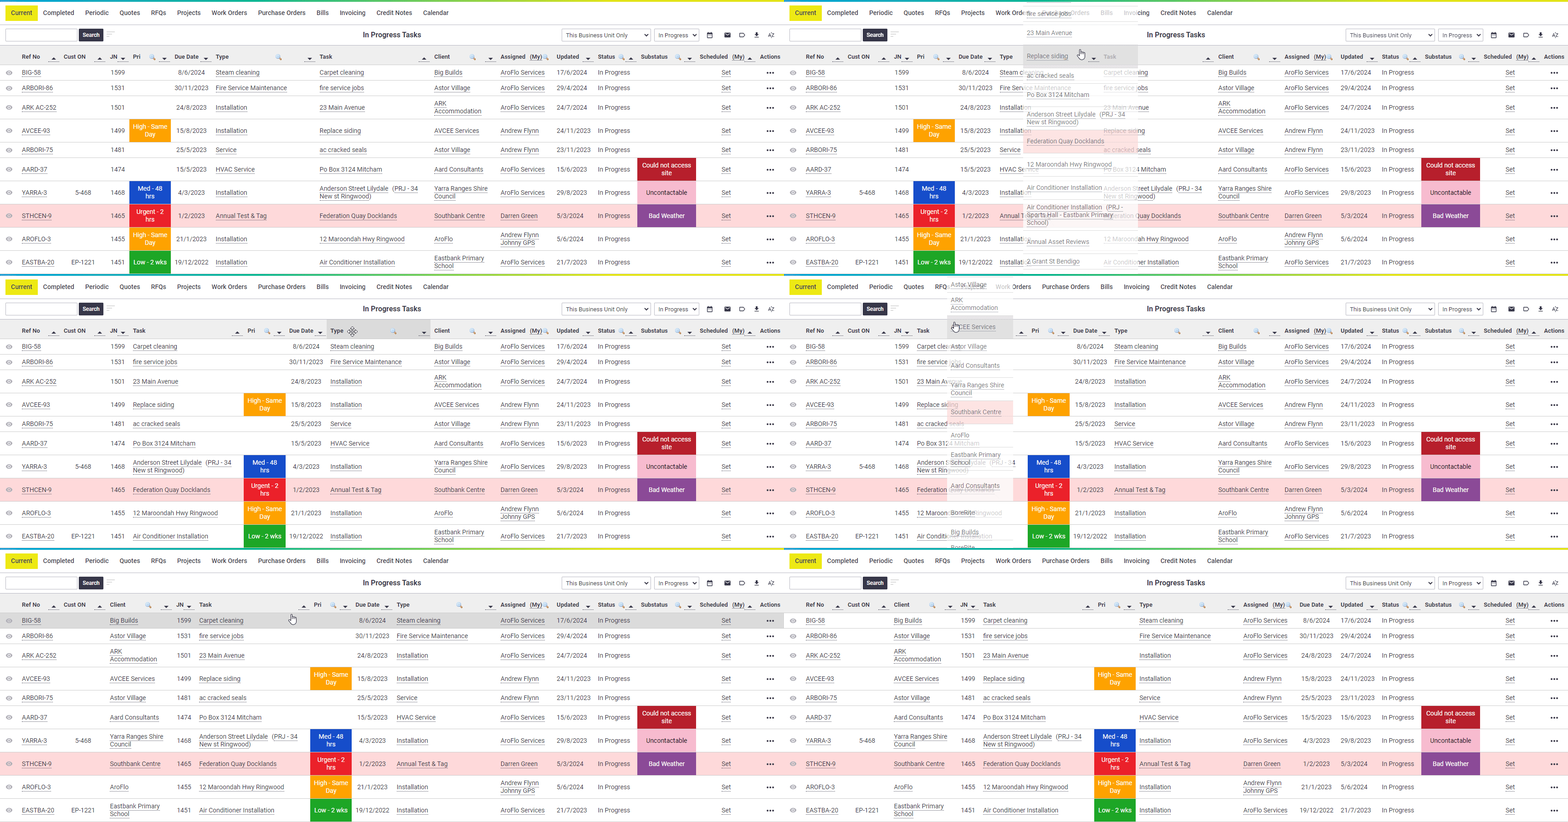
Did you know you can rearrange the columns on your task lists in AroFlo Office? Simply click and drag them to where you want them.
To go back to the default order, click the  icon.
icon.

July Insight - Request customer reviews via Checklist event messages ✅
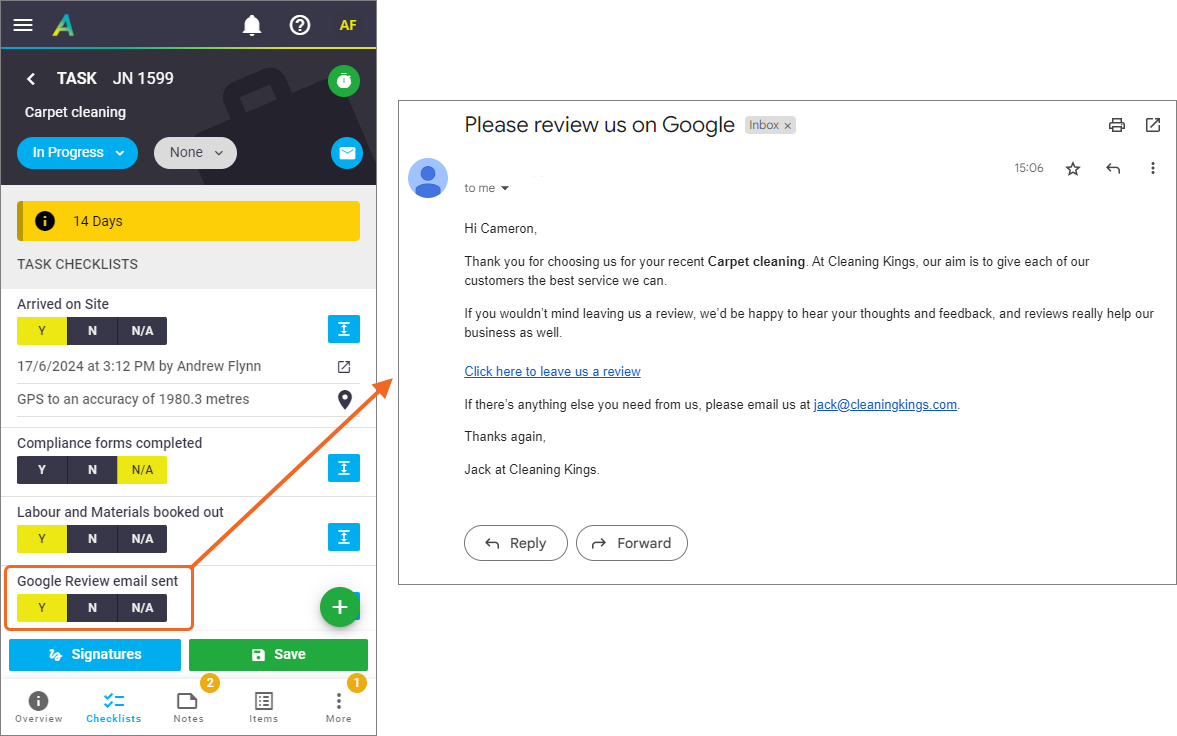
Did you know that you can trigger emails or SMSes via checklist items? More specifically, you can control when you want to send an email/SMS to your client asking them to review you.
In order to achieve this, set up a checklist item on your relevant checklist template(s) and set up a Checklist event message. You may need to create an email/SMS template as well. Whenever you want this email or SMS to send, simply trigger it using the relevant checklist item.

More on Checklist Templates More on Event Messages More on Email Templates
May Insight - Reorder checklist items ⬆️⬇️
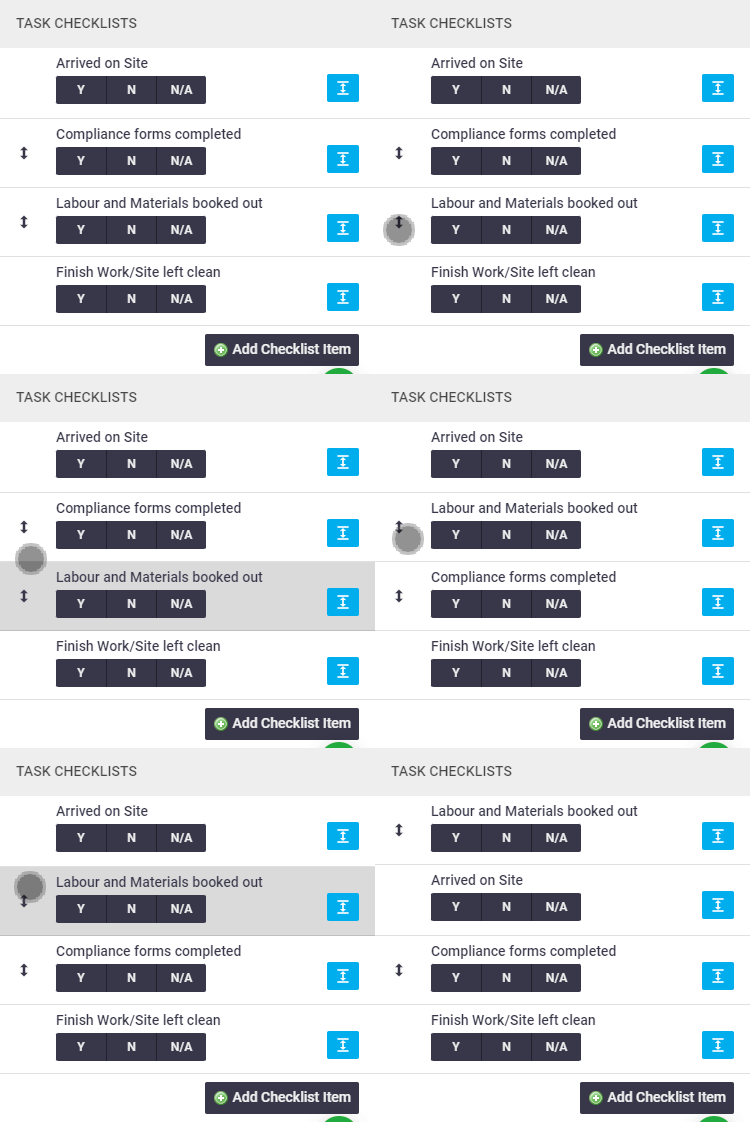
Did you know you can reorder checklist items?
Simply tick the Sortable option on each applicable checklist item when setting up or editing your checklist template.

To reorder items, click and drag the double-ended arrow  (if using Office) or hold and drag (if using Field).
