Periodic Settings
The settings that control the behaviour of periodic templates, such as if tasks get generated on weekends or not, are found in Site Admin - Periodic Settings.
Periodic task templates are used to automatically generate tasks for scheduled maintenance or other recurring services.
To create a periodic task template, click Workflow > Periodic > Create. The New Periodic window opens.
Alternatives
You can also create a periodic task template via a periodic list page (Workflow > Periodic > Open/Expired > Create Periodic).
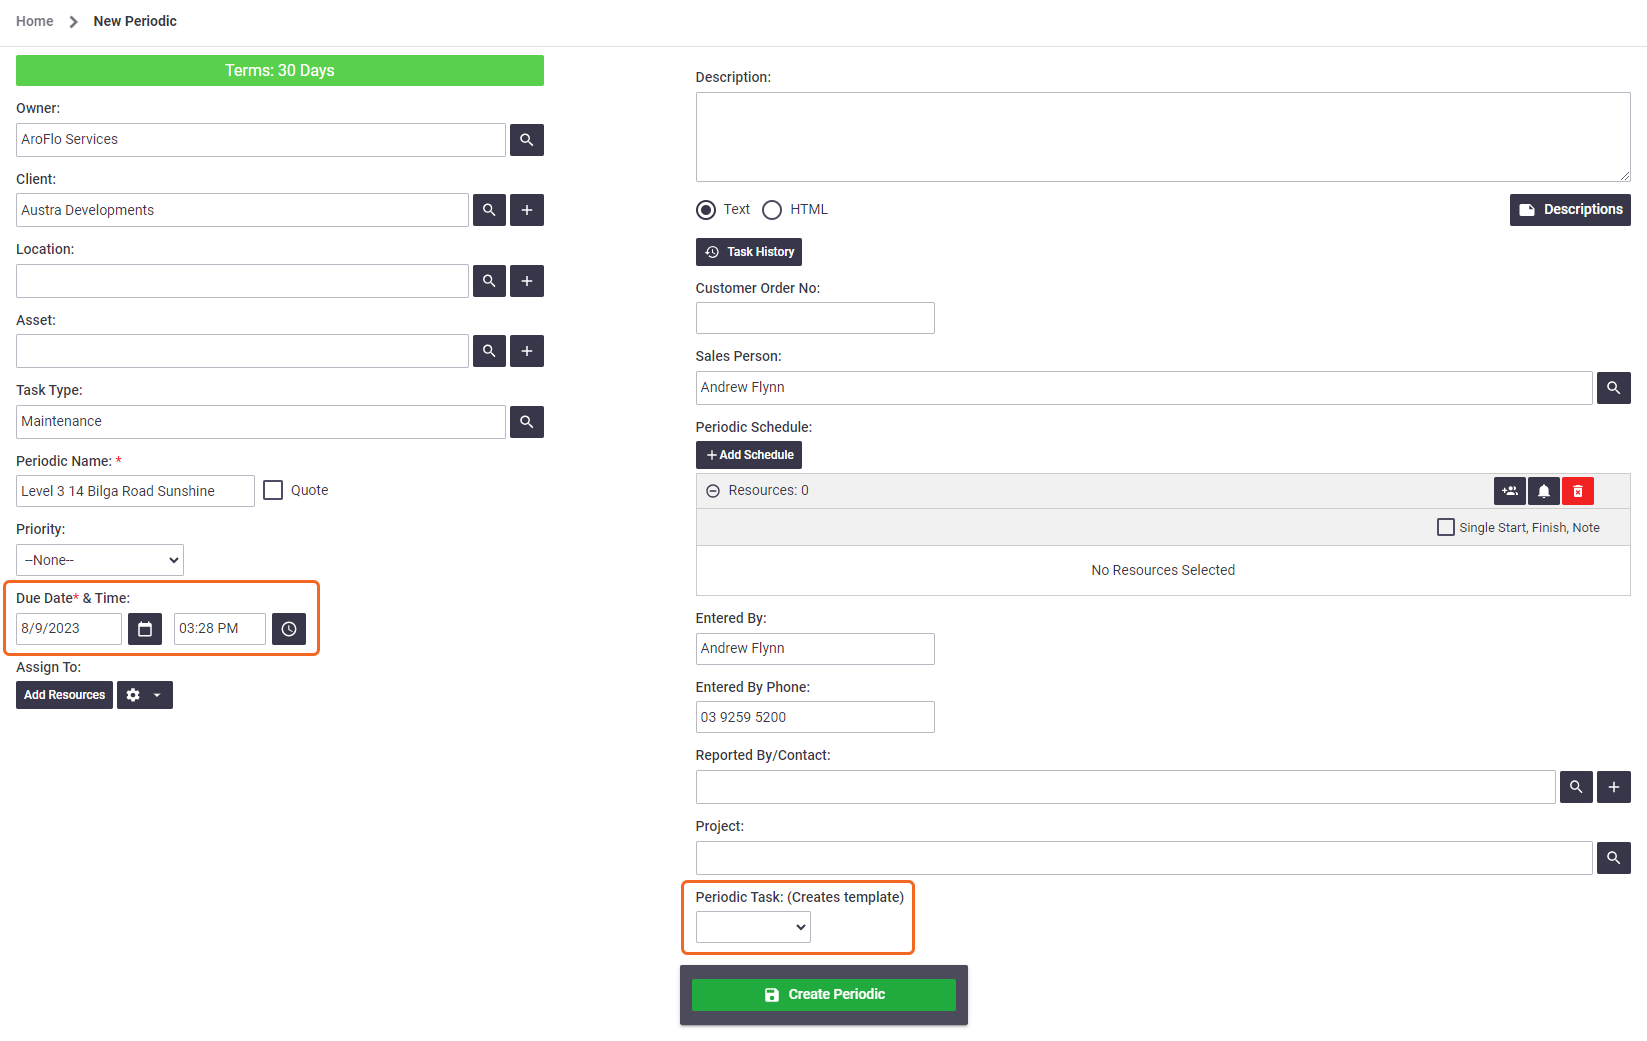
Complete the fields as if you were creating a task, but in the:
- Due Date & Time fields, enter the date on which AroFlo should generate the task for the first time
-
Periodic Task field, select the frequency at which the task should be generated, e.g. weekly, quarterly, yearly.
Custom frequencies
If necessary, you can add your own custom frequencies in Site Admin. See Frequencies.
Click Create Periodic. The Periodic Task Template opens.

You can also create a periodic task template from a Task or Quote worksheet via the Create button > Periodic Template. This method will auto-populate the Client, Location, Task Type, Priority, Description and Reported By/Contact fields on the template using the information within the task/quote. Set the Due Date to when the task is next due, then select a frequency option for how often the task should generate.
Periodic Detail
Once you have created the periodic task template, fill out the relevant information in the Details section on the left side of the screen.
Explanation of fields
| Field/Button | Description |
|---|---|
| Review Date* | Used to record the review date of a contract (if applicable). |
| Start Date* | Used to record the start date of a contract (if applicable). |
| Expiry Date | Used to record the expiry date of a contract (if applicable).
Periodic task templates with an expiry date will trigger an alert on your home screen's message board two weeks before expiry. To remove the alert from the message board, either extend or delete the expiry date on the periodic task template. The alert will disappear overnight. |
| Custom Fields |
If you're using custom fields, they will appear with the 'Update field from task' checkbox. When ticked, the next generated task will be pre-filled with the value found on the most recent task. |
| View Checklist | Click this button to view, create or edit checklists for a periodic task. Checklists added to the periodic task template are specific to the periodic task only. |
| Generated Task Status | Used to pre-set the task status for all tasks generated from this template. The default statuses are Not Started, In Progress, and Pending. |
| Generated Task Substatus | Works in conjunction with the Generated Task Status and is used to pre-set the task substatus for all tasks generated from this template. |
| Template Status | Used to activate or archive (deactivate) the periodic task template. See Archive a periodic template below for more information. |
| Delete | Delete a periodic template that has never generated a task. See Delete a periodic template below for more information. |
| * These dates are for review purposes only and do not affect the generation of tasks from periodic templates. | |
Periodic Task Owner
|
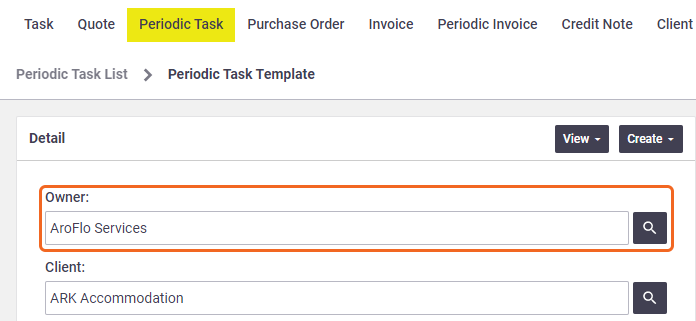
For businesses with multiple business units, users in the Management and Supervisor pre-built permission groups (and others with permission) can change the Owner (i.e. business unit) when they create a periodic template. Managers can also edit the Owner field on existing periodic templates. Custom permission groupsFor custom permission groups, Site Administrators can enable users to both create periodic templates and edit the Owner field via:
The Owner can only be changed if all the data that made up the template (i.e. task type, client, assigned users, assets, materials, compliance forms and priorities, both in the main template and in the Extras section) is also available in the business unit you want to switch to. After a new Owner is selected, all fields that depend on the business unit will show data for the selected destination business unit. |
 |
 |
Extras
Once you've filled out the Periodic details, fill out the tabs on the right side of the screen.
Frequency Details
Use this tab to set the frequency at which you want the periodic task to generate. When the task generates, the frequency will be appended automatically to the task name.
Show this

Standard Frequency
Explanation of fields
Option |
Description |
|---|---|
| Frequency, Baseline Date | These fields together determine when each instance of a periodic task will be generated.
About the Baseline Date The Baseline Date drives the generation of all instances of the periodic task and allows for necessary variations (e.g. weekends, short months). Once you've set the Baseline Date, avoid changing it. If you need to change the date of a particular instance of a periodic task, go into the Details section of the periodic task template and alter the Due Date. |
| Set Day of the Month | Set Day of the Month allows you to select which day of the month the periodic task should occur on, e.g. first Monday in the quarter. This field only appears for month- or year-based frequencies. |
| Generated By |
This determines whether the periodic task is generated automatically or manually.
|
| Next Due Date Calculated Using | This field allows you to tell AroFlo to amend the next due date based on certain conditions.
|
Dynamic Frequencies
Dynamic frequencies allow you to add a date range. If the next due date of the periodic task falls within that date range, the frequency will change to the one selected in the date range.

Variable Service Templates
See Set up Variable Service Templates.
Rest of tabs
Schedule
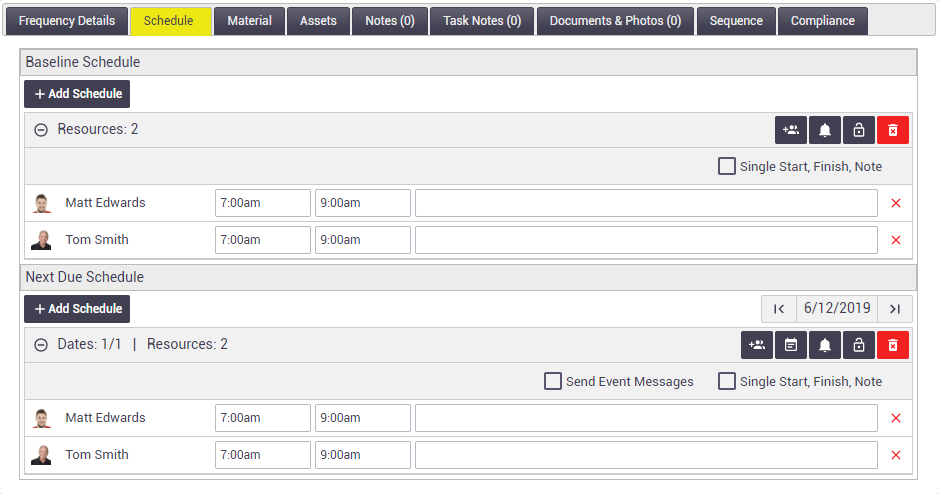
Use the Schedule tab to set a schedule for the upcoming periodic tasks to be shown in the scheduled resources calendar.
- Baseline Schedule - Sets the default schedule for this periodic task template.
- Next Due Schedule - Displays the schedule for when the periodic task is next due to generate. You can modify this without affecting future schedules. Change this when you need to reschedule a periodic for the next instance only, and not for all future schedules.
- In the Baseline Schedule, click Add Schedule.
- Select the resources and times and enter schedule notes as required.
- Save.
To see upcoming scheduled tasks in your calendar, you must enable Show Periodic Tasks in your calendar settings. For more information, see Calendar Settings. You can then account for upcoming periodic tasks as you schedule your work.
Material
|
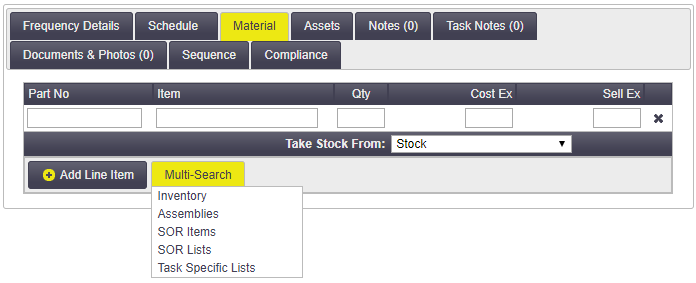
Use the Material tab to automatically add materials to the periodic task when it is next generated. For example, if your periodic task is for a standard servicing procedure that always requires a replacement filter, you can add the filter to the Material tab. This saves Field users from having to manually add materials to the task each time. To add material to a periodic task template, click Material > Add Line Item. Hover over Multi-Search for access to your inventory list, assemblies and so on. |
 |
 |
Assets
|
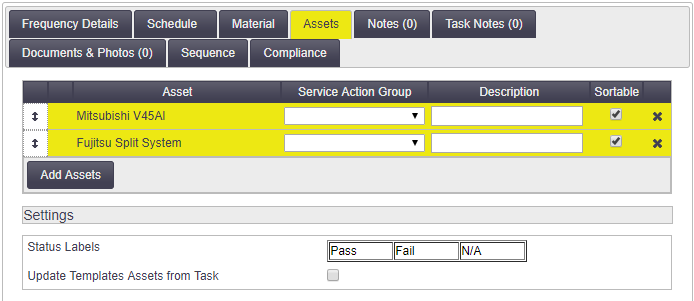
Use the Assets tab to select the assets specified within a service contract. When you create a periodic task template, you can only add one asset (a primary asset) onto the template at that time. After creation, you can use the Assets tab to add all of the assets that are required for this periodic task.
Settings
Click Save Periodic to save your changes. |
 |
||||||
 |
Notes
The Notes tab is used for recording notes about the periodic template for internal reference purposes.
Task Notes
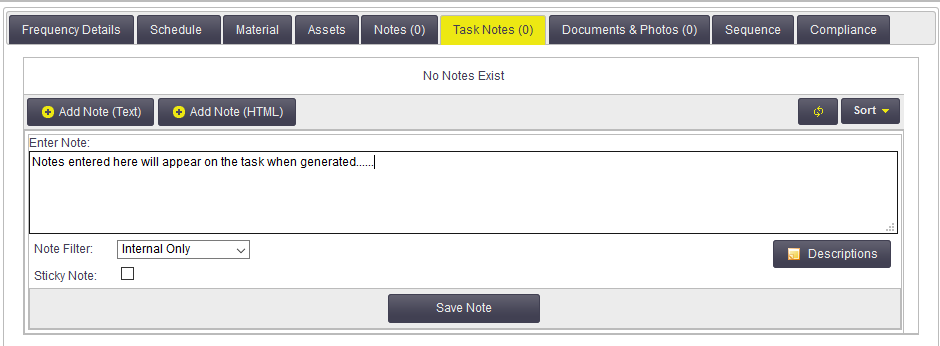
The Task Notes tab is used for recording any job-related notes that you want to appear on generated tasks.
Documents & Photos
Documents and photos can also be added to periodic task templates so that they are automatically added to tasks when generated. Either upload from a device or link to documents in the Document Directory.
Sequence
You can use the Sequence tab to keep track of the number of periodic tasks that have been generated when there is a set limit required. For example, you may have a contract that defines 10 periodic services. In this case, you would set the:
- Sequence No to 1
- Sequence Target to 10.
This will append a sequence number to the Task ID each time the periodic task is generated.
Here's an example using the Task ID '12 Maroondah Hwy':
Periodic task instance |
Task ID |
|---|---|
| First | 12 Maroondah Hwy 1 |
| Fifth | 12 Maroondah Hwy 5 |
| Tenth | 12 Maroondah Hwy 10 |
- Neither the Sequence No. nor Sequence Target can be set to 0, so it's a good idea to start at 1.
- Periodic tasks will still be generated after the Sequence Target number has been reached. This field is for informational and tracking purposes only. To stop the periodic tasks being generated, archive the periodic task template.
Compliance
You can add compliance forms to the Compliance tab on the periodic task template to allow your Field users to quickly and easily access the correct forms for the type of service they are performing.
- Click Compliance tab.
- Click Add Compliance Form.
- Double-click the compliance forms you require.
- Close the Search Compliance Form window.
- Save.
Add compliance forms to periodic assets
Compliance forms can also be linked to each asset listed on the periodic task template. This allows your Field users to quickly and easily access the correct form for each asset they are servicing.
- On the periodic task template, click the Assets tab.

- If you haven't already, add your assets
- Beside each asset you want to add forms to, click Forms.
- Click View Forms.
- Click Add Asset Compliance Form.
Asset compliance forms
This list will only display the compliance forms that are linked to the asset on the asset card. If there are no compliance forms in this list, you can click the asset name to access the asset card and add the required compliance forms. For more information, see Create an Asset.
- Double-click the compliance forms you require.
- Close the Select Compliance Form window.
- Save.
How do Field users find periodic asset forms?
|
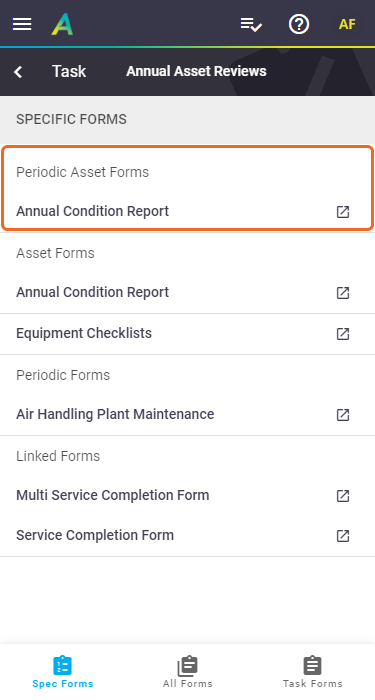
When the task is generated for the periodic service, Field users will be able to access these compliance forms via More > Assets > options button on the asset > Forms > View Forms > Spec Forms > Periodic Asset Forms. Breakdown of available forms in this image
|
 |
||||||||||
 |
Archive a periodic template
You can archive a periodic template to remove it from your list of active periodic templates.
- Archived periodic templates will no longer generate tasks.
- Tasks previously generated by an archived template will be unaffected.
To archive a periodic template, set the Template Status to Archived and click Save.
|
To reactivate an archived periodic template:
|
 |
 |
Delete a periodic template
You can only delete a periodic template that has no tasks linked to it, i.e. the template has never generated a task, or you have deleted any tasks that it did generate. To delete the template, simply open it and click Delete Periodic > OK.