To edit an asset, you need to open the asset card:
- Navigate to Manage > Assets
- Find the asset you need, using your asset categories and/or Client and Location filters
- Click the relevant asset name to open the asset card.
Alternatively, once you've created an asset and saved for the first time, you'll have more options available to edit the asset.
From the asset card, you can edit the Asset Information and Asset Details. See Create an Asset in AroFlo Office for an explanation of these fields.
The below fields only appear once you are editing the asset (i.e. once you've saved for the first time).
Make any changes as necessary and Save Asset.

Asset Information
| Field | Description |
|---|---|
| Status |
Used to identify the asset as 'Active' or 'Archived'. To archive an asset, select 'Archived' and click Save. Note: any existing GPS device connections will be deactivated. |
Asset Details
| Field | Description |
|---|---|
| ODO Reading | Displays the current odometer reading of the asset. This figure is updated by assigning the asset to a task and registering the ODO reading at a particular time. |
| ODO Type | The unit of measure for the odometer reading. The options are Kilometres, Hours, Miles, Cycles, or Count. |
You can also edit any Custom Fields that apply to this asset.
Asset Tabs

Notes
Used to record notes about the asset in either plain text or HTML. Date and time stamps are automatically stored against the note. This information can be viewed in both AroFlo Office and Field. See Notes for more information.
Notes added to the asset when used on a task will also appear here with a reference and link to the task it was added from.
Documents & Photos
Used for storing documents and images associated with the asset, such as warranty information, user manuals, photos of the asset or even a video on how to perform particular actions with the asset. See Documents and Photos for more information.
Client History
Displays asset movement history including client, location, date and time moved, and the user who changed the asset details.
Compliance
Used to link electronic compliance forms that are associated with this asset so that they can be easily added to tasks containing this asset.
To add a compliance form:
- Click the Compliance tab.
- Click Add Compliance Form.
- Select a compliance form from the list.
- Close the Select Compliance Form window.
- Save Asset.
Where can I access these forms?
Once an asset is added to a task, in Field, from the assets list, tap the options button > Forms > Spec Forms tab > linked Compliance forms will be listed under ‘Asset Forms’.
Task History
Displays the tasks and quotes that the asset has been added to, including job number, client, location, status of the task/quote and the last checked status, along with the date and who it was checked by. See Adding Assets to Tasks in AroFlo Office - Asset Checklist for more information about Last Checked.
Click the JN or task name to open the related task/quote, or alternatively, click the blank space in a row or the  (eye icon) to use the Task or Quote Preview.
You can click the Last Check status of an asset on a task to easily open up this tab.

Resource Zones
Select the geographical area(s) that relate to the asset. Resource zones must be set up in site administration.
Asset Types
Used for linking asset types to this asset. Asset types let you specify which custom fields should appear on which asset cards and which task asset fields should display on assets in the asset list of a task.
Sub-Assets
This tab is only visible when you tick the 'Allow Sub Assets' option on the asset card. It is used for creating sub-assets that are part of a primary asset.
To add a sub-asset:
From the asset card -
- Select the Allow Sub Assets checkbox.
- Save Asset.
- In the Sub Assets tab, click Add Sub Asset (lower left of screen).
- Choose to either select an existing asset from the list, or click Add Asset to create a new asset.
- Save your changes.
Users
Keep track of company assets provided to staff by assigning an asset to a user's profile.
Assign a user to an asset
- Click Add User.
- Select the checkbox next to the user's name.
- Click X to close the window.
- Click Save.
If AroFlo Field tracking has been enabled for this asset, the user will automatically be assigned to this asset.
Unassign a user from an asset
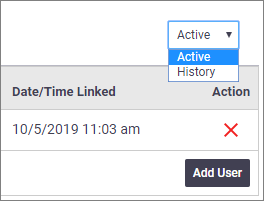
- Click the red x next to the user you want to unassign.
- Save your changes.
|
To check the history of who was assigned, select History from the dropdown. The view will change to 'Historical Users'. Sorting
|
 |
 |
Inventory
Link inventory items to an asset. If you generate a quote from an asset task, any inventory items linked to the asset will auto-populate as line items on your quote. See Adding Assets to Tasks - Generate Quotes for Assets.
Permission Groups
Users in the Management and Supervisor Permission Group will be able to link inventory items to assets.
Custom permission groups
For custom permission groups, Site Administrators can enable the Inventory tab by going into Permission Groups > [Select permission group] > Assets > Fields > Inventory > tick at least View and Add. Tick Remove if you want users to be able to remove inventory items from assets.