Many HVAC companies are contracted to perform monthly, quarterly and annual servicing of a range of equipment.

Example:
Suppose you have a maintenance contract containing a variable maintenance schedule.
Variable maintenance schedule
| Location | Equipment | 1 Mth | 3 Mth | Annual |
|---|---|---|---|---|
| A/C.No.1 Serves Zone 7 & 8 | 1 x Daikin Rooftop Packaged Unit (Mod. UAYQ60CY1A) | X | X | X |
| A/C.No.2 Serves Zones 1,2,3 | 1 x Daikin Rooftop Packaged Unit (Mod. UAYQ120CY1A) | X | X | X |
| A/C.No.3 Serves Zones 4,5,6 | 1 x Daikin Rooftop Packaged Unit (Mod. UAYQ120CY1A) | X | X | X |
| A/C.No.4 | 1 x Daikin Split Ducted Unit (Mod. FTXZ25NV1B) | X | X | X |
| A/C.No.5 Serves Computer Store / Powered Equip.Supply Store |
1 x Fujitsu Split System (Mod. AOT24AAJK) Cooling Only | X | X | |
| A/C.No.6 | 1 x Apac Ducted Split (Mod. S21) | X | X | X |
| A/C.No.7 | 1 x Apac Ducted Split (Mod. S14) | X | X | X |
| 1 x Raypak Boiler (Mod. 538 BMM ) (Inc.1 x Make-up Tank) & 1 x Grunfos Primary Circ.Pump |
X | X | ||
| 1 x Grunfos Secondary H.H/W.Circ.Pump | X | X | ||
| 1 x Rheem (Gas) 260L D.H/W.Unit | X | X | ||
| 1 x Grunfos D.H/W.Circ.Pump | X | X | ||
| Chemical Dosing Heating Water Closed Circuit | X |
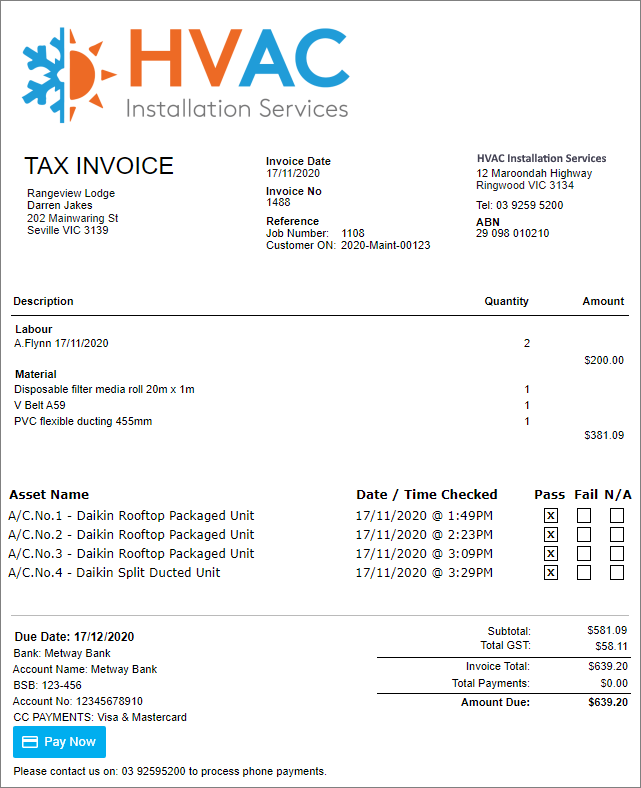
You need to keep records of all the work you do on your clients' equipment, from commissioning, regular servicing and maintenance, to decommissioning and disposal. You also need a reliable way of scheduling the work, so nothing gets missed or forgotten, and easily invoicing at the end of the job.
Sample invoice
With AroFlo, you would manage this by:
- creating an asset for each piece of a client's equipment
- setting up a periodic task template to automatically generate tasks at the required frequency
- linking the asset cards to the periodic task template.
This page will explain how to do this.
Set up a client asset card
|
For each client asset that you service, you can create an asset in AroFlo. The asset card is where you can:
Save time with asset imports If you have a list of client assets, you can import the list and AroFlo will create your asset cards for you. |
 |
Show me how to create an asset
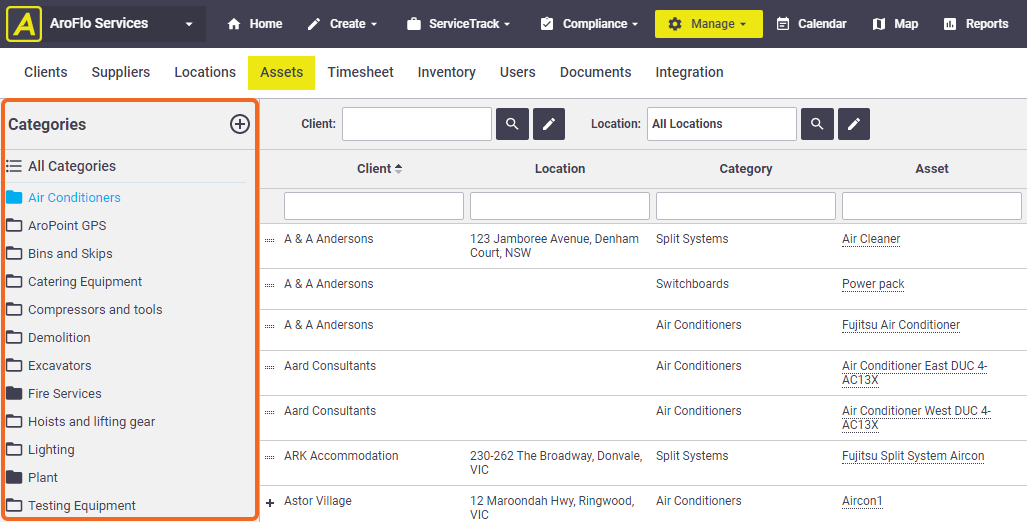
In AroFlo Office, from the main menu, click Manage > Assets. Either select a category from the Categories list on the left, or click the  (plus) icon to add a category.
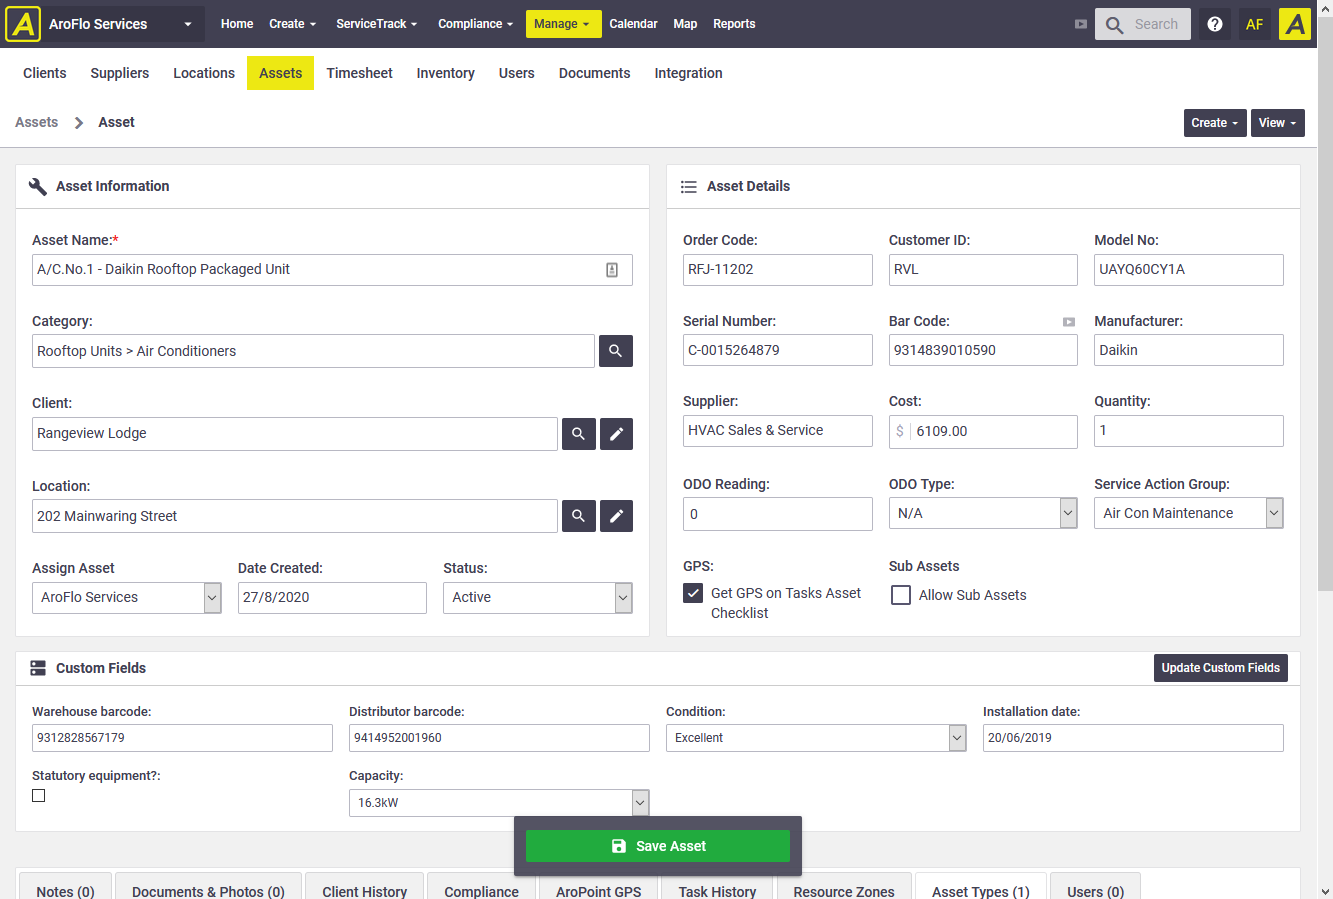
Suppose we're creating an asset for the first asset on the variable maintenance schedule above: the Daikin Rooftop Packaged Unit.
- Within the category or sub-category you want, select a Client by clicking the
.png) (magnifier).
(magnifier). - Click Add Asset. The Category, Client, Location and Date Created fields will already be populated.
- In the Asset Name field, enter: A/C.No.1 - Daikin Rooftop Packaged Unit.
- Complete the fields in the Asset Details area, using the sample details below:
- Order Code: RFJ-11202
- Customer ID: RVL
- Model No: UAYQ60CY1A
- Serial Number: C-0015264879
- Barcode: 9314839010590
Need more barcodes?
If you need additional barcode fields, you can assign an Asset Type to the asset. Asset Types let you add Custom Fields, including barcode fields, to only those assets you choose. - Manufacturer: Daikin
- Supplier: HVAC Sales & Service
- Cost: 6109.00
- Quantity: 1.
- ODO Reading and ODO Type: leave blank
- Service Action Group: If you've set up Service Actions, you can select one here. In this example, we've chosen a Service Action Group called Air Con Maintenance.
- Click Add Asset.
Once you've created your asset, you'll see additional tabs at the bottom of the asset card. You can use these for adding further information, such as notes, documents and photos, compliance forms, and more. See Create an Asset for more information.
Create a periodic task template
|
You can create a periodic task template that will automatically create jobs at the frequency you need. When you set up your periodic task template, you can link to it everything your staff will need for the job: |
 |
Show me how to create a periodic task template
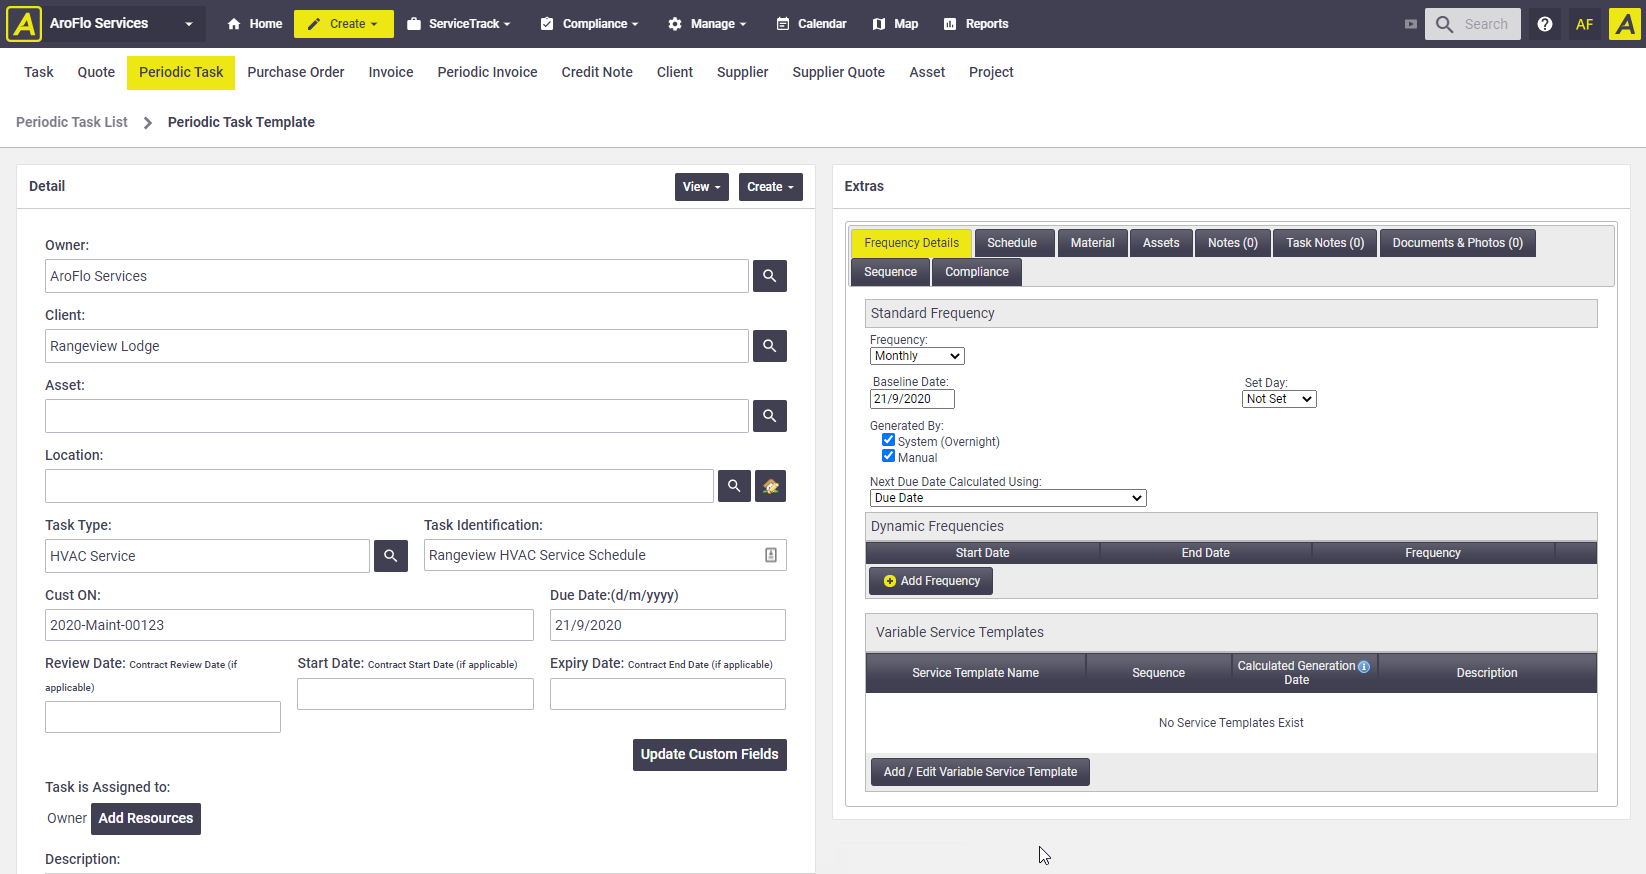
From the main menu, click Workflow > Periodic > Create This will take you into a screen that looks like the Create a Task screen. We're going to complete all the details you'd need to complete if you were creating a job for your client.
- Select a Client or create one by clicking the
.png) (magnifier) icon. In our example (see main image), we've selected Rangeview Lodge.
(magnifier) icon. In our example (see main image), we've selected Rangeview Lodge. - If the job's address is different from the client's address, select a Location. We've left this blank in our example.
- In the Asset field, you can click the
.png) to select the asset you want to link to the job. In our case, we have a range of assets we want to link, so we'll leave this field empty and add the assets later.
to select the asset you want to link to the job. In our case, we have a range of assets we want to link, so we'll leave this field empty and add the assets later. - Select the Task Type you want for the jobs. We've chosen HVAC Service.
Task Types automatically apply groups of settings to each task, such as a service charge, a particular checklist, relevant forms, or the materials needed for the job.
- The Periodic Identification field will contain the client address by default, but you can override this by typing over it. Let's enter: Rangeview HVAC Service Schedule.
- Set a Priority for the jobs, or select None if you don't want a priority on the jobs.
- In the Due Date & Time fields, enter the date on which AroFlo should generate the task for the first time. In our example, we've chosen 21/9/2020.
- Optional: Click Add Resources if you want to assign the task to a particular person or group of people.
Assign vs Schedule
Assigning is not the same as Scheduling in AroFlo:- If you assign a task to someone, they become responsible for seeing that the work is done; they are not necessarily the person who has to do the work.
- If you schedule a task to someone, they're the ones who will do the work.You can update your periodic task template at any time, so if you're not sure you want to assign someone just now, don't worry - you can do it later.
- In the Description field, enter a description of the work to be done, for example: Scheduled servicing of HVAC system as per maintenance contract.
- If the client has provided an order number for the work, enter it into the Customer Order Number field. We've entered: 2020-Maint-00123.
- You can Schedule the task to someone now, or do this later. The resources who appear on a schedule in a periodic task template will be the ones who receive the job each time it's generated. We'll leave this blank for now, and add some resources later.
- In Reported By / Contact, click the
.png) to add the name of your contact person for this client.
to add the name of your contact person for this client. - If the work forms part of a project, click the
.png) to select the project name. We'll leave this blank for our example.
to select the project name. We'll leave this blank for our example. - In the Periodic Task dropdown, select the frequency at which the tasks should be created. You'll see a red banner, advising that you're now creating a template and not a task. Don't be alarmed - it's just AroFlo's way of making sure you know you're not yet creating the task.
But I need multiple frequencies!
Yes, our contract calls for monthly, quarterly and yearly services. We'll add the quarterly and yearly ones in the next section. - Click Create Periodic to save your template.
You'll now see that the screen has been split into a Detail section, containing the info we just entered, and an Extras section, which we'll look at next.
Add Extras
In the Extras section, you'll see a bunch of tabs that give you more options for adding everything your Field staff will need. The Frequency Details tab appears first by default, but for this exercise, we're going to jump across to the Assets tab and set that up first.
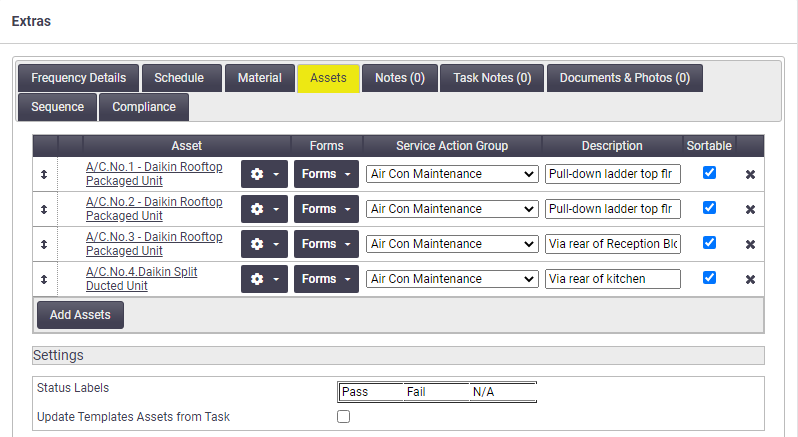
Assets Tab
|
On the Assets tab, click Add Assets to select the assets that need monthly servicing (we'll deal with our quarterly and annual services later). You can also add an asset from here, if it's not already on your asset register. Optional: Use the Description field to indicate how to access each unit. Service Actions In our example, you can see that we've selected a Service Action Group called Air Con Maintenance. This allows us to add asset-specific documents, compliance forms and inventory items (such as special charges) to the task, giving Field staff even more options than the Task Type alone gives them. See Using Service Actions for some examples.
|
 |
Frequency Details
The Frequency Details tab is really the heart of the periodic task template concept. The sections below describe what you can do in this tab.
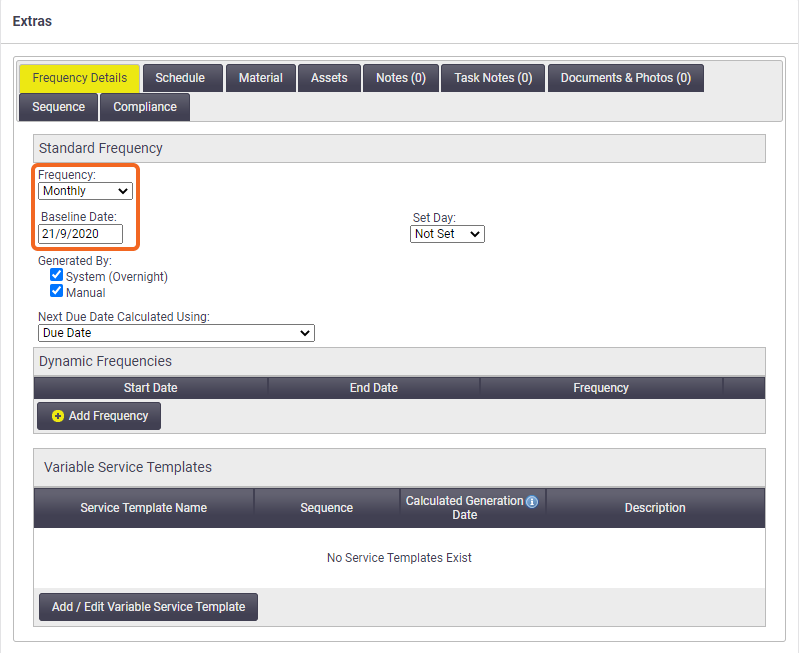
Standard Frequency
|
In this section, you can see the Frequency we chose while creating our template: Monthly. You can change this if you need to by making a different selection from the dropdown. But we'll leave this in place for now, as our maintenance contract calls for monthly servicing. The Baseline Date is the Due Date we entered while creating the template. This is the date on which AroFlo will base all its date calculations in the future. See Create a Periodic Task Template - Frequency Details for more information about the Baseline Date and the other fields within the Standard Frequency section. Dynamic Frequencies See Seasonal Maintenance for information about Dynamic Frequencies and where they can be handy. |
 |
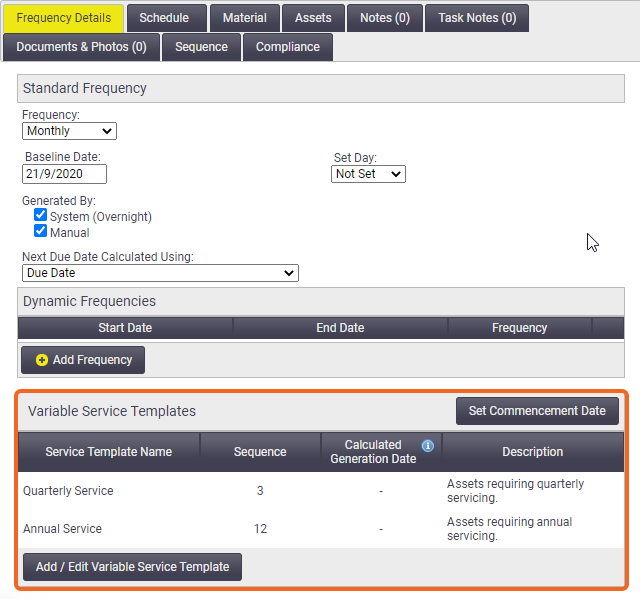
Variable Service Templates
|
You'll recall that our variable maintenance schedule indicated that for our quarterly and annual services, there are additional assets to be serviced. We can add Variable Service Templates to cover these. These are like templates within the periodic task template. As with the default periodic template, you can apply materials, assets, compliance forms, and documents and photos specific to each variable service template, as well as a specific description and checklist. Variable Service Templates override the base periodic template. So for assets that require monthly, quarterly and annual servicing, be sure to set each asset up in your Variable Service Template just as you did for your base periodic template. |
 |
Show me how to set up Variable Service Templates
- In the Variable Service Templates area, click Add / Edit Variable Service Template.
- Click Add Service Template.
- In the Service Template field, enter the name: Quarterly Service.
- In the Use this template every dropdown, select: 3rd (3 monthly).
- In the Description field, enter: Assets requiring quarterly servicing.
- Optional: Enter a Priority. We'll leave this set to None.
- Optional: Click View Checklist to link a specific checklist to the quarterly tasks. You can also select a service action group specific to quarterly services here. Click Save > Variable Service Template to return to the Quarterly Service template we were working on.
- Click the Assets tab.
- Click Add Assets and select all the assets that require quarterly servicing.
You can select a Service Action Group for each asset. This can be a handy way of giving your technicians additional options on the job.
At this stage, you can either click Save > Periodic Task to return to the main periodic task template screen, or click Add Service Template to create another Variable Service Template. Let's create another one, this time for the Annual service.
- Repeat steps 1 - 9, above, but in:
- step 3, call the template Annual Service
- step 4, select 12th (12 monthly)
- step 9, add all the assets that require annual servicing.
- Click the Compliance tab.
- Click Add Compliance Form and select the forms you need.
- Click Save > Periodic Task.
You should now see two entries in the Variable Service Templates area, as we have on our example.
Set Commencement Date lets you choose the date on which the variable service templates will generate tasks. This can be handy for service agreements that are already in place when you set up your periodic task template. See Set a specific commencement date for variable services for more information.
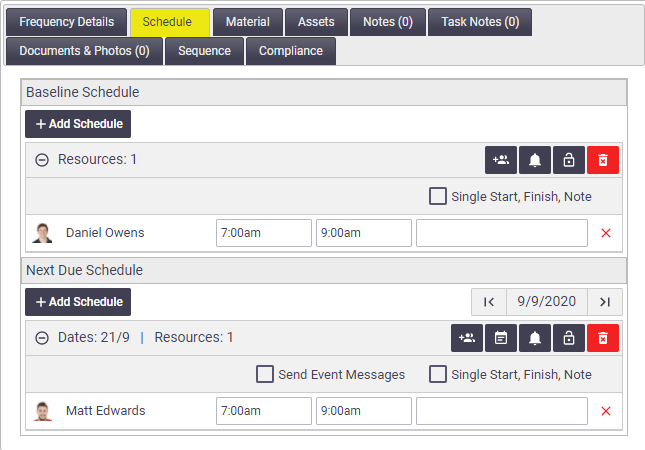
Schedule tab
|
The Schedule tab lets you say which resources, assets or crews should be scheduled to the task each time it's generated. The Schedule window works just like it does in the AroFlo Calendar. In this image, the:
If you prefer to schedule the tasks manually each time they generate, you can leave the Schedule tab blank. |
 |
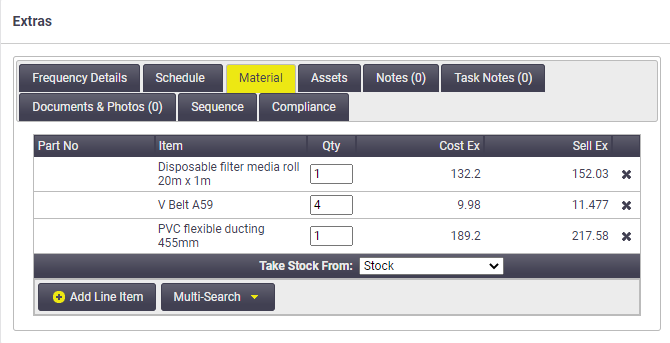
Material Tab
|
The Material tab lets you assign materials to the task, so that staff don't have to go looking through the inventory list each time. If you know you'll always need to use a particular item, add it to the list. Remember that if you're using Variable Service Templates, these will override whatever you have on your base periodic template, so be sure to add the relevant materials to each Variable Service Template you create. |
 |
See Create a Periodic Task Template for information on the remaining tabs.