Manage your user list via Manage > Users.
What you have access to is dependent on your level of access.
| Permission Group | Description |
|---|---|
| Worker | Can only view themselves |
| Supervisor | Can view other users |
| Management | Can view and edit other users |
Office vs Site Administration
- Although Management users can edit most user information in AroFlo Office, certain things such as permission groups, hourly cost rate, feature access settings, hours of work, and resource zones can only be edited via Site Admin. See Edit a User in Site Administration.
- Similarly, creating a user can only be done in Site Administration. See Create a User
- Select Users from the Manage menu to see the list of users.

- Click on the user's first name or surname to view their user card.
- Update any details as needed and click Save.
See below for settings which can be updated.
User card settings
| Setting | Description |
|---|---|
| Given Names, Surname | Enter the user's full name. |
| User Name | Enter a username (min. 4 - max. 36 characters) and click the Check Availability button to ensure it is a unique username. Special characters such as @ # $ % [ ] " ' - are accepted, which allows for email addresses to be used as a username. |
| Multi-factor authentication (MFA) |
Multi-factor authentication offers an additional level of security for your AroFlo site. It requires users to enter their user name, password, and a code obtained from an authenticator app. Only Site Administrators can see this setting. |
| Position |
Select an appropriate position from the list. This list is configured in Site Admin > Settings > Users / Contacts > Positions. |
|
Phone, Fax, Mobile, Email Address, Alternative Email Address |
Enter contact details. Mobile and email address are used for system-generated notifications, including Event Messages. |
|
Address Line 1, Address Line 2, City, State, Postcode |
Enter user's address details. |
| GPS Coordinates |
Click Auto-Generate to capture GPS coordinates of the address. This information assists with making decisions on job-runs, scheduling commitments and resource management. |
User settings
Settings tab
Sync AroFlo calendar with Google
|
Allow AroFlo to post schedules for this user to their Google Calendar. This allows users to receive notifications of scheduled work via their mobile phone's calendar. For information on setting up this link, see Google Calendar Sync. |
 |
 |
Notes tab
Used to record notes about the user in either plain text or richly formatted HTML. Date and time stamps are automatically stored against the note. See Notes for more information.
Assets tab
Allows you to keep track of company assets provided to staff by assigning an asset to a user's profile.
Tracked assets
This includes assets which are being GPS Tracked.
Assign asset
To assign an asset to a user:
- Click Add Asset.
- Select an asset from the list.
Sorting
Click on the column headers to sort, e.g. click Asset to sort alphabetically
Type a search query (minimum 3 characters) into the box below the column header (e.g. Name) to filter by your selection.
- Click X to close the window.
- Click Save.
Unassign asset
To unassign an asset from a user:
- Click the red x next to the asset you want to unassign.
- Save your changes.
Check history
|
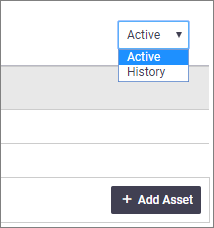
To check the history of previously assigned assets, select History from the dropdown. The view will change to 'Historical Assets'. Sorting
|
 |
 |
Documents and Photos tab
The documents and photos functionality is only available if you have Document Storage enabled for your AroFlo subscription.
To find out more or to activate this feature, please call AroFlo Customer Support or submit a support request.
Documents and photos specific to the user can be uploaded for reference. This could include a photo, bio or certifications. You could add user photos to layouts (such as a final invoice) so your clients can see who did certain work or who is going to show up at their door. An example can be found in Add Images to Layout.

See Upload Documents and Photos for a guide to uploading documents and photos to a user card.
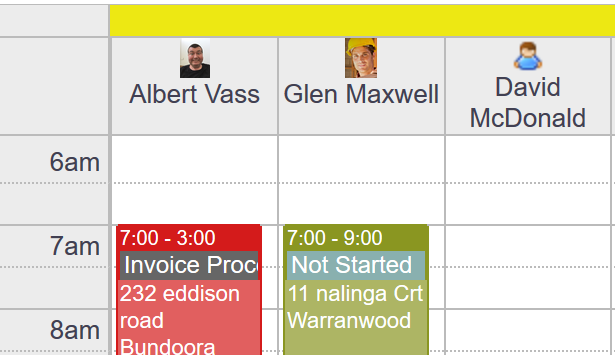
User photos in Calendar
| User photos will display by default on the AroFlo calendar. |  |
 |
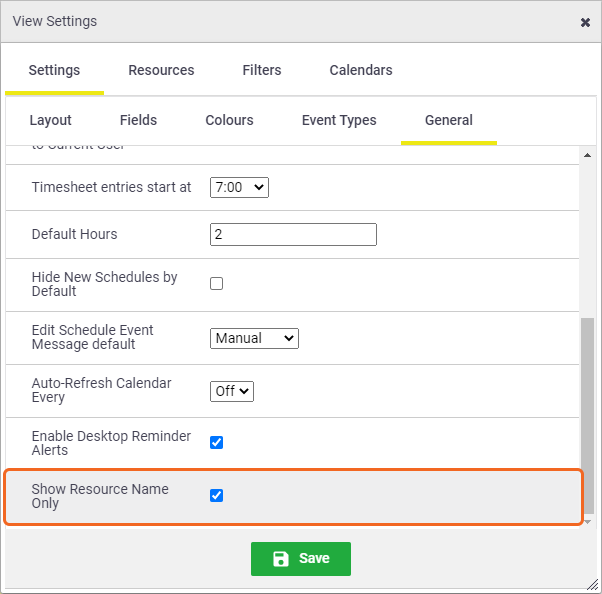
| If you don't want user photos in the calendar, go to the Calendar Settings > General Settings and select Show Resource Name Only. |  |
 |
Calendar Subscription tab
| This allows you to generate a link a user can use to subscribe their AroFlo calendar to an external calendar. Using the checkboxes, you can limit how much information is sent from AroFlo to the external calendar. Refer to Subscribe Calendar to a Third Party Program for more instructions. |  |
 |