Use AroFlo's bulk data import tool to quickly and easily import large sets of data from a .CSV or .XLS file directly into AroFlo.
- Import clients, locations, suppliers, assets, tasks, inventory items, and quote line items.
- Match columns within your file to the relevant fields in AroFlo.
- Save field mappings as a template for regular data imports.
- Update inventory item information.
When bulk importing data into AroFlo, please be aware of our recommended data limits.
Prepare your data
- The first step is to prepare your data for upload. You can:
- place your data into one of our Bulk Data Import templates,
- use your own (e.g. your supplier's price file), or
- export your data from your accounting package.
- Save your file as either a comma-separated values (.CSV) file or an Excel 97-2003 Workbook (.XLS).
Note: .XLSX files will not upload. - Remove any duplicate or obsolete records, and any blank columns or rows within the data.
What do you want to import?
I want to import:
Assets
Check that your data has the following mandatory fields, each in its own column:
- Main Category
- Asset Name
Category
Ensure you have created an Asset category within AroFlo first.
Sub Assets
If wanting to bulk import sub assets, you can either follow these instructions and manage main assets and sub assets manually once imported, or alternatively, you can contact our team and send the file to us.
- Manage > Assets or
- Accounts > Clients > Select a client > View > Assets
Multiple clients vs Single client
If you are importing an asset file with multiple clients, ensure your spreadsheet contains a ‘Client’ column and ensure this column is mapped. If importing assets for a single client, you can use the search filter to select the relevant client you're uploading assets for and you don't need a ‘Client’ column in your spreadsheet.
Multiple business units
When importing assets across multiple business units (e.g. Victoria, NSW, Tasmania), type the name into the Assigned Asset field in the spreadsheet to specify which one the asset belongs to in advance.
Clients
Dedicated instructions
See our dedicated instructions for importing clients and suppliers. Alternatively, you can continue with the steps below.
Check that your data has the following mandatory fields, each in its own column:
- Client Name (this is a Company name)
- Primary Contact First Name
- Primary Contact Last Name
Transaction Terms
Make sure the content of your Transaction Terms column exactly matches how AroFlo describes Transaction Terms. For example, use '30 Days' not '30', 'thirty' or any other format.
You can check on how AroFlo formats this data by going to Create > Client. Check the 'Terms' dropdown menu to see the options available.
Alternatively, you can create your own Transaction Terms in AroFlo before importing your data. Just go to Site Administration > Settings, and search on Transaction Terms.
Is Individual?
The Individual checkbox can have the values '1', 'yes', 'y', 't', 'true', 'on', 'checked', 'filled', or 'individual'.
Navigate to:
Accounts > Clients.
Inventory items
Check that your data has the following mandatory fields, each in its own column:
- Category
- Item Description
Category
If you're uploading an inventory item which you don't have an Inventory category for, AroFlo will create one for you.
Updating existing items
You can also use this feature to update existing inventory items' details, e.g. part numbers, item descriptions, or pricing updates. Click here to find out more.
Simple and Detailed Cost
When importing inventory items, an item will be flagged as Detailed Cost upon import:
If the Unit of Measure (purchase unit of measure) is a number other than 1 (or blank - see below), or
If the Sell Unit Type is a value other than blank, or
If the Purchase Cost has a value other than blank.
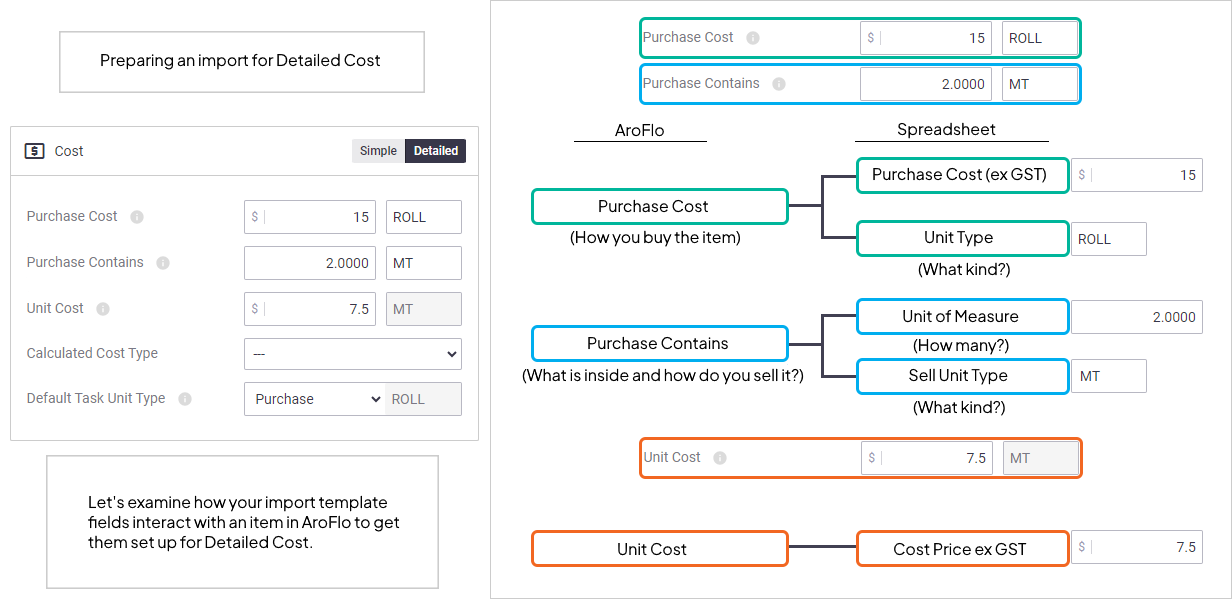
When setting up an import for Detailed Cost you need to make sure your fields are populated with the right information. Purchase Cost and Purchase Contains are split into two different fields each in your import template.
See the graphic below for more information:
The following values are allowed in the fields shown:
Calculated Cost Type
- NONE or NA
- MAXIMUM, MAX, UPPER or HIGHEST
- AVERAGE or AVG
- LATEST, LAST or RECENT
- SET or FIXED
Sell Type
- SELL
- COST + MARK UP
- CALCULATED COST + MARK UP
Note: You can have either 'simple' or 'detailed' pricing in your spreadsheet, but not both.
Unit Type
Note: In most cases, plural forms will also be valid.
- EA or EACH
- MM, MILIMETRE, MILLIMETRE, MILIMETER or MILLIMETER
- CM, CENTIMETRE or CENTIMETER
- M, MT, METRE or METER
- M2, SQUARE METER, SQUARE METRE, SQ METER or SQ METRE
- M3, CUBIC METER, CUBIC METRE, CU METER or CU METRE
- LM, LINEAL METRE, LINEAL METER, LINEAR METRE or LINEAR METER
- BOX or BX
- PKT, PACKET or PACK
- ROLL or RL
- BAG or BG
- PAL, PALLET or PLT
- PR or PAIR
- ML, MILLILITRE, MILLILITER, MILILITRE or MILILITER
- L, LTR, LITRE or LITER
- BBL, BRL, BL, BARREL or BAREL
- GL, GAL, GLN, GALLON or GALON
- GR, GRM or GRAM
- KG, KILOGRAM or KILOGRM
- O, OC, OZ or OUNCE
- LB, PND or POUND
- TN, TON or TONNE
- IN or INCH
- FT, FEET or FOOT
- YD, YRD or YARD
Navigate to:
Manage > Inventory.
Locations
Check that your data has the following mandatory fields, each in its own column:
- Client or Supplier Name (this is a Company name)
- Location / Address 1
Navigate to Accounts > Locations to be able to upload locations for both clients and suppliers
Alternatively, to import locations for a particular client, navigate to Accounts > Clients > Select the client > View > Locations
Or, to import locations for a particular supplier, navigate to Accounts > Suppliers > Select the supplier > View > Locations
Quote line items
There are no mandatory fields for importing quote line items.
Navigate to:
- For simple quotes - Workflow > Quotes > Select a Quote
- For detailed quotes - see Bulk Import: Detailed Quotes.
Suppliers/Contractors
Check that your data has the following mandatory fields, each in its own column:
- Supplier/Contractor Name (this is a Company name)
- Primary Contact First Name
- Primary Contact Last Name
Transaction Terms
Make sure the content of your Transaction Terms column exactly matches how AroFlo describes Transaction Terms. For example, use '30 Days' not '30', 'thirty' or any other format.
You can check on how AroFlo formats this data by going to Create > Supplier/Contractor. Check the 'Terms' dropdown menu to see the options available.
Alternatively, you can create your own Transaction Terms in AroFlo before importing your data. Just go to Site Administration > Settings, and search on Transaction Terms.
Navigate to:
Manage > Suppliers or Contractors
Tasks
Check that your data has the following mandatory fields, each in its own column:
- Client
- Task Identification
- Task Type
Navigate to:
Workflow > Tasks > Open.
Upload your file
Follow the steps below to upload your data file to AroFlo.
1. Click Import
|
Click the Import Assistant For Clients, Suppliers, and Contractors, you'll see |
 |
 |
2. Select a file to upload
| In the Bulk Data Import window, select a file to upload, or drag and drop a file onto the window. As soon as you've made your selection or dropped a file onto the window, the upload begins. |  |
 |
Map the columns
The columns in your data may not exactly match the fields available in AroFlo, so you need to map each column in your data to an AroFlo field name. You can either use an existing mapping template, or start a new template.
Use an existing mapping template
Depending on what you're importing, you may have options to use one of AroFlo's default mapping templates. E.g. for clients, you will see the below options for Xero and QuickBooks; for Quotes, you'll have templates for Groundplan and PolyPlan; for inventory, there will be a few leading supplier mapping templates; also for inventory you will have the default pricing templates from our Import Templates page. If you have saved previous mappings, you will see your own mapping templates listed with the default templates.
To review the mapping between an existing mapping template and the file you've uploaded, click the ![]() (expand) icon. The pre-set mapping displays, and you can change it if you need to by clicking Use Template and following the instructions in Step 1 of the next section.
(expand) icon. The pre-set mapping displays, and you can change it if you need to by clicking Use Template and following the instructions in Step 1 of the next section.

Start a new mapping template
This is the best option if you're unsure about whether or not to use an existing template. Click Start A New Template to get started.

- For each column, click the down arrow and select the AroFlo field name that most closely matches the column found in your spreadsheet. In the example below, we're telling AroFlo that Column 4 contains the 'zip code' and column 5 contains the 'Country'.

Data appearing under the dark grey column headers will be imported.
- To switch a dark grey column header off, click the arrow beside the field and select -- not mapped --. You can do this for any field other than the mandatory fields (marked with an asterisk).
- To switch a light grey column header on, click the arrow beside the field and select the most suitable mapping category.
- If you plan to upload an updated version of the same data file in the future, you can save the current mapping to use again:
- check the Save this mapping as a template box at the bottom of the window
- enter a name for the template.
Delete a custom mapping template
|
You can delete any custom bulk import templates you've created if you no longer need them. AroFlo default templates cannot be deleted. |
 |
 |
Importing Custom Fields
When using the bulk import function, you can also import custom fields for certain areas. All you need to do is ensure your custom fields are included as headings in your Excel spreadsheet and map the fields accordingly.
Click the relevant tab to learn more about uploading custom fields for that area.
Things to note
- This process can only be used for importing new entries and not updating existing ones.
- There is a maximum of 20 custom fields per entry (except for Task custom fields).
- Checkbox type custom fields can only allow yes/no values.
- If you're using custom fields but don't include them in your upload, or don't map the fields, the custom fields will still be added to your entries but with blank values.
Assets
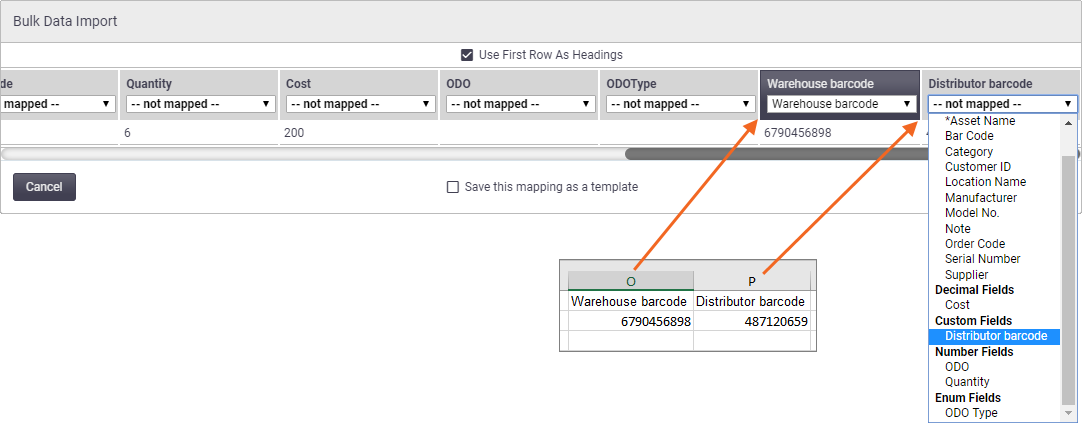
In this example, Warehouse barcode and Distributor barcode have been added as custom fields.
Clients
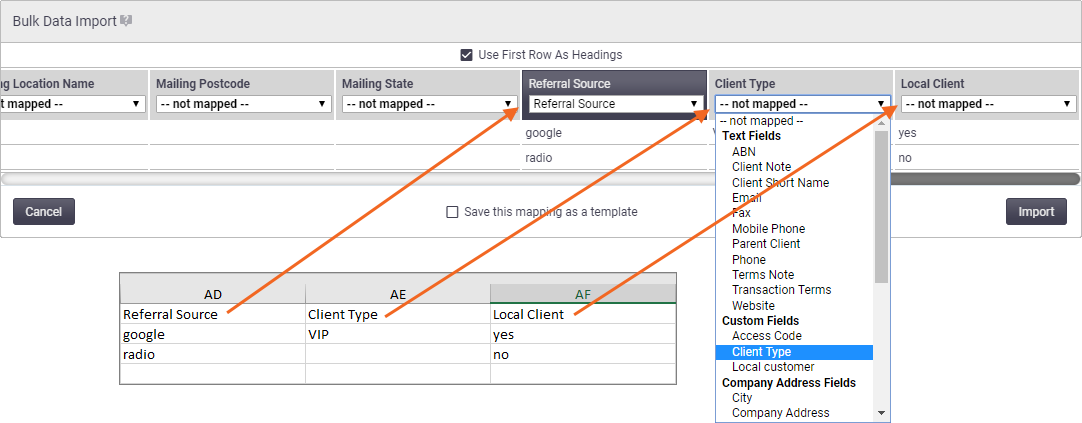
In this example, Referral Source, Client Type, and Local Client have been added as custom fields.
Locations
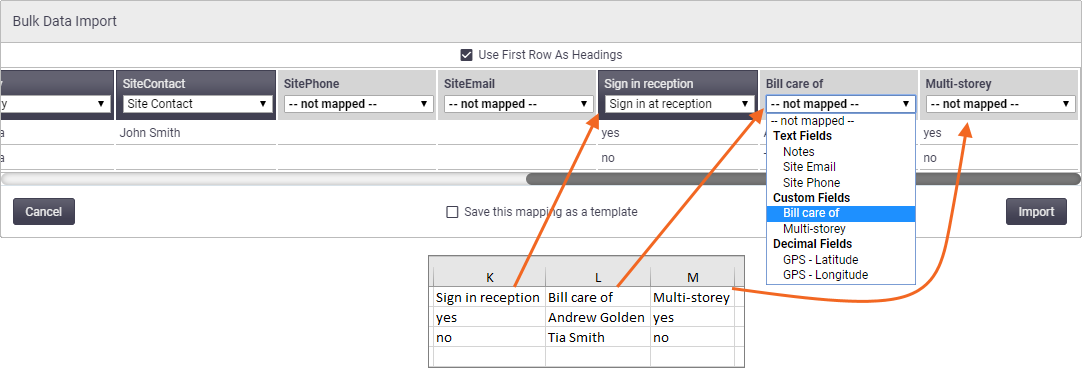
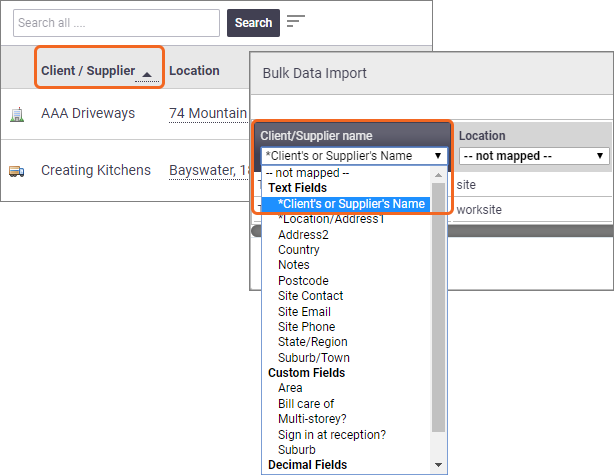
In this example, Sign in at reception, Bill care of, and Multi-storey have been added as custom fields.
Clients and Suppliers
|
When bulk importing locations from Manage > Locations, you can import to both clients and suppliers.
|
 |
 |
Suppliers
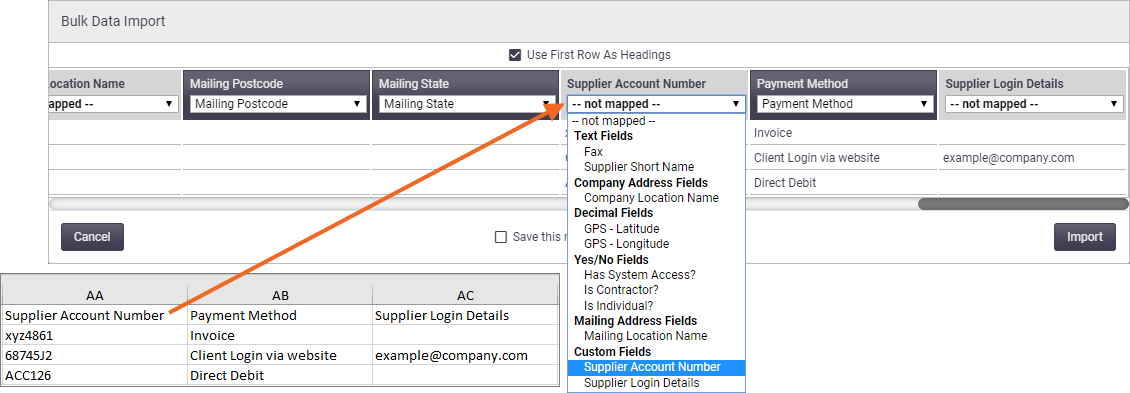
In this example, Supplier Account Number, Payment Method, and Supplier Login Details have been added as custom fields.
Tasks
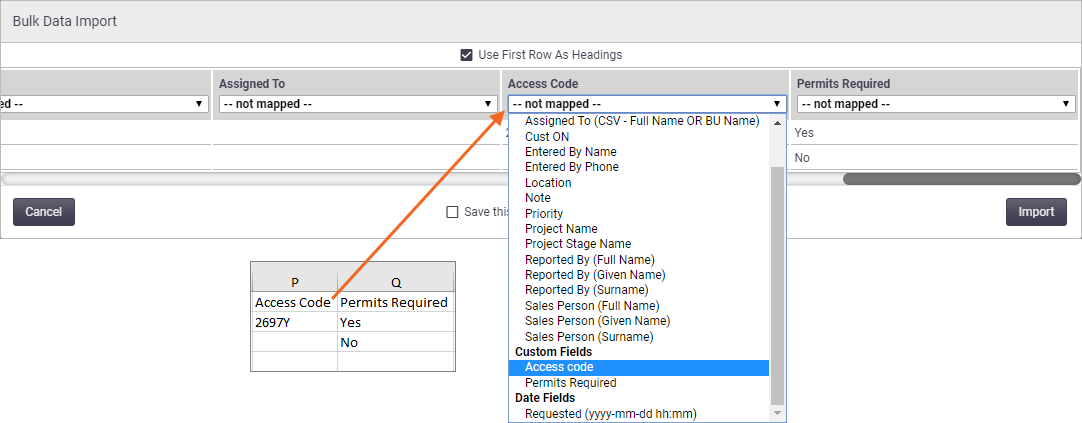
In this example, Access Code and Permits Required have been added as custom fields.
Import your data
Now that you've mapped your data, it's ready to be imported.
- Click Import.
- Click Yes on the prompt, confirming you want to import the file. The import process begins and can take a few moments.
The import process cannot be undone once you've clicked Import. If you need to reverse your changes after a bulk import, please contact our Customer Service team for assistance. A charge for this service may be incurred.
View import results
Once your data has been imported, the results window appears.

| Result | Description |
|---|---|
| Inserted | The number of new items inserted into AroFlo |
| Issues | The number of items marked with an error and not imported. You can download a copy of the entries that contained an error. Refer to Bulk Data Imports Troubleshooting for help with the most common types of issues. |
After closing the results window, you may need to refresh your browser to view the Imported data in AroFlo.
Updating existing information
You can use the bulk data import tool to update existing information within your inventory. See Bulk Import: Update Inventory.