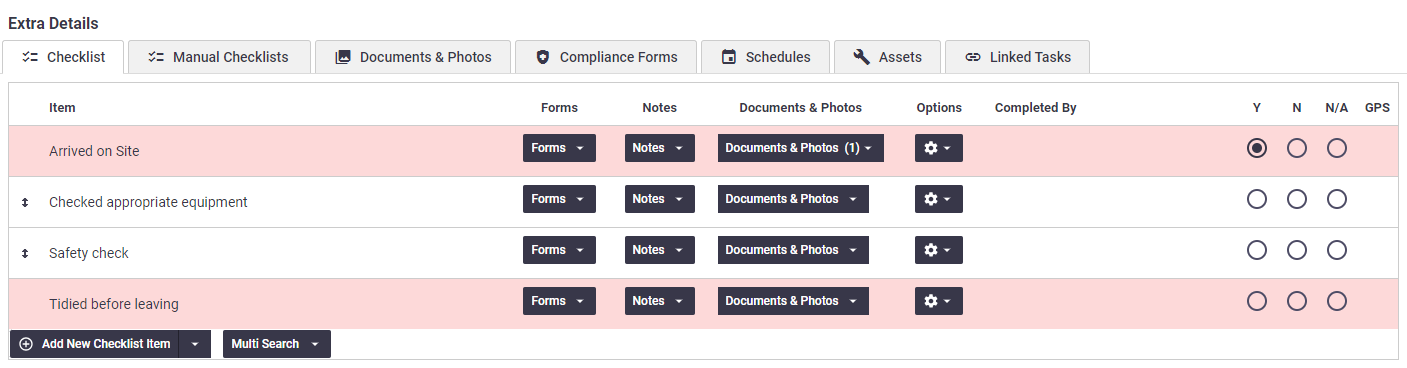
Task checklists are a series of items that require a response (Yes, No, NA), which can be added to tasks. They are visible in Office and in Field.
A task checklist might be used to list a series of steps that field staff should follow to properly complete a task, for example:
- Arrived on Site
- Compliance Forms Completed
- Labour and Materials booked out
- Site left clean and tidy.
Checklists can also be used to:
- Guide a user through a task
- Automatically start and stop the labour timer
- Prompt a user to complete certain forms, such as compliance or maintenance forms
- Record when or where a certain checklist item was completed, for future reference.
Checklists can be added manually to any task or quote after it has been created, or, if it's a series of steps common to your Task Types, checklists can also be inserted automatically as soon as the task or quote is created.
Create a checklist template
Task checklists are generated from checklist templates. Please refer to Checklist Templates for more information.
View task checklists
When viewing a Task in Office, checklist items from Checklists appear in the Checklist tab. Depending on the Task Type, Auto-Add Checklists may appear as soon as the task is created. Otherwise, checklist items can be added manually using the instructions below.
Auto-Add Checklists can be set up by your Site Administrator within Site Admin - Task Types.
Add more checklist items
Once a Task has been created, additional checklist items can be added if required, using the options at the bottom of the checklist. This can be useful if a task requires ad hoc checklist items that are unique to a particular job, or if you need to add existing items from other checklist templates.
Ad hoc checklist items
Click Add New Checklist Item to add a one-off checklist step.
Ad hoc checklist items can also be set up to update Checklist Templates automatically within Site Admin - Checklist Settings.
Copy and paste checklist items
If you have existing checklists saved in a different file format such as Word or Excel, you can easily copy and paste that information into AroFlo to quickly create custom checklists.
- Click the arrow icon on the Add New Checklist Item button.
- Click Add Multiple Checklist Items.
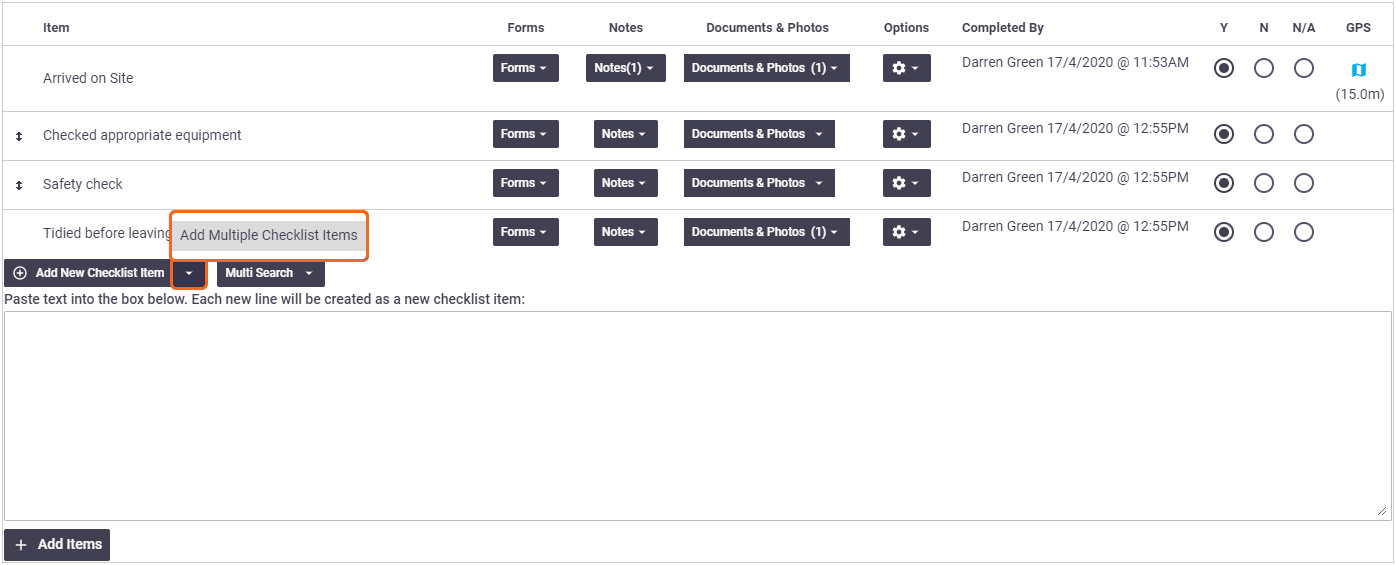
- Copy text from an external source and paste into the white box.
You will need to ensure each checklist item is on a new line. This text box is limited to 800 characters.
- When you're ready, click Add Items.
These items can be edited before saving.
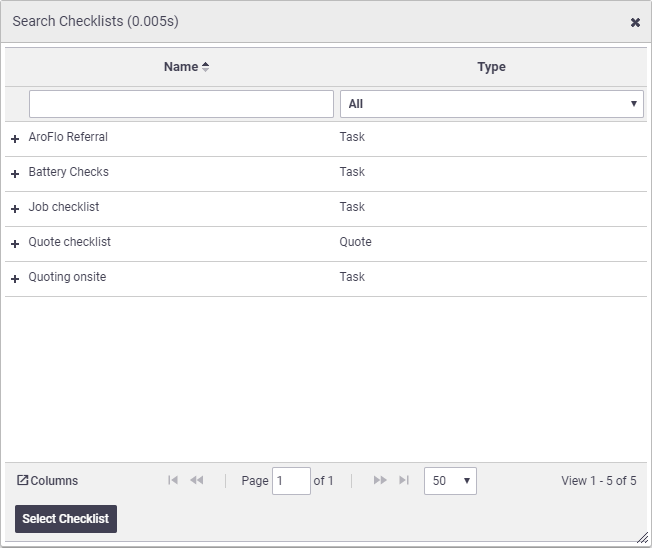
Select existing checklist items
|
Use Multi-Search to select an existing checklist item from another checklist template, or an entire checklist template.
Periodic tasks Periodic tasks will also have the option to select the checklist/items within the Periodic Task Template Checklist. Select Multi-Search > Periodic Checklists and use the instructions as above to either add all items from the checklist or add individual items. |
 |
|
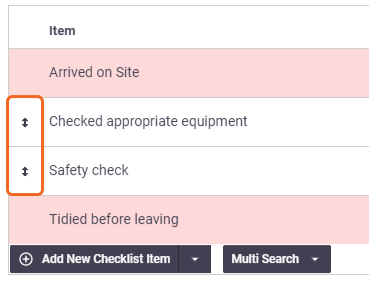
Once you've added your additional checklist items, at this point you can rename them if necessary, and also reorder the newly-added ones using the ![]() (double-ended arrow), prior to Saving the task to save your checklist items.
(double-ended arrow), prior to Saving the task to save your checklist items.
Add manual checklists
You can manually add additional checklists to a task via the Manual Checklists tab.
Manual checklists are useful if:
- You have generic checklists which could be used for multiple Task Types,
- You have checklists that don't need to be added every time you select that Task Type.
- You are working on the task over multiple days or with multiple people. For example, you have completed the first checklist item (i.e. Arrived on Site) on day 1, and need to add the same checklist item again on day 2.

- Click the Add Checklist… header
- Select the checklist you want to add from the dropdown and click + Add
- Save Task.
Can't see the Manual Checklists tab?
The Manual Checklists tab will only display if manual checklists have been set up by a Site Administrator within Site Admin - Task Types and only the relevant checklists set up will display in the list.
- Manual Checklists display as grouped checklist templates. Click the yellow header to collapse the grouping.
- Once you've added a checklist from the list, you can add individual checklist items or entire checklist templates to a checklist grouping. See Add more checklist items, above.
Reorder checklist items
|
Checklist items marked as sortable will have a Ad hoc and copied and pasted items can also be sortable, depending on the Task Type settings. |
 |
|
Complete checklist items
| Checklist Items are completed by selecting a response, which can be either PASS (Y), FAIL (N), or NOT APPLICABLE (N/A). | 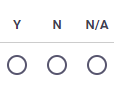 |
|
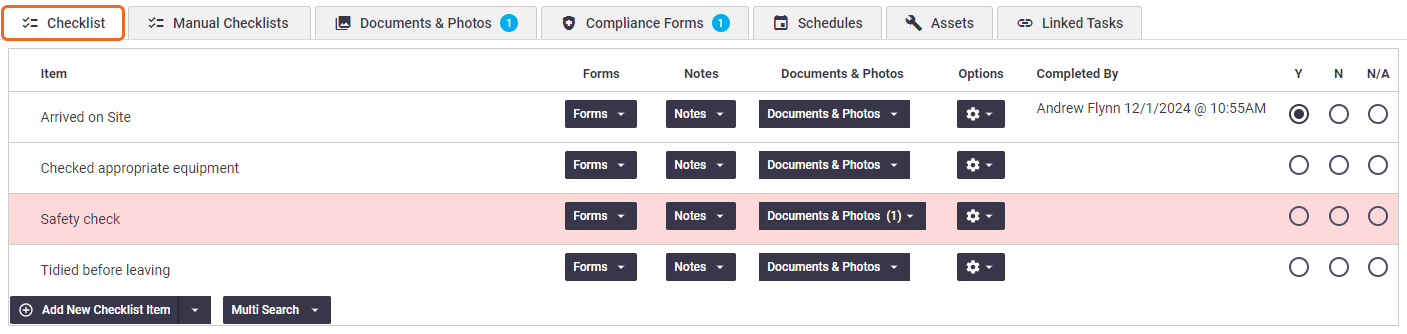
Any checklist item highlighted with a colour band has been marked as mandatory and must be marked with a response before the Task can be completed.
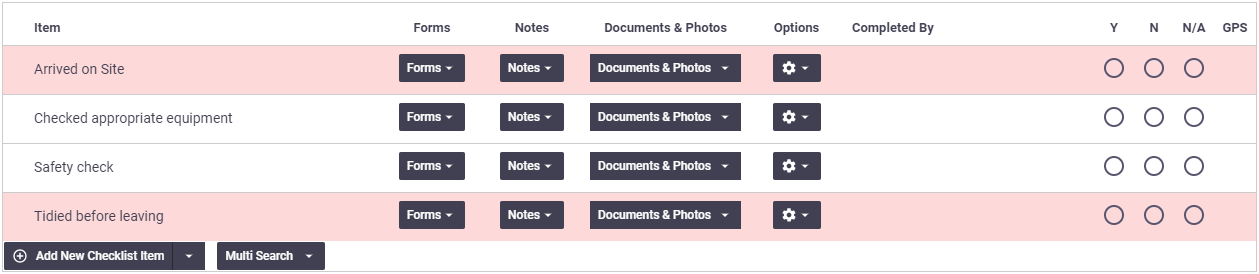
When selecting any response, the following details are also filled in:
Column |
Description |
||
|---|---|---|---|
| Completed By | Name of the user who last changed/completed the Checklist Item, as well as the time and date. | ||
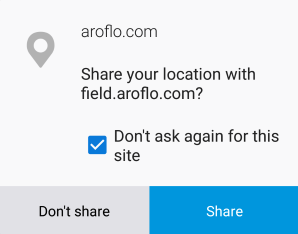
| GPS | If enabled in Checklist item settings, GPS location where the Checklist Item was last changed/completed, captured from AroFlo Field.  Clicking To ensure this function works, make sure the:
Share location
|
|
If a Checklist Item is marked as FAIL (N), you may also have two options shown (if set up in Checklist settings):
|
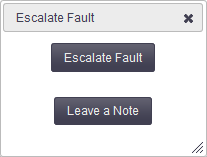 |
|
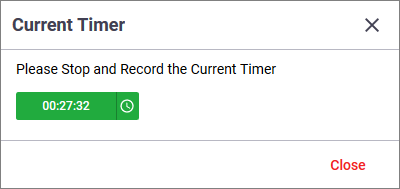
Start / Stop Timer via Checklist
Your Site Administrator can set up your checklist items to automatically start or stop the labour timer when an item is marked Y (Yes/Pass).
Start the timer
|
Once this feature is set up, users can start the labour timer as follows:
|
 |
|
Stop the timer
|
To stop the labour timer via a checklist item:
|
 |
|
Other checklist features
Use the buttons on each checklist item to:
- link a form to a checklist item,
- add and view checklist notes, or
- add and view Documents and Photos.
Forms
| Click Forms > Create Form to link existing forms such as Compliance Forms, OHS Checklists, and Custom Forms to this checklist item, or click Forms > View Form to view forms already linked. | 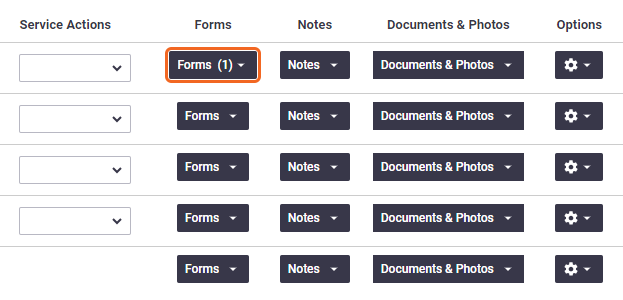 |
|
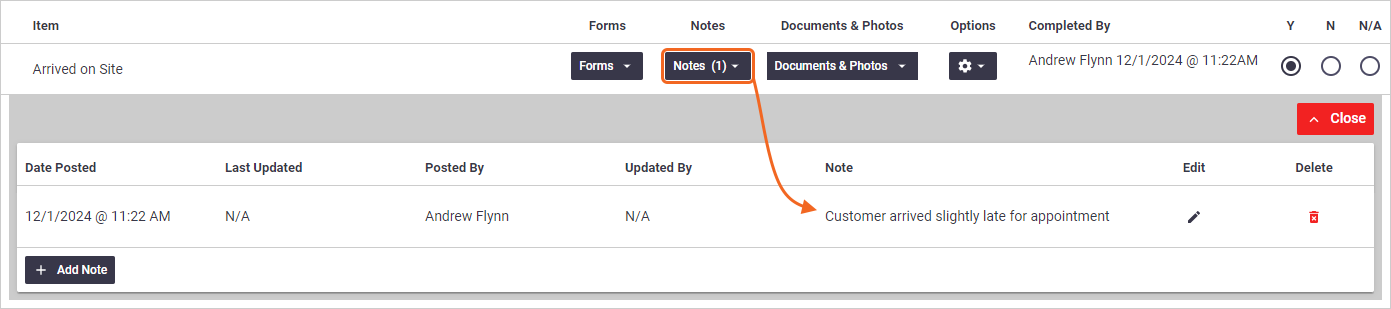
Notes
|
If necessary, you can add notes to a checklist item by clicking Notes > Add Note. This might include details on why an item was marked as a certain condition (such as marking it failed) or general notes about the Checklist item when it was completed. To view existing notes, click Notes > View Notes. This will display relevant information for each note that has been left. Click Add Note if you need to add additional notes. Edit a note by clicking If you need to delete a note, click |
 |
|
 (pencil icon). The Last Updated and Updated By fields will update accordingly.
Permission Groups
Anyone using default permission groups can view and add checklist notes. Supervisors will also be able to edit, and Managers will be able to edit and remove.
Custom permission groups
For custom permission groups, Site Administrators can enable checklist notes by going into Permission Groups > [Select permission group] > Checklists > Fields > Notes > View (set to ticked). This will enable Add and Edit as well.
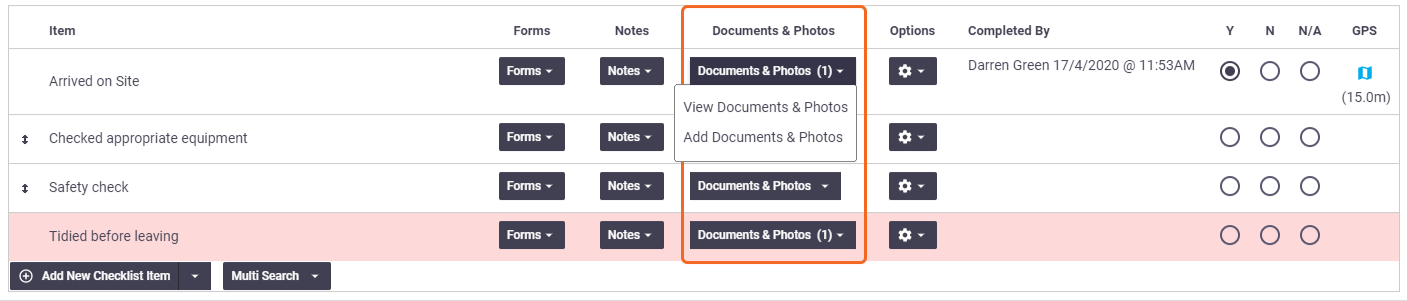
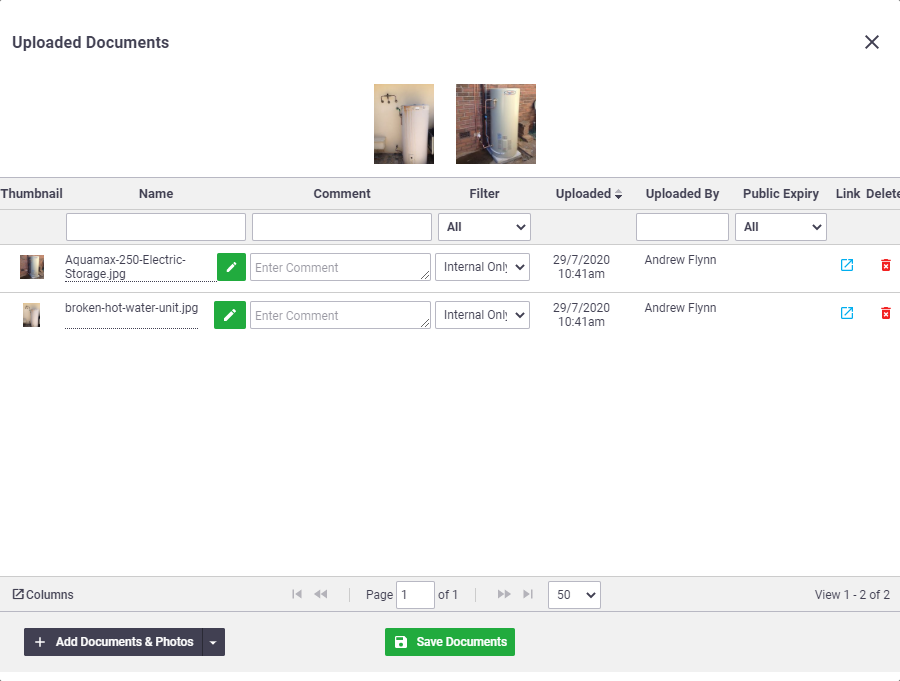
Documents and Photos
|
Adding Documents Adding documents and photos to checklist items can be useful. For example, if you need to fail a checklist item, you can attach a photo to show why. Simply click the down arrow in the Documents & Photos area and Add Documents & Photos to upload a document and/or photo to the checklist item. |
 |
|
Permission Groups
Anyone using default permission groups can view and add checklist documents and photos. Supervisors will also be able to edit, and Managers will be able to edit and delete.
Viewing Documents
If a photo has been attached to a checklist item, a counter will display on the button to indicate how many documents and photos are attached  . Click the down arrow and View Documents & Photos to view the attachments.
Additional options
|
 |
|
Email attachments
| Documents and photos on checklist items can also be attached to task and invoice emails. | 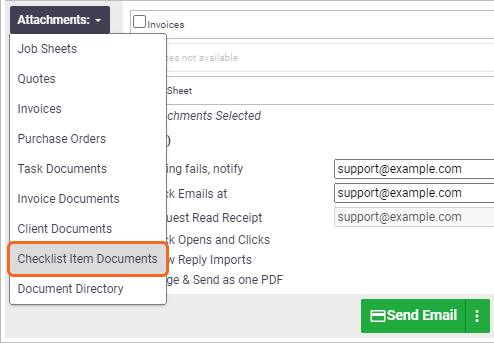 |
|
Duplicate a checklist item
A checklist Item can be duplicated by clicking the ![]() (cog with arrow) icon and selecting Duplicate Checklist Item.
(cog with arrow) icon and selecting Duplicate Checklist Item.

This is the fastest way to duplicate a Checklist item where multiple people are working on a step. Each technician can duplicate a Checklist Item and tick it off for themselves. Duplicating also retains any settings on the original (such as email or SMS on pass/fail/ N.A).
It is also especially useful in scenarios where someone marks a Checklist Item as failed and leaves a note. A new user can review the note, duplicate the Item, and update the Checklists with an ongoing record. By duplicating, different users can work on common Checklist Items.
Watch a video on duplicating checklist items
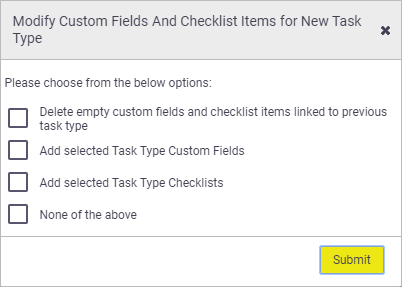
Changing task types
|
If you change the task type on an existing task, you will be given an option on how you want to proceed, depending on the scenario. You can choose more than one option, or choose 'None of the above'.
|
 |
||||||||||
|
Service Actions
If a Service Action Group has been linked to the Checklist Template, a column will appear so a Service Action can be selected for each checklist item.

This feature can be especially useful where Items are changed on a very frequent basis. This could be during maintenance swap-outs where it may not be worthwhile to maintain the changes in an Asset Register.
The checklist items listed could be the items being changed frequently with Service Actions to add an Inventory item, Form, or Document for each.