Calendar Views - Overview

Learn how to manage your calendar views in AroFlo Office

Updated on January 15th, 2025

Calendar views are made up of the View Type and the Calendar Settings you select.

  • Always have your preferred calendar view at your fingertips
  • Save multiple views for different parts of your business
  • Easily update your saved calendar views with a few clicks
  • Share calendar views with other users.

View Type

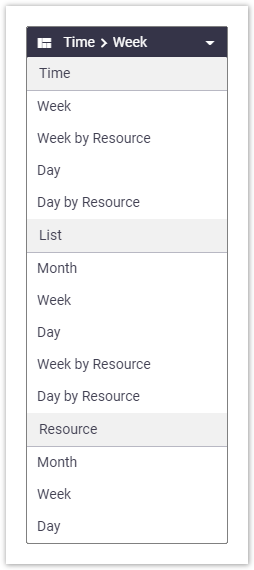
The View Type determines the basic layout of your calendar. Choose from time-based, list-based, or resource-based views. See image to the right.


Calendar Settings

The Calendar Settings let you change things like:

  • the range of times that appear on your calendar, e.g. 7:00 - 3:30
  • whether or not to display weekend days
  • which event types should appear, e.g. tasks only, all events
  • colors
  • which labels appear on schedule entries, e.g. Task Address, Job No, Start Time
  • how often the calendar should update with new entries.

These are just a few of the settings you can adjust in your calendar to tailor the view to your requirements.


Interested in learning through an interactive course in the AroFlo Academy?

Go to course


Standard Calendar View

New AroFlo users can start scheduling straight away with the standard calendar view included with your site. This view is not customizable but will automatically include yourself and the next 9 users you add, as well as remove deleted users.

The standard calendar view is designed to automatically refresh so you get the latest information about your scheduled tasks for that day (see Auto-Refresh Calendar Every setting).

In addition, the view includes a slot called All-Day when you want your team to be aware of a company-wide event which you might want to separate from your job schedule. 

If you have more than 10 users, the calendar will prompt you to create your own customized view:

Once you're ready, use the instructions below to create your own view.


Save a calendar view

We recommend saving your preferred calendar settings by creating a customized calendar view.

When you create a new calendar view, the Standard layout described above is used as the base, and you can then customize it as you see fit.

Duplicate a calendar view

If you're only making minor changes to a calendar view and don't want to run the risk of losing any calendar settings, we suggest duplicating a calendar view. If you prefer to start afresh, however, follow the below instructions.


To create a calendar view:

  1. From the main menu, click Calendar.
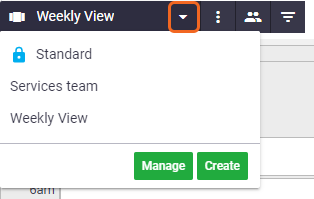
  2. In the top left, click the down arrow to the right of the view name > Create.
  3. Enter a name for the view, e.g. Weekly View.
  4. Optional: Enter a description of the view.
  5. Optional: If you want others in your company to be able to access the same calendar view, tick the 'Shared' box. (See Sharing a calendar view below).
  6. Click Create.
  7. Alter the Settings (), Resources (), and Filters () to create the view that best suits your needs. See Calendar Settings for details.
  8. Click Save.
  9. Refresh your browser to apply the changes.


Edit a calendar view

To change the name or description of a calendar view:

  1. Click the down arrow to the right of the view name.
  2. Click Manage.
  3. Click the (pencil icon).
  4. Make your changes.
  5. Click Save.


View Types

The View Types menu provides a range of calendar display options to suit your preferences and scheduling requirements. Each view type is described below.

Navigation Tip

The AroFlo Office calendar has been designed to adjust to a range of screen sizes. For readability, some calendar views have been designed with a minimum column width. Depending on the view and settings you choose, and the size of your screen, you may sometimes need to scroll, using either the horizontal or vertical scroll bars that appear.


Time-based views

Week

If you haven't set up any custom calendar views, the Time > Week view will be the one you see when you first use the AroFlo calendar. By default, it displays weekdays and weekends, and times broken up into 15-minute increments. This can all be changed by using the calendar settings.


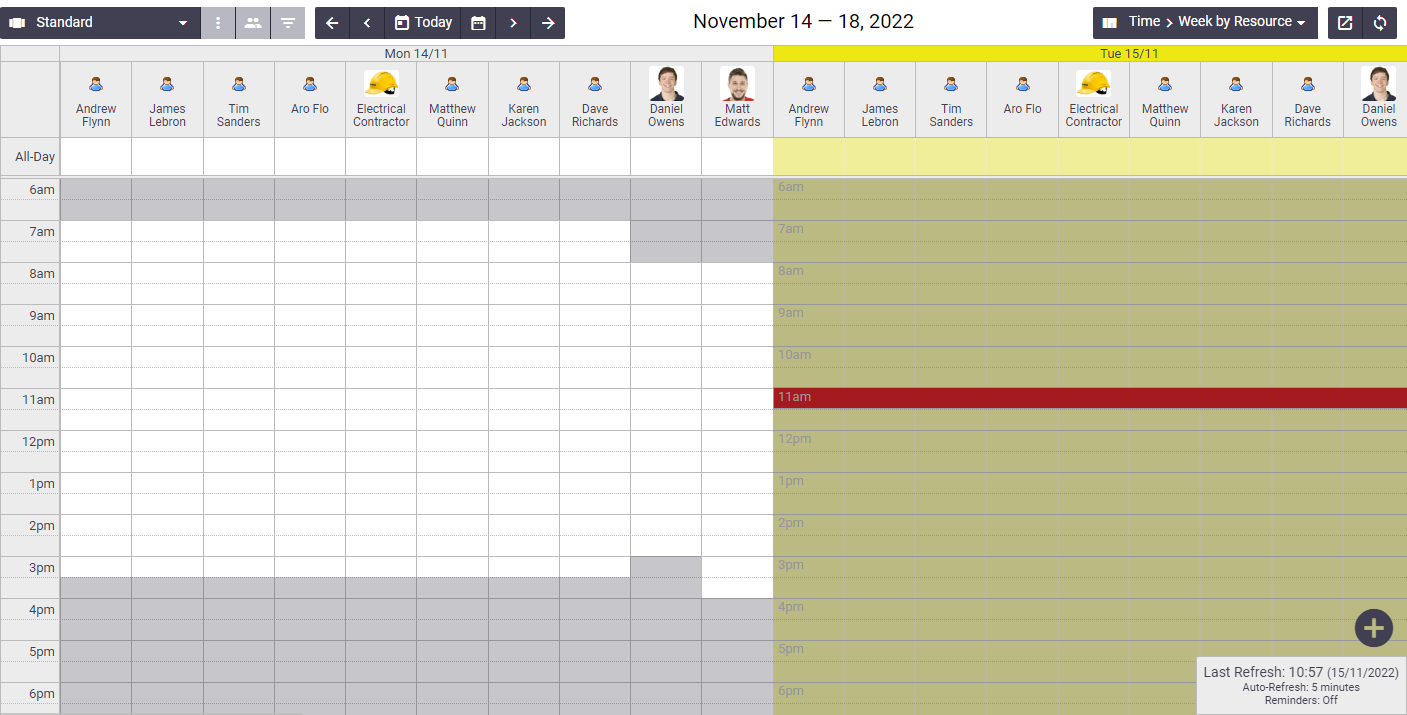
Week by Resource

This view allows you to include staff names and pictures. In this image, a custom calendar view called 'Weekly View' has been created, and weekend days have been hidden.


Day

This view shows you just one day's tasks. In this image, we've included the resource name (Matt Edwards) in the task tile. This can be helpful if you prefer a simple, clean-looking view but still need to know who will be doing the job.


Day by Resource

This view shows you what your selected staff members have on for the day. In this image, we've included the client name (Terry's Hedging Service) in the task tile.


List-based views

Month

This view gives you a quick overview of what's on for the month. Each job's start time is shown at the start of the task tile description, e.g. 7a for 7:00am, 2:45p, for 2:45pm.


Week

This view shows you a simple view of the week. As with the month view, there are no times on the layout itself, but the start time of each event is included in the task tile information.


Day

The List > Day view gives you all the events scheduled for the day, for all the resources you've selected in your settings.


Week by Resource

This view shows you the week, broken down into a column for each resource.


Day by Resource

This view lets you focus on the day's overview per resource.


Resource-based views

Month

This view lists your chosen resources down the left-hand side and shows the whole month broken into days. The current day is shaded in a colour taken from the theme you've chosen for your AroFlo site. Schedules can be dragged onto different days or resources, and are automatically arranged by start time within each resource's day.


Week

As with Resource > Month, your resources are listed on the left-hand side, the current day is shaded in a color chosen from your theme, and the week is broken into days.


Day

On the Resource > Day view, each resource's day is divided up into times according to the timespan you've selected in your calendar settings. In the image below, the timespan has been set to 30 minutes.


Sharing a calendar view

If you want other people in your company to be able to access a calendar view you have created, set the view to 'Shared'. This will allow other users to use this view, but not edit it.

You can do this when you create the view, or when you edit it.

Updates visible to all users

When you edit a view you have created and shared, anyone using that view will see your changes, meaning they'll always have current information.


Example:

Your Admin Officer creates and shares a calendar view called 'All Staff'. When they update their version of the view, e.g. they add or remove a resource, all shared versions of the view are updated, too.

 
  • A tick in the Shared column means you own this view and have made it available to other users.
  • The (Share icon) means the view belongs to someone else, and you have added it to your list of views. Changes you make to a shared view are temporary and will not affect the original owner's version of this view. Click (pencil icon) to see who the owner of the calendar is.


Accessing a shared view

To access a calendar view that someone has made shareable:

  1. Click the down arrow to the right of the saved views dropdown (top left of calendar).
  2. Click Manage.
  3. Click Add Shared Views.
  4. Select a calendar view from the Search Shared Views window and click Select Views > OK. The view will now be available in your saved views dropdown.

You can either:

  • use the shared view as is, remembering that changes that the view owner makes to their version (e.g. color settings) will be reflected in yours,
  • make temporary changes that will not be saved if you navigate to a different view or another part of AroFlo, or
  • save a copy of the shared view (see Duplicate a calendar view, below) and make any permanent changes you need to.
 

Adding External Dates

You can add government and industry body calendars to your AroFlo calendar, so public holidays, industry RDOs, and even your favorite sporting schedule automatically display in your AroFlo calendar. See Add External Calendars for instructions.


Set a view as the default

If you've saved multiple calendar views, you may want to set one of them as your default view. If you don't set a default view, AroFlo will use your last-used view as the default.


Set a default view for all Business Units

To set a default view that will apply to all Business Units:

  1. Click the down arrow to the right of the view name.
  2. Click Manage.
  3. Click the radio button beside the view you want to set as the default.


Set a Business Unit specific default view

To override the default you have set for all Business Units and set a different default for an individual Business Unit:

  1. Click the (pencil) icon on the relevant view.
  2. Click Select.
  3. Click the checkbox beside the relevant Business Unit, and click the x in the top right to close the Search Business Units window.
  4. Click Save.

To remove a Business Unit specific default view, click Select, deselect the Business Unit, close the window, and Save.


In our image, the Weekly View is the user's default view for all Business Units, and the Services Team view is their default view for the AVCEE Services Business Unit.


Delete a calendar view

Complete steps 1 to 3 from Edit a calendar view, above, and then click Delete.


Duplicate a calendar view

If you have a view you're happy with, but you want to make a slightly different version of it (e.g. you want all the same settings but a different group of users displayed, or vice versa), you can duplicate the view as follows:

  1. Complete steps 1 to 3 from Edit a calendar view, above.
  2. Rename the view.
  3. Hover over the down arrow beside the Save button.
  4. Click Save As.
 

Shared views

You can also use these steps to duplicate a shared view.