Disclaimer
Creating Expandable Forms is an advanced feature of creating Custom Forms and this article currently does not follow the same style as our traditional help articles. For more assistance, please contact our support team.
Sometimes, you may need additional space on a form. On paper, this is handled by adding blank lines or a notes area. In AroFlo, you can create expandable form templates so that extra rows or columns can be added by the user when they are completing the form in the field.

Let's say that we want to be able to repeat our set of questions for each device or asset that we're servicing. We can do this using a 'sub-table'.
Why 'sub-table'?
Because it's a table within a table. Remember that our form is basically a bunch of rows and columns. We can mark some rows and columns as a 'sub-table', and this is the part of the table that is expandable or 'dynamic'.
Our image shows an example of an expandable form in AroFlo Office. You can see that we have a button called add new row. Users can click this to add a new 'answer' row for each device they need to service.
On this page, we'll work through how to set this kind of form up.
Expandable forms are unsupported with RTF document templates.
Create a form
To demonstrate the sub-table idea, we're going to create a new form, but in reality, you could incorporate your sub-table into a larger form. We'll use the same set of fields as were used in our earlier form, but this time, the settings that we apply to some of the cells will make some rows repeatable.
- Within Site Administration, click Settings and search for Forms.
- Click Forms to display our custom forms list.
- Select the 'Service Forms' category.
- Click Create Form at the top right.
If you've worked through the exercises on Create a Form Template, this view will be familiar to you. It's where we can define the functionality of our new form.
View an explanation of each form option
Field |
Description |
|---|---|
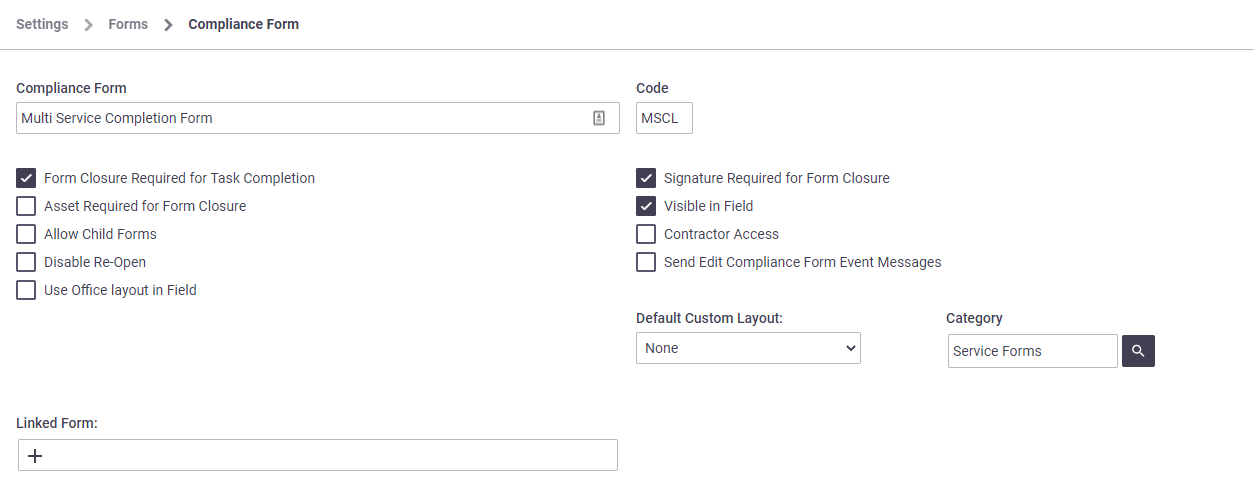
| Compliance Form | Used to enter the name of the form |
| Code | Allows you to assign a short code to the form This appears in the Ref column when you access your compliance forms via AroFlo Office's Compliance > Tasks menu. |
| Form Closure Required for Task Completion | Indicates that any task with this type of form linked to it cannot be marked as completed until the form is also marked as completed |
| Signature Required for Form Closure | Indicates that the user must capture a signature before the form can be closed |
| Asset Required for Form Closure | Indicates that the user must assign an asset to the form before it can be closed. This is great for asset-specific compliance forms as it prevents users creating the form against the task, rather than the asset |
| Visible in Field | Indicates that the form will be visible to the field technicians on their mobile devices |
| Allow Child Forms | Indicates that this form can have sub forms added to it |
| Contractor Access | Determines whether or not this form will be available from a contractor login |
| Disable Re-Open | When checked, prevents users re-opening a completed compliance form |
| Send Edit Compliance Form Event Messages | Ensures that an event message is sent whenever a compliance form is edited |
| Use Office layout in Field | Displays the compliance form's Office interface layout when viewing the form in AroFlo Field |
| Default Custom Layout | Determines which layout is used for the printable version of the form |
| Linked Form | Allows you to link to another form in the system |
Enter the following information (table to the right):
Leave 'Default Custom Layout' set to 'None'.
Click Save Compliance Forms which will return you to your list of forms.
On the Multi Service Completion Form, click on Edit in the Fields column.
Field |
Action |
|---|---|
| Compliance Form (form name) | Type 'Multi Service Completion Form' |
| Code | Type 'MSCL' |
| Form Closure Required for Task Completion | Tick |
| Signature Required for Form Closure | Tick |
| Visible in Field | Tick |
Add rows and columns
We'll lay our sub-table out horizontally, and create a common linkage between our Header Line and our Data Line. The Data Line is the one that will be repeated when a user clicks add new row.

We'll also need to include a new field called 'Device'. Here's a schematic of what we're going to create:
| Multi Service Completion Form | |||||
| Header Line: | Device | Filters Checked | Level | More Maintenance Required | Comments |
| Data Line: | <Text Box> | <Radio Button> | <Select Box> | <Check Box> | <Select Box> |
Let's go ahead and create two rows below the existing row, and add our form title.
- Hover over the left-hand end of the first row and click add row below, twice.
- On the first row:
- click the
 (edit) icon
 - in the Field Type dropdown, select Heading.
- in the Label Text field, enter 'Multi Service Completion Form'
- Click Done.
- click the
- In the second row, hover over the right-hand side and click
 add cell right five times, so we end up with six cells on the second row.
 - Repeat step 3 for the third row.
- Back on the first row, hover over the right-hand side of the heading cell and click
 span right five times, until the header row goes all the way across.
 - Click Save Form.
Your form should now look like the one in our image.
Link the sub-table rows
| Before we label our cells and enter the elements for our answer cells, we'll link the sub-table's Header Line and Data Line. | 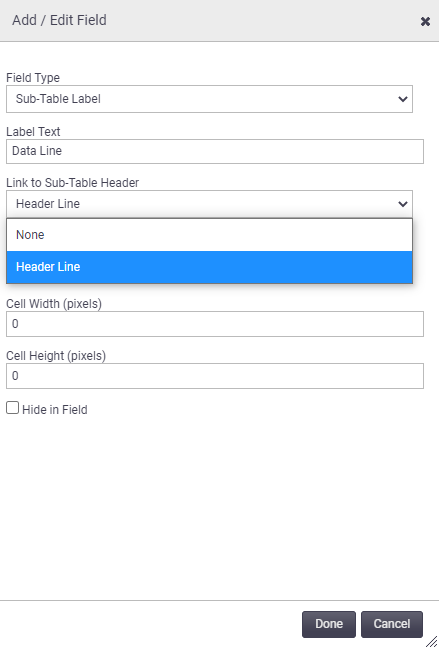 |
|
- In the first cell of the second row, click the
 (edit) icon.
 - In the Field Type dropdown, select Sub-Table Header (To add Row). This marks the start of our sub-table.
- In the Label Text field, enter 'Header Line'.
- Click Done.
- In the first cell of the third row, click the
 (edit) icon.
 - In the Field Type dropdown, select Sub-table Label.
- In the Label Text field, enter 'Data Line'. This will determine which fields are to be duplicated by our sub-table.
- Click Done > Save Form.
In the cell with the label 'Data Line':
- Click the
 (edit) icon.
 - In the Link to Sub-Table Header field, select 'Header Line'. This indicates that this row is a part of our sub-table and should be repeated when the user clicks the add new row button on their form.
- Click Done > Save Form.
If you can't see the Header Line option in the Link to Sub-Table Header dropdown, click Cancel to close the Add / Edit Field, then click Save Form. Re-open the Add / Edit Field window; if you still can't see the Header Line option, check that you've set up the Header Line cell correctly.
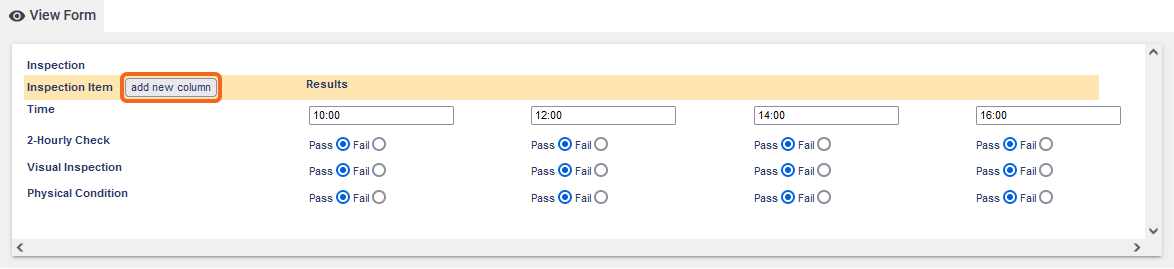
You can also create a sub-table that allows users to add columns on the fly. The principles are the same as for our horizontal table; the only difference is that instead of selecting Sub-Table Header (To add Row) you'll select Sub-Table Header (To add Column). Click this image for an example:
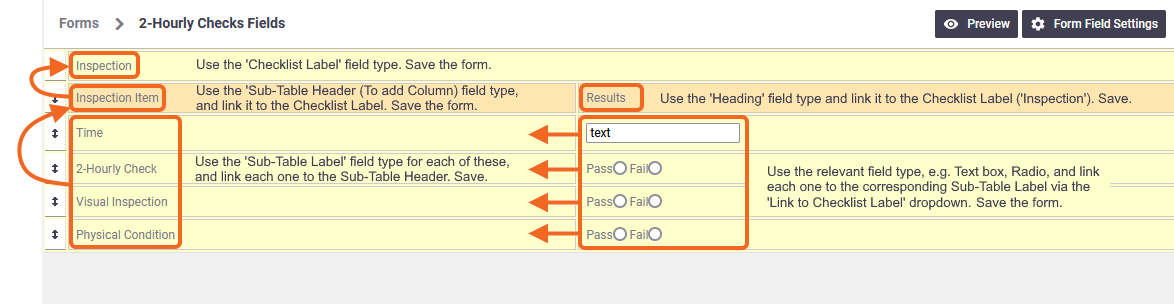
On your task, click add new column as needed.
Label the cells
We're now going to label the cells on our sub-table Header Line, as per the table in the Add Rows and Columns section.

- On the second cell in the Header Line, click the
 (edit) icon.
 - In the Field Type dropdown, choose Heading.
- In the Label Text field, enter 'Device'.
- Click the Hide in Field checkbox.
- Click Done.
- Repeat steps 1 to 5 for the remaining headings: 'Filters Checked', 'Level', 'More Maintenance Required', and 'Comments'.
- Click Save Form.
Your form should be looking something like the one in our image.
Now we'll add the answer elements to our sub-table Data Line, as per the table in the Add Rows and Columns section.


- On the second cell in the Data Line (under the 'Device' heading), click the
 (edit) icon.
 - In the Field Type dropdown, choose Text Box.
- In the Label Text field, enter 'Device'.
- In the Link to Checklist Label dropdown, select Data Line.
- Click Done.
- Repeat steps 1 to 4 for the remaining headings, using the Field Type and Label Text that corresponds with each question, e.g. Radio Button for 'Filters Checked', until you get to the last column, 'Comments'. For the Comments cell, we'll use a Select Box that has two options:
- No Comments
- See Task Notes.
- Click Save Form.
Your form should be looking something like the one in our image. You can click Preview, but this will not let you test the add new row functionality. You're best to add your new form to a task, to see how it will work. See Using Forms on Tasks for instructions.
In our image, we have switched off the field labels for the Office view. To do this, click  (edit icon) on each answer field. In the Hide Field Label In field, select 'Office'.
The final thing we'll do is switch off the field labels for the Header Line and the Data Line.
- Click the
 (edit) icon in the Header Line cell.
 - In the Hide Field Label In field, choose Field and Office.
- Click Done.
- Repeat these steps for the Data Line cell.
- Click Save Form.
What to do next
| You've now learned how to create a basic custom form, and a more advanced expandable form. |  |
|