The examples below show you how to set up conditions for some common scenarios that may apply to your business. You can set up all these conditions and more once you have set up ordinary hours of work.
Example 1 - Apply a lunch break
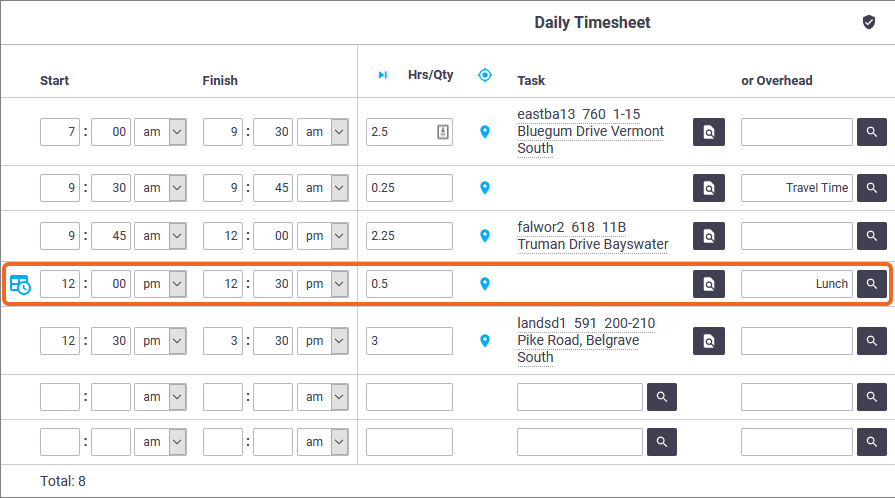
If your company requires staff to take a lunch break at a set time or for a set duration, you can create a condition to automatically insert a lunch break timesheet entry for all users. The timesheet entry will be applied as soon as the user saves their first labour or overhead entry for the day.
If you have staff who don't need to complete timesheets but for whom a lunch break still needs to be recorded, the automated lunch break will be added when you approve the timesheet via the EOD Approval button.
Show me how
To set up a condition to insert a lunch break:
- Go to Site Admin > Settings.
- In the Search Settings box, enter Hours of Work.
- On the day you want to set the condition for, click Add / Edit Automation (far right of window).
- Click Add Condition.
- Under Condition Type, select Insert Ordinary Hours. This will insert the condition, according to the set start / finish times (or hours), into the end user's daily timesheet.
- Under Overhead, select 'Lunch' from the dropdown list.
If you can't see an overhead for 'Lunch' in the list, you will need to create one. To include the lunch break in the timesheet total, enable the Include in Timesheet Total option when creating the overhead. See Overheads for more information.
- In the Work Type field, either leave the default work type in place or make a selection from the dropdown list.
- Optional: In the Tracking Centre dropdown, select which tracking centre you want the automated entry to have.
If you leave the Tracking Centre as Not Set, the timesheet entry will draw the tracking centre from the next level in the tracking centre hierarchy for labour items: User, Work Type, Task Type, Business Unit.
- To enter the duration of the lunch break, either complete the:
- Start Time and Finish Time fields; or
-
Hours field.
What do you see on the timesheet?
If you've set start and finish times for the lunch break, here's what you'll see on the timesheet:

If you don't define a start and finish time but just set a number of hours for the lunch break (e.g. 0.5 hours), the entry will appear at the top of the timesheet.
- Click Save Conditions.

Repeat the above steps for each working day. You could also use this process to insert a weekly toolbox talk, any award allowances such as wash time, or your Friday afternoon social time.
Example 2 - Autofill non-productive time
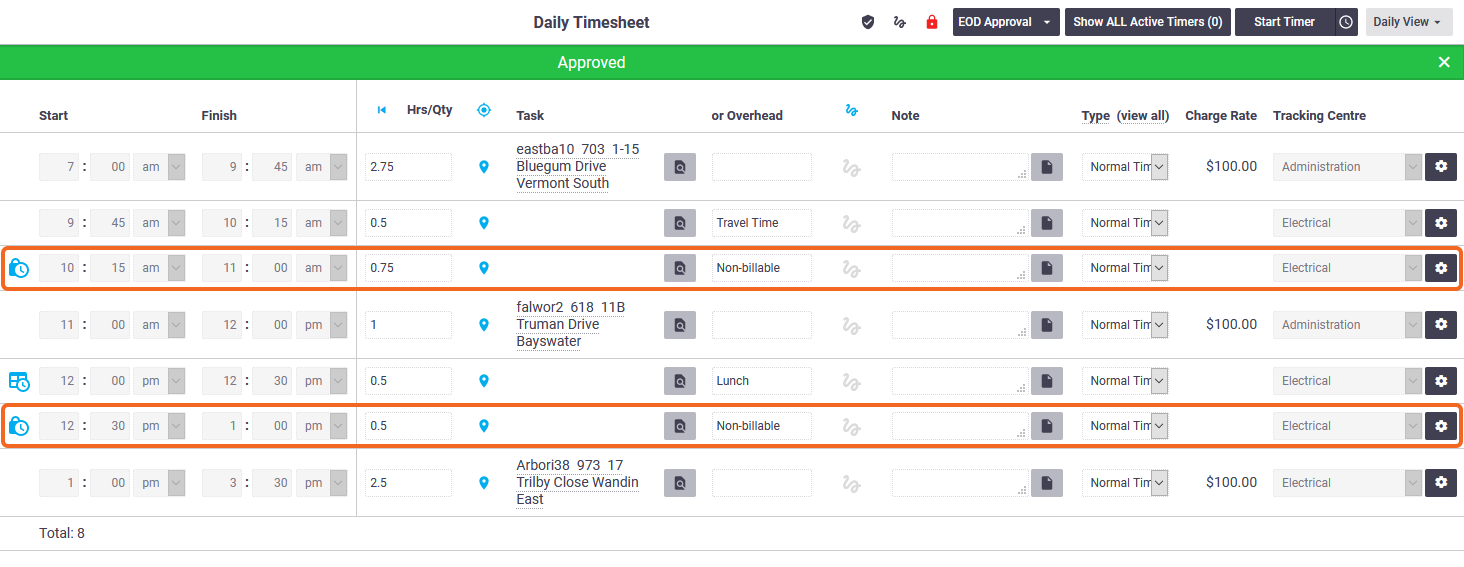
Your technician works on five jobs for the day and records their billable hours. With timesheet automation, you can fill in the non-productive time between jobs with an overhead.
You can use the Autofill Ordinary Hours condition for this. The condition will be applied when the daily timesheet is approved via the EOD Approval button.
Show me how
Ensure you've set up your work types and overheads in Site Admin. The overhead you use for converting non-productive time in the work day should:
- be a ‘Time’ overhead (not an ‘Expense’)
- have Include in Timesheet Total ticked.
To set a condition to apply an overhead to periods of non-productive time:
- Go to Site Admin > Settings.
- In the Search Settings box, enter Hours of Work.
- On the first day you want to set the condition for, click Add / Edit Automation.
- Click Add Condition.
- Under Condition Type select Autofill Ordinary Hours.
- Select the Overhead you want to apply to any gaps in the timesheet, e.g. 'Non-billable'.
- In the Work Type dropdown, select the work type you want to apply to the gaps.
- Optional: Select the Tracking Centre to be applied.
If you leave the Tracking Centre as Not Set, the timesheet entry will draw the tracking centre from the next level in the tracking centre hierarchy for labour items: User, Work Type, Task Type, Business Unit.
- Click Save Conditions.
Repeat the above steps for each day that you want to fill gaps on.


Remember that the way this condition works depends on whether users enter:
- start / finish times: in this case, AroFlo will insert an entry for each gap in the timesheet
- hours only: AroFlo will tally up all the gaps in the timesheet and apply one entry on EOD Approval.
Example 3 - Convert overtime hours
Suppose your company's ordinary working hours are Monday to Friday from 7:00am to 3:30pm, and that any hours worked outside of those times on a weekday are charged as follows:
- first 2 hours: Time & Half
- next 2 hours: Double Time
- more than 4 hours: Double Time & Half.
On Saturdays and Sundays, all time worked is charged at Double Time, and if more than 4 hours is worked, the rate changes to After Hours.
You can set conditions to automatically convert overtime entries to these work types. These conditions will be applied when a user saves an entry that crosses over into overtime (or is completely within overtime hours).
Show me how
Ensure you've set up your work types in Site Admin.

Let's set up conditions for the normal work days first:
- Go to Site Admin > Settings.
- In the Search Settings box, enter Hours of Work.
- On the first day you want to set the condition for, click Add / Edit Automation.
- Click Add Condition three times.
- Under Condition Type, select Convert Overtime for all three rows
- In the Work Type dropdown, select Time & Half, Double Time, and Double Time & Half in each respective row.
- Under Condition Applies To, select:
- After Hours of Work Finish Time for row 1
- After Additional Hours of Work for row 2. In the Hours field that appears, enter 2.00.
- After Additional Hours of Work for row 3. In the Hours field, enter 4.00.
- Click Save Conditions.
Repeat the above steps for each day that you want automatic overtime conversion on.
Now let's look at the weekends:
- Set the Enable / Disable Hours of Work field to Enable, if it's not already enabled.
- Type 0 for the hour field for both the Start and Finish Time. The Hours field will set itself to 0 (i.e. the normal working hours for that day are zero).
- Save to set the hours of work.
- Click Add / Edit Automation.
- Click Add Condition twice:
- Under Condition Type, select Convert Overtime for both rows.
- In the Work Type dropdown, select Double Time for row 1 and After Hours for row 2.
- Under Condition Applies To, select:
- All Time Outside Hours of Work for row 1
- After Additional Hours of Work for row 2. In the Hours field, enter 4.00.

Repeat the above steps for each weekend day.
There may be more than one setup that will achieve the result you want. See Timesheet Automation Conditions for more information on what each condition type does.
See a detailed example of how overnight entries are handled
Suppose your normal hours of work for weekdays are 7:00am to 3:30pm and you have the following Convert overtime conditions set up:
Convert overtime condition |
Work Type |
|---|---|
| Before Hours of Work Start Time | Early |
| After Hours of Work Finish Time | Time & Half |
| After Additional Hours of Work (2 Hours) | Double Time |
| After Additional Hours of Work (4 Hours) | Double Time & Half |
A staff member works from 3:30pm to 1:00am the next day. The conditions will be applied as follows (also see image):
- 3:30pm to 5:30pm - Time & Half
- 5:30pm to 7:30pm - Double Time
- 7:30pm to 1:00am - Double Time & Half.
Note: The 'Before Hours of Work Start Time' condition does not apply to the 1 hour between midnight and 1:00am, because the entry started the previous day.
Suppose the user above goes home for some rest, starts work at 10:00am and works until 5:00pm. Here's how this could be handled:
- 7:00am to 10:00am - the user could manually enter a suitable overhead, e.g. Paid Rest. Alternatively, if you have an Autofill condition set up for non-billable time, AroFlo could apply an overhead for you.
- 10:00am to 3:30pm - the work type for your ordinary hours of work would apply, e.g. Normal Time.
- 3:30pm to 5:00pm - the Time & Half work type will apply.
Note: The Double Time work type will not kick in, even though the user has technically worked 2.5 hours of overtime in total for the day. Remember that the 1 hour between midnight and 1:00am has already been captured on the previous day's timesheet, so it cannot be counted again.
Tying it all together
This image shows what your automation conditions will look like if you set up a day with:
- an automated lunch break, as shown in Example 1
- the Autofill Ordinary Hours condition shown in Example 2
- the weekday overtime conversion conditions shown in Example 3.

There is no limit to the number of Insert Ordinary Hours and Convert Overtime conditions you can apply. The Autofill Ordinary Hours condition can only be applied once in any given day.
Here's what the Daily Timesheet will look like once the above conditions have been applied and EOD Approval has been given. The user has had a long day, working from 7:00am to 6:00pm, but with an hour of non-productive time between 11:00am and 12:00pm.

- The 'Non-billable' overhead has been applied to this period of non-productive time.
- All the hours worked beyond the normal finish time of 3:30pm have been converted to overtime - 2 hours at Time & Half, and half an hour at Double Time.
Remember that you can:
- click the
 (View Hours of Work) icon to see the ordinary working hours and automation conditions for the day
 - hover over the
 (automate on Save) or
  (automate on EOD Approval) icons to see which automation condition has been applied to each row.