Types of Compliance Form

Learn how to stay compliant in AroFlo Field

Updated on February 15th, 2024

Create a compliance form via Menu > Compliance > Forms, or alternatively, add a compliance form to a task via the More tab > Forms.

See Compliance Forms for more information on available fields and form navigation.


OH&S checklists

OH&S checklists are quick and easy checklists that require less information compared to a risk assessment form. Checklist items may trigger a fail action (if configured) which will prompt you to complete a specific custom form as a requirement when the item is marked as 'Fail'.


Checklist items may also provide links to other types of compliance forms.

  1. Go to All Forms.
  2. Tap OHS Checklists.
  3. Tap the name of the form that you require.

    Category select

    By default, OHS Checklists from all categories will display. To narrow down your search:

    - Tap Categories

    - tap the category the form is saved under (and sub-category if applicable) to only display OH&S Checklists within that category

    - Finally, tap the name of the form that you require.

     
  4. Edit the Name / Incident: and Reported fields if needed.
  5. If assets are linked to the task, select the asset this OHS checklist relates to.
  6. Work through each checklist item and select Pass, Fail or N/A (not applicable).

    Fail action

    If configured, checklist items that have been marked as 'Fail' will trigger a fail action such as a custom form that is required to be completed in the event that the checklist item has failed. You will be automatically prompted to create the required form when you close the OHS checklist.

     
  7. If signatures are required, scroll down and tap Capture Signature.
  8. When the form is fully complete, change the status to Closed.
  9. Tap Save.

Open Task

Tap the task link to return to the task this form is attached to.


Risk assessment forms

A risk assessment form is typically a Job Safety Analysis (JSA) featuring risk levels and links to other forms and/or documents such as a Safe Work Method Statement (SWMS).

  1. Go to All Forms.
  2. Tap Risk Templates.
  3. Tap the name of the form that you require.

    Category select

    By default, risk templates from all categories will display. To narrow down your search:

    - Tap Categories

    - tap the category the form is saved under (and sub-category if applicable) to only display risk templates within that category

    - Finally, tap the name of the form that you require.

     
  4. (Optional): Review the activities, risks, controls, and checklist items, by tapping the relevant tab.
  5. Tap Create Form to create a new risk assessment form (based on the selected form template).

    Show me


    The Name / Incident: and Reported Date fields are pre-filled on the form, but you can edit these details if needed.

     
  6. Work through each checklist item and select Pass, Fail or N/A (not applicable).

    Tap the header of a compliance activity to expand or collapse it.

     
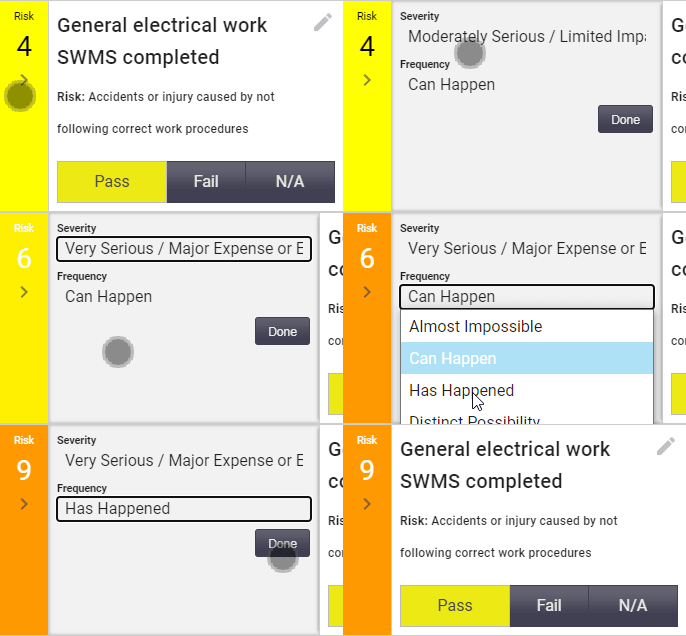
  7. To update the residual risk level after applying the control measures, tap the coloured risk level displayed on the left.

    Show me


  8. Select a Severity and a Frequency from the dropdown lists.
  9. Tap Done.
  10. Once all checklist items have been completed, you need to either accept or reject the risks using the options provided e.g: Pass, Fail, N/A.

    Capture signature

    A signature can also be captured to confirm acceptance of the form. This may be set as a requirement before the task can be closed. For more information, see Capture Signature.

     
  11. When the form is fully complete, change the status to Closed and then Save.

You will be returned to the task sheet to begin work on the job.


Edit or add checklist items

Each risk assessment checklist item relates to an activity, risk and control measure.

To edit a checklist item: tap (grey pencil icon), make the required changes and tap Save.


To add a new checklist item:

  1. Scroll down and tap Add Checklist Item.
  2. Enter:
    1. The Activity. (e.g. Installation of Ladder),
    2. Risk of the activity (e.g. Back Injury),
    3. Control measures to be applied (e.g. Follow correct manual lifting procedure),
    4. and the Checklist item (e.g. Follow correct manual lifting procedure to prevent back injury during installation of ladder).

      Search for existing items
      If you want to use a checklist item from another risk template form in AroFlo:

      - Tap (magnifying glass) at the top right
      - Enter a keyword into the Activity or Risk field
      - Tap Search.
      - From the available search results, tap Select to use this checklist item.

       
  3. Tap Create.

Any changes made will only affect this specific version of the form.


Create an ad-hoc risk assessment form

This feature is designed for field staff to quickly and easily create a risk assessment form for unusual or unexpected situations.

This is a one-off form and does not create a template for future use. 

 
  1. Go to All Forms.
  2. Tap Create Assessment (bottom of page).
  3. Enter the Name / Incident of the form.
  4. (Optional) Select an Asset from the dropdown that this assessment relates to.

    Selecting an asset will overwrite the name of the form.


    Asset Dropdown

    - The dropdown will appear if the selected client has assets linked to them.

    - If a location has been selected on the task, assets belonging to the selected client and location will display in the dropdown. If no assets exist for the location, the Asset dropdown will not appear.


  5. Tap Save.
  6. Tap Add Checklist Item to add checklist items to the form.
  7. Enter:
    1. The Activity. (e.g. Installation of Ladder),
    2. Risk of the activity (e.g. Back Injury),
    3. Control measures to be applied (e.g. Follow correct manual lifting procedure),
    4. and the Checklist item (e.g. Follow correct manual lifting procedure to prevent back injury during installation of ladder).

      The checklist item should capture the activity, risk, and control measure as this is the primary field that will be displayed both on screen and in the print layout.

       
  8. Tap Save.
  9. Tap < Form (top left of screen).
  10. Repeat steps 4 - 7 for additional checklist items.
  11. If there are risks or compliance items that are not covered by this form, use the Create a Linked Form button to link it to other forms within AroFlo.
  12.  Once all items have been added, you can complete the checklist items and close the form.


Create a Linked Form

Risk assessment forms have the option of adding a linked form. This is useful if there are risks or compliance items that are not covered by this form.

  1. Under the checklist items, tap Create A Linked Form.
  2. Select a Form Type (OHS Checklist, Risk Assessment, or select one of your custom forms):
    1. If selecting OHS Checklist or Risk Assessment, tap (magnifying glass) to search your forms and then select an option from the results that appear to link this form to your risk assessment form.
    2. If selecting a custom form, tap Create Form to link this form to your risk assessment form.
  3. (Optional) Edit the Name / Incident of the form.

    By default, the name of the form will be '(form name) - Sub Form'

     
  4. Complete each item on the form as required (see relevant section - OH&S checklists, Risk assessment forms, Custom forms).

Tap < Parent to return to the risk assessment form you created the linked form from.


Your custom form will also be added to the task under Task Forms.


Custom forms

Custom forms are used for any other type of form that isn't covered by a Risk Template  or an OHS Checklist. These forms have been customised by your Site Administrator, and may provide a range of options including radio buttons, checkboxes, dropdown lists, text/memo fields and date fields.

  1. Go to All Forms
  2. Tap the name of the form that you require.

    Category select

    By default, custom forms from all categories will display. To narrow down your search:

    - Tap Categories.
    - Tap the category the form is saved under (and sub-category if applicable) to only display custom forms within that category.
    - Tap the name of the form that you require.

    Show Me


  3. Edit the Name / Incident: and Reported fields if needed.
  4. (Optional) Select an Asset from the dropdown that this form relates to.

    Selecting an asset will overwrite the name of the form.


    Asset Dropdown

    - The dropdown will appear if the selected client has assets linked to them.

    - If a location has been selected on the task, assets belonging to the selected client and location will display in the dropdown. If no assets exist for the location, the Asset dropdown will not appear.


  5. Complete each item on the form as required.
  6. Fill out any checklist items, if checklists were created for this form
  7. If necessary, create a linked form, if one was linked to this form template.
  8. Save
  9. If signatures are required, scroll down and tap Capture Signature.
  10. When the form is fully complete, change the status to Closed.

Linked Documents

If the form contains linked documents, the form will contain a separate tab for you to access these.

Show Me