|
AroPoint features a dedicated GPS reporting function. This page will go through some common types of reports that you might want to set up or view, for example, data about each time an object goes in and out of a geofence. Click |
 |
 |
Generate a Report
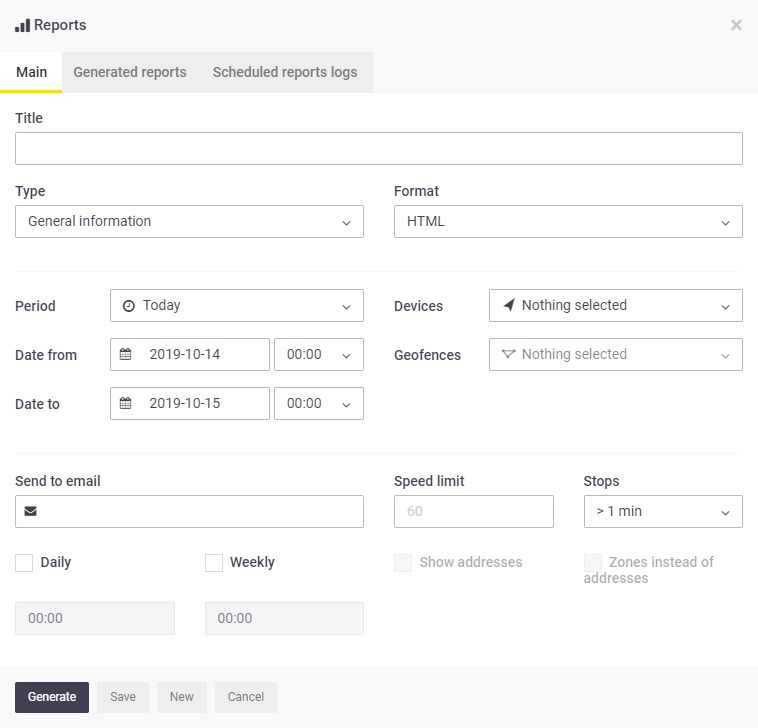
- Select the report Type from the dropdown.
- Select the report Format.
Formats
Report Format Description HTML Suitable to view in a Web Browser XLS Suitable to view and edit using Microsoft Excel PDF / PDF (Landscape) Suitable to view in either portrait or landscape format using a PDF reader, e.g. Adobe Acrobat - Select a time period from the dropdown, or input a date range using the calendar options.
- Select the objects you want to include in this report and close the dropdown box.
Select all
Use the Select all function to select all objects.
- If using the Geofence in/out report type, select applicable geofences to be included in the report.
Select all
Use the Select all function to select all geofences.
Optional fields
The fields that apply are determined by the report type you choose.
FieldDescriptionSend to email Enter the email address the report should be sent to.
This only applies to scheduled reports.
Daily/Weekly Select a frequency of when you'd like to receive emails and enter a time you'd like to receive it.
This only applies to scheduled reports.
Speed Limit Enter the maximum / minimum speed limit. This is mandatory for Overspeed and Underspeed reports, but other reports may reference speed limit data if you input a value here.
Stops Set duration of stops
This can eliminate traffic light stops, e.g. >2 min will only display data for stops that are greater than two minutes. By default this is set to >1 min, e.g. stops that are less than one minute will not create a data entry line.
Show addresses Nearest address will be shown against each data entry line.
Zones instead of addresses Geofence zones will be shown against each data entry line.
- Click Generate to view the report.
Types of reports
There are several different report types to choose from. Below is a description of the most common ones you might want to use.
Report Type |
Description |
|---|---|
| General Information | Shows basic information like start and end time, route length, average speed, top speed. |
| General Information (merged) | Same information as above but in a table format. |
| Drives and stops | Same information as General Information but with added stops, including duration of intervals between stops. |
| Drives and stops / Geoefences | Same information as Drives and stops but with added geofence information. |
| Travel sheet | Gives coordinates of stops and duration in between. |
| Overspeed | Displays records of when the speed entered into the Speed limit field was exceeded, by how much, and for how long. |
| Underspeed | Displays records of when the object speed was less than the speed entered into the Speed limit field, by how much, and for how long. |
| Geofence in/out | Gives the times at which an object entered or left a geofence, including stop duration. This report requires you to select geofences. |
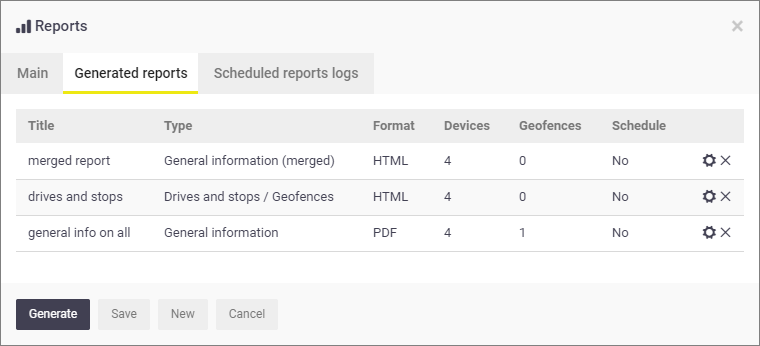
Save a Report as a template
Click the This is helpful if you want to generate the report again in future, or create another report based on the majority of this data, rather than starting from scratch. |
 |
 |
Scheduled Reports
Click the This is helpful if you want to generate the report again in future, or create another report based on the majority of this data, rather than starting from scratch. |
 |
 |
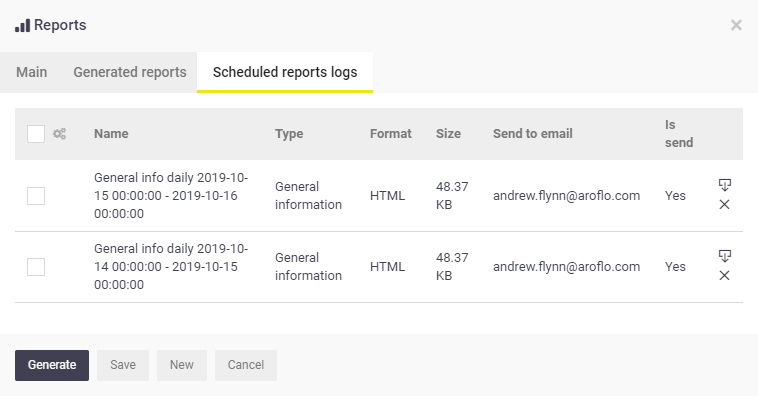
Scheduled reports logs
Previous periodic reports will be stored in the Scheduled reports logs tab and can be reviewed from there. This can be useful if you can't find the corresponding email or didn't receive it for some reason.
 (spanner icon) > Reports.
 (cog) to view the settings in the Main tab.
 (cog) to view the settings in the Main tab.