

The task worksheet is the central location where all information relating to the task is stored and managed. This includes task notes, checklists, job costs, compliance forms (SWMs, JSAs, etc), documents, photos and email history. Everything you need to know about the job is at your fingertips.
Task header
|
The task header (top section) displays the information that was entered when the task was first created. If needed, you can change key details using the Edit Task Header button at the top left of the screen. There are also a number of quick links that allow you to edit or change the client, location, asset or sales person on the open task.
You may also see a coloured banner at the top of the task header, indicating the client's transaction terms (see image). |
 |
If you've signed up to an SMS provider, you can send SMS messages to your clients and staff using the  (mobile phone) icon.
Elements explained
Buttons at top
| Button | Description |
|---|---|
 |
Return to the current task list. |
 |
Refresh the open task screen to see changes made by you or another user. |
 |
Edit the details displayed within the task header such as the task name, task type, description, etc. See Edit Task Header. |
 |
Set restrictions on who can access this task. See Task Restrictions. |
 |
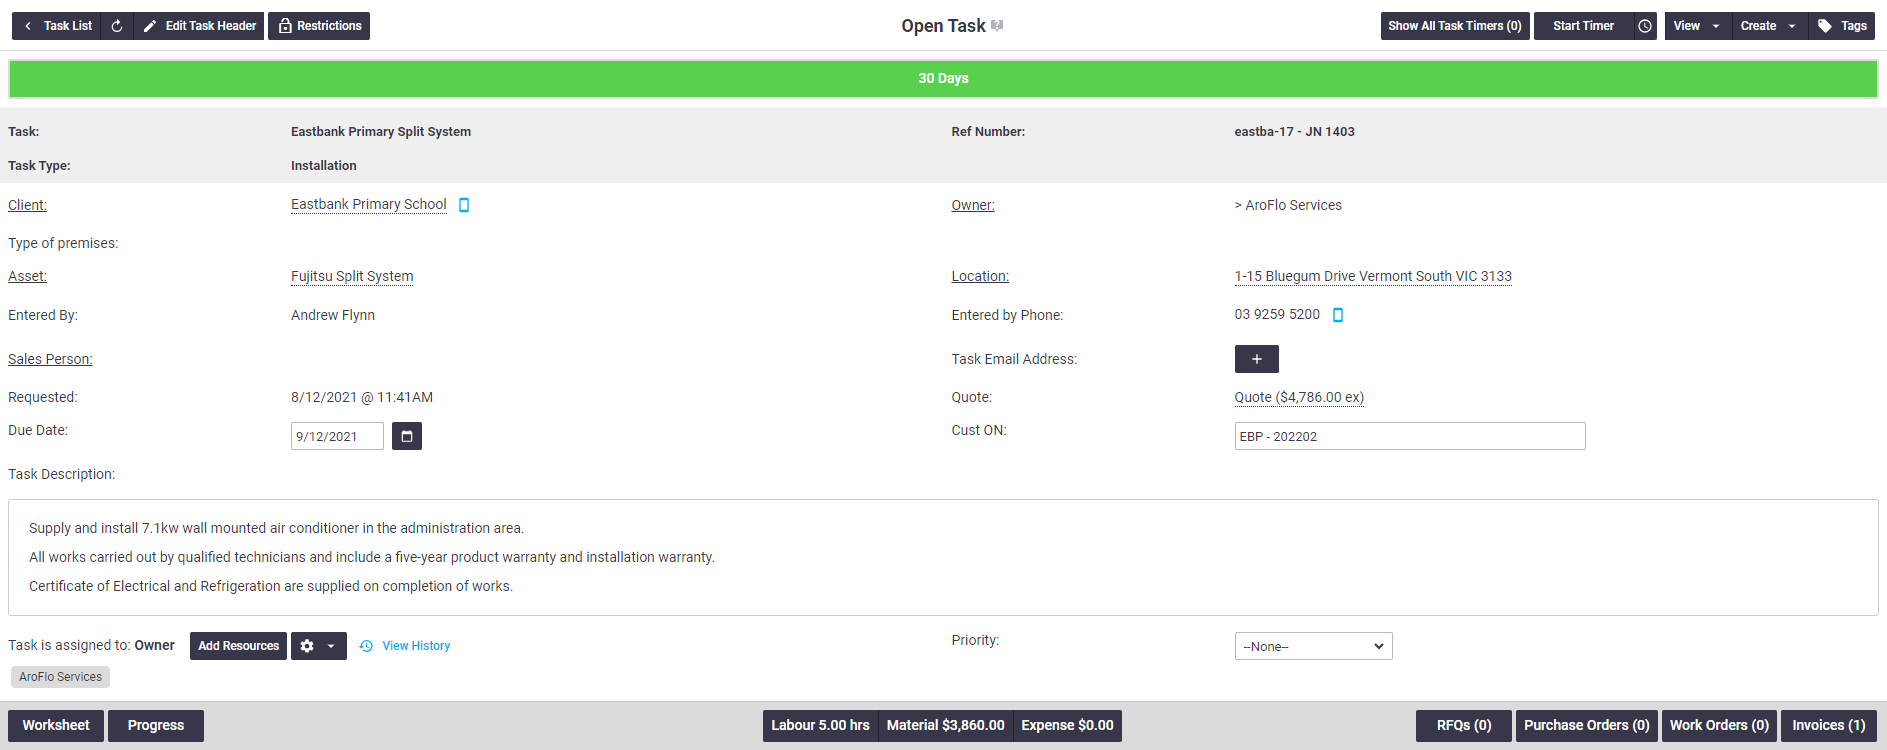
Managers, Supervisors (and those with permission) can use this to view active timers on the current Task. PermissionsSite Administrators can create a custom permission group and enable the timer via: Permission Groups > Tasks > Fields > Labour Timer (set to ticked) |
 |
Start a timer to record labour performed on this Task. Learn more about recording labour here. You can set up your checklist items to start and stop the timer automatically. See Checklist Templates for more information. |
 |
Quick menu to view all tasks or periodics for the client, or client and location displayed on the open task. |
 |
Quick menu to create a new Quote, Task or Periodic Template using the client, or client and location displayed on the open task. You can also create a Short URL to send the task to other users. |
 |
Tags can be applied to tasks to enable grouping of tasks within the current and completed task lists. See Task Tags for more information. |
Worksheet quick links
On a project task?
If you're on a project task, you'll have additional fields at the top of the worksheet telling you the project name and stage name (if applicable), as well as the project Ref Number.
Click the Project name to open the Project.

| Field/Button | Description | ||
|---|---|---|---|
| Client | Move the task to a different client. Click Client, then click the If a client doesn't exist, click Add Client, enter the details and save.
You can change the client on a task without affecting the current location. The location is retained against the original client on the location card. This allows you to create a task for a client at a work location that belongs to a different client. |
||
| Eastbank Primary School (example client name) | Open the Client card to view or edit details. | ||
| Owner |
If you have multiple business units, this allows you to change the ownership of a task to a different business unit. Click Owner, then click the Changing the Owner Changing the Owner of the task means it will disappear from your Workflow > Tasks > Open menu and be listed in the other business unit's. If you still want to have visibility over the task but want another business unit to be responsible for it, assign the task instead. See Add Resources, below. |
||
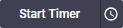
| Asset | Select a different primary asset for the task. |
||
| Fujitsu Split System (example asset name) | Open the Asset card to view or edit details. ODO Reading
|
||
| Location |
Move the task to a different location (work site address). Click Location, then click the If a location doesn't exist, click Add Location, enter the details and Save. |
||
| 1-15 Bluegum Drive Vermont South VIC 3133 (example location name) | Open the Location card to view or edit details. | ||
| Sales Person | Assign a sales person to the task (if applicable). | ||
| Task Email Address | Send emails to a task by using a unique task email address. Emails can include attachments which are then saved in documents and photos. If no unique email address exists, click |
||
| Quote | Displays the quoted value of this task. If a quote exists, click the Quote Link to open it. If no quote exists, click |
||
 |
Add ResourcesThe Add Resources button is used to assign one or more resources, business units, or contractors, to the job. They may not necessarily be the person performing the work, i.e. the 'scheduled' resource. Click Add Resources to select the resource you want to assign the task to. If you don't see the name you need, start typing the name and select it from the list. You can select multiple resources if needed. Click Select Resources to add the resources' names to the task. When you Save, the resources' names become links to their user, client or contractor card (if the resource is a business unit there is no link). Assign to MyselfTo quickly assign the task to yourself: click Unassign Resources
If resources have been assigned and unassigned, click Save the task to update changes. |
 (magnifying glass) and search, or select another client from the list.
 to select a new business unit from the list.
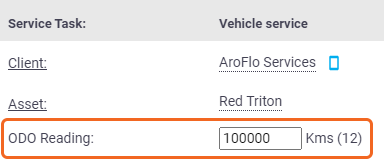
 and search or select a new location from the list.
 to create one.
 to
to  (down arrow icon), then Assign To Myself.
 View History to see which resources have previously been assigned to the task and by who.
Using custom fields?
Depending on the type of task, you may have additional fields available to you, if custom fields have been set. Examples include a text box, a select box, a date field, radio buttons, a canvas draw field, or a documents and photos field.
Below we'll go through how to use a few types of custom field. See Custom Fields for the full list and how you might use these in your workflow.
Documents and Photos
Documents and Photos fields can be really useful, especially if you want to record something like before and after photos on a job.
- Click Upload and either:
- Upload files from your file system,
- Take a Photo using your device's camera
- Drag and drop a file into the box
- Paste a copied image into the box
- Click Done.
- Save Task.

Once uploaded, click Files to access the files and from here you can preview images, add comments, rename files, delete, edit the document filter, etc.
See Manage Documents and Photos for more things you can do with Documents and Photos.
Multiselect
|
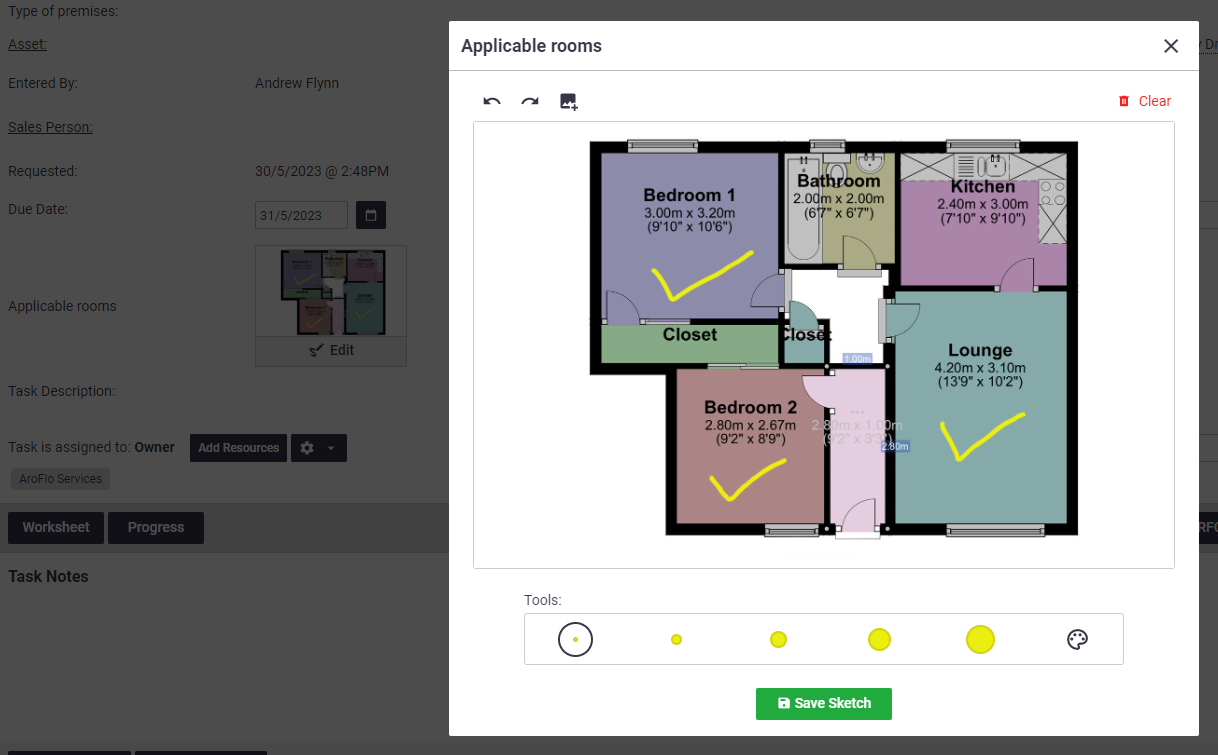
A multiselect custom field is useful for selecting and showing multiple options, for example, rooms of a house that need to be serviced.
|
 |
- If you have a long list of options, you can type in the
 (Filter) list field to narrow down your results
 - Click the x next to an option to remove it, or expand the list and click Clear selections to clear all. Remember to Save your task.
Canvas
|
This field can either be used to create simple drawings, or for uploading an image, and then marking it up.
|
 |
 Edit (pencil draw) to open the field
 to upload an image from your file system and then mark it up.
 Edit (pencil draw) to edit it.
Tools
- Pick a line thickness using the coloured circles
- Click the colour palette
 to pick a different colour and use the available options (e.g. RGB or HEX code)
 - Undo and redo using the buttons


- Click
 (Clear) to erase the canvas.
Job costs
|
Job costs are generally booked by field staff as they complete their daily tasks via AroFlo Field. A series of buttons underneath the task header section allow office staff to view these costs, and record any additional costs including labour, materials and expenses. Costs from labour and material items added from purchase orders or work orders, can also be viewed from here. See Task Worksheet Labour, Materials and Expenses pages for more information. It is vital to keep this information up-to-date and accurate to ensure that all costs are captured for invoicing and reporting purposes. Completed Tasks These options will look slightly different once the task has been marked as Completed and the Worksheet will be automatically shown. See Completing a task for more info. |
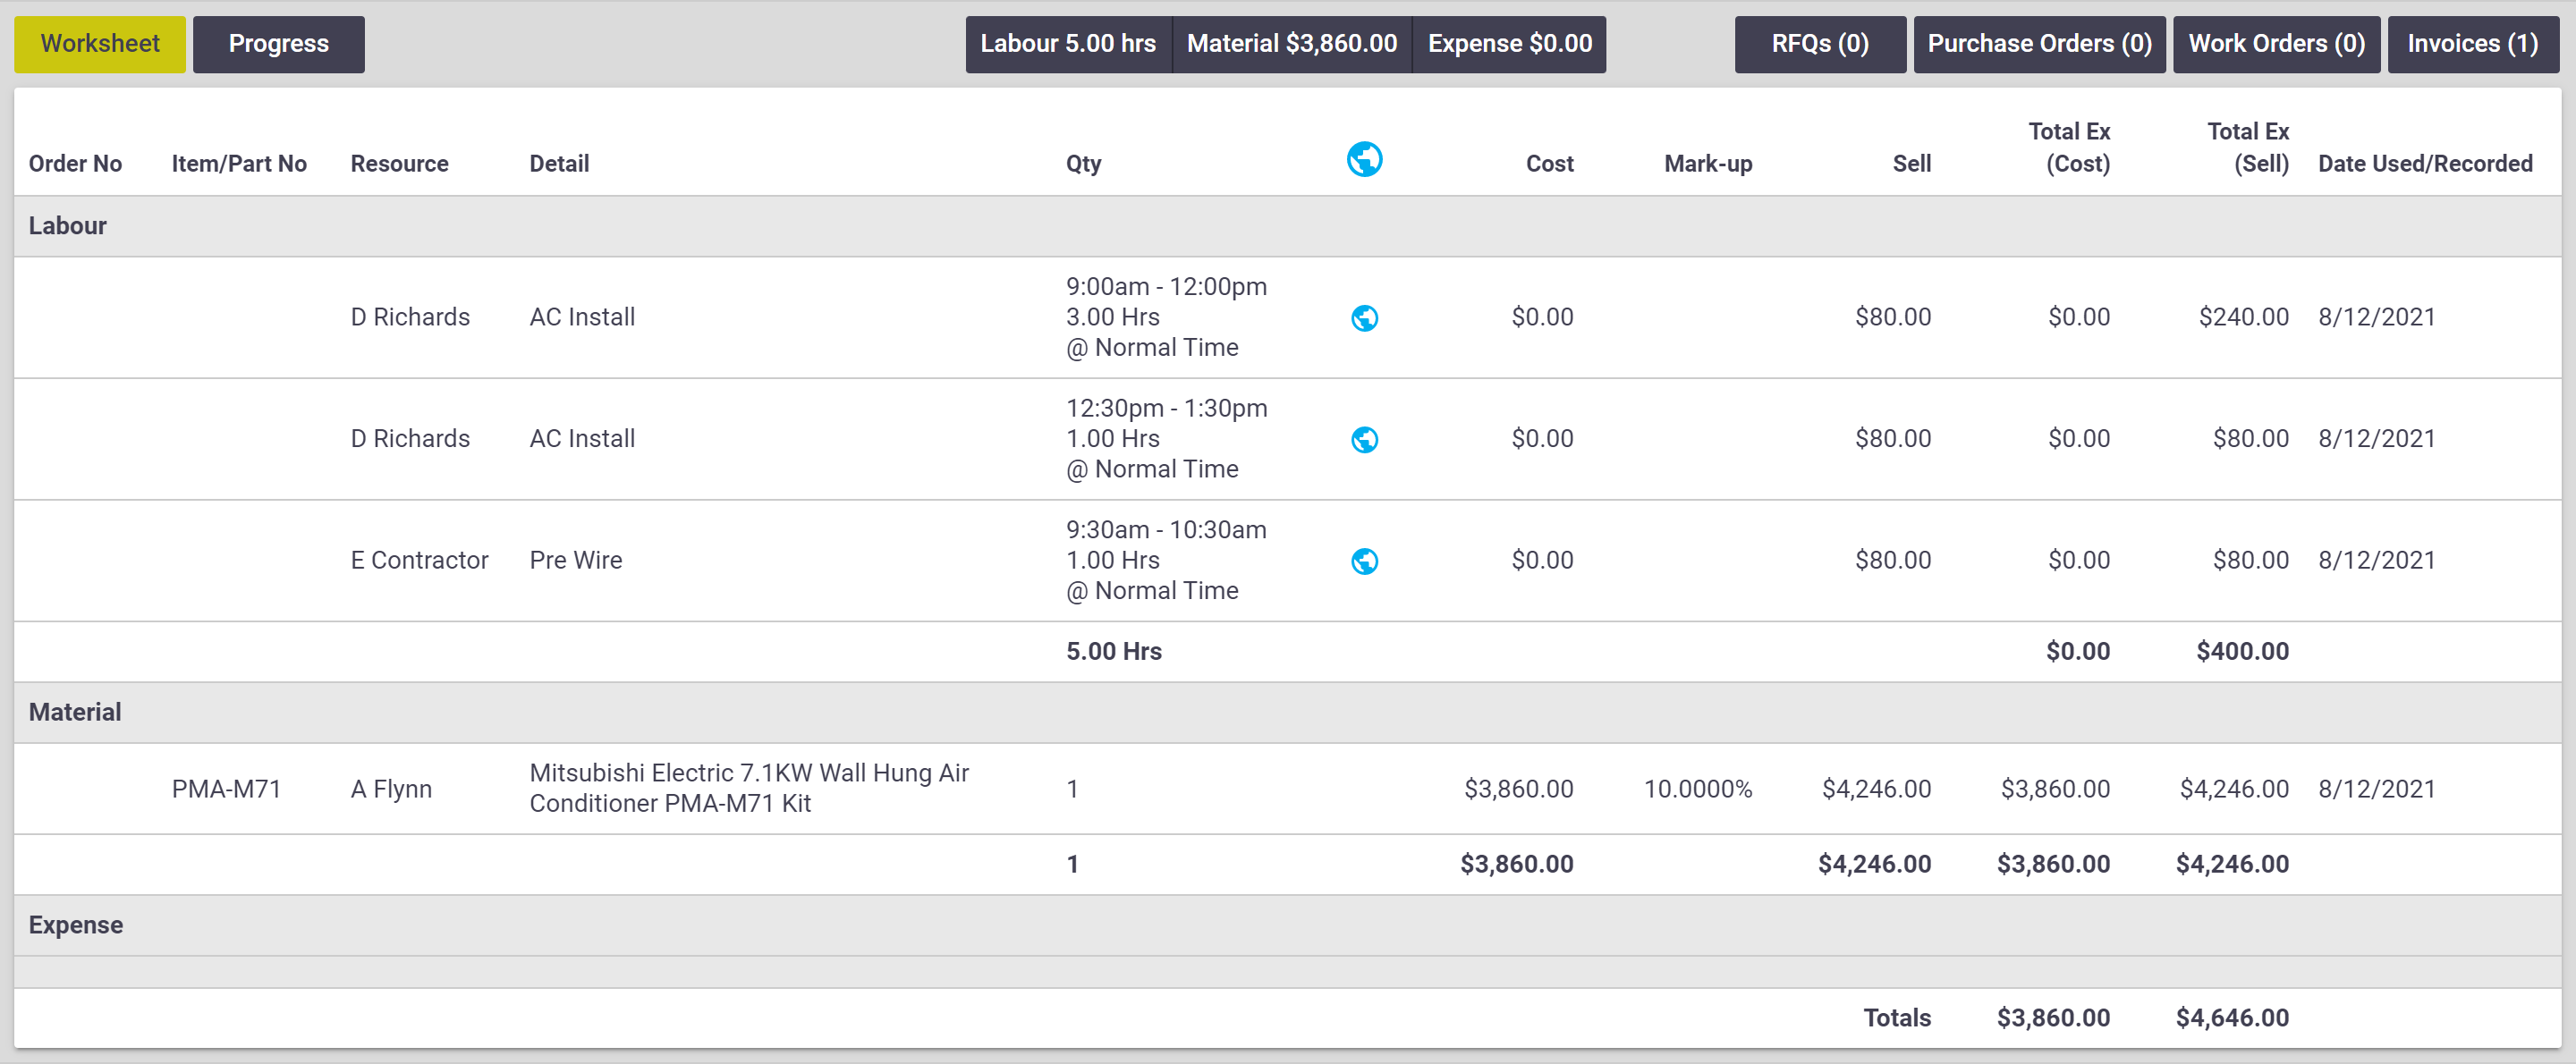 |
Worksheet
Provides an itemised worksheet of all costs booked on the job, including cost, mark-up and sell values (see above image).
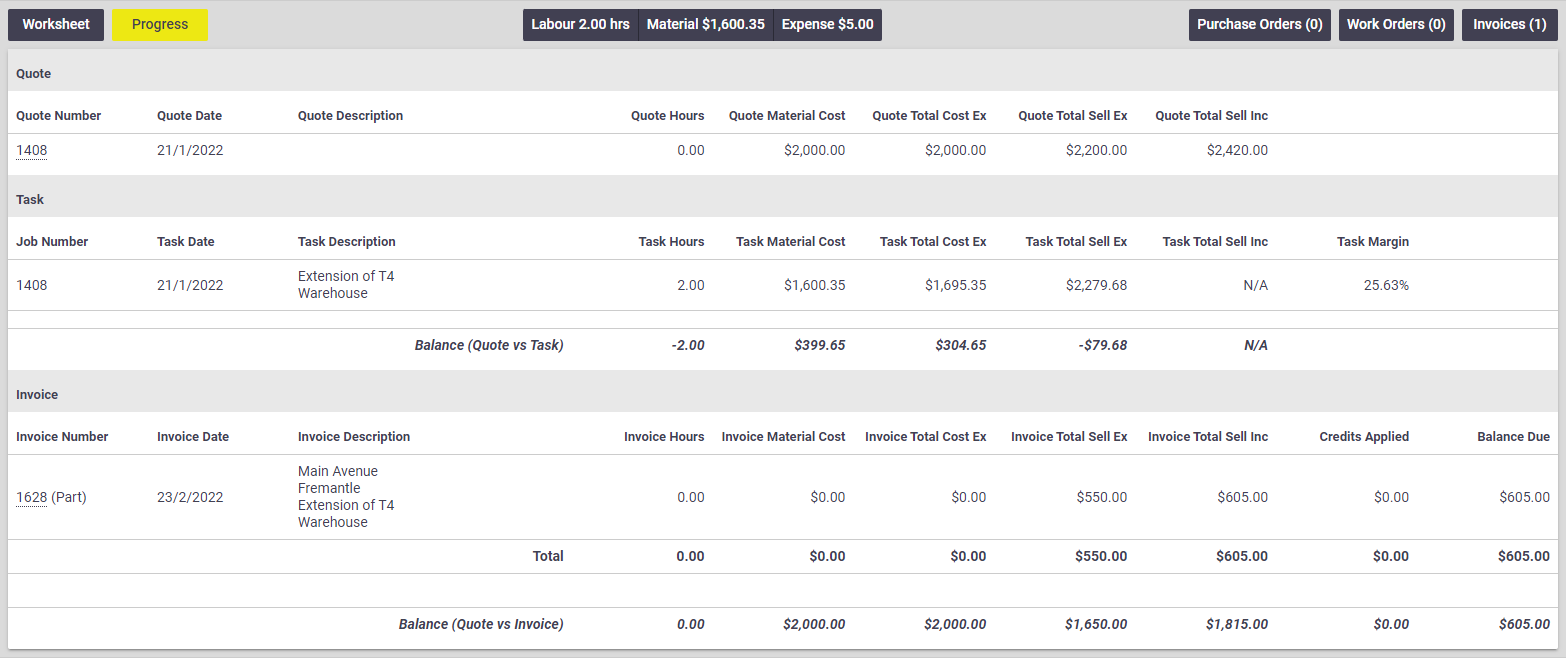
Progress
|
Displays a summarised table comparing your quote to the task and any Invoices.
The Task section includes a balance outstanding (in dollars and hours) that you can still expend on your job (based on values in your original quote). This is useful when you want to quickly check if you are over or under budget. For example: You may have quoted 50 hours of labour, your task has incurred 40 hours of labour, so your labour balance is 10 hours.
The Invoice section includes a list of all invoices and a balance for costs (in dollars and hours) that you haven't yet invoiced. |
 |
RFQs
View or create a Request for Quote (RFQ). RFQs can are used to request quotes for materials or contract labour.
Purchase Orders
View and/or create purchase orders for materials that may be required for the task.
Project tasks
If working on a project task, you'll have an option to view purchase orders for all tasks within the project.
Work Orders
View and/or create work orders for contracted work that may be required for the task.
Project tasks
If working on a project task, you'll have an option to view work orders for all tasks within the project.
Invoices
View and/or create a part invoice to bill your client for work that has been completed to-date.
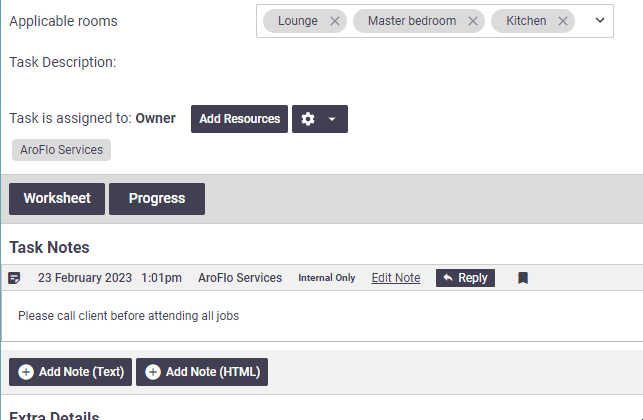
Task Notes
|
Task Notes can be used to:
To enter a Task Note, click Add Note (Text) or Add Note (HTML). The HTML option allows you to format the text using fonts, colours, bullets, tables and more.
You can also reply to task notes. See Add Notes - Reply to a note. |
 |
Task Note visibility
AroFlo displays the three most recent Task Notes.
- To view the full list of notes, click View (X) Previous Notes ..., where (X) denotes how many other notes are recorded.
- To hide all but the last three, click Hide Previous Notes ... .
Each note is displayed with a fixed height. If the content for any note is greater than this height you can either click or hover over the note to expand it to its full height.
Task notes are visible to the person who created the note, regardless of which filter has been set (e.g. Internal Admin Only, Visible to All). Therefore, if a user with Worker access adds a note that is 'Internal Admin Only' they will still be able to see it because they entered it.
You can also set restrictions for task notes. See Add Notes - Note Restrictions.
Flag important notes as 'Sticky' to keep them at the top of the notes list.
Storing email and SMS messages in Task Notes
The Task Notes section can also include email and SMS messages sent from the Task to help you keep track of all client communication. For more information, please refer to Email and SMS on Task Notes.
Resource history in Task Notes
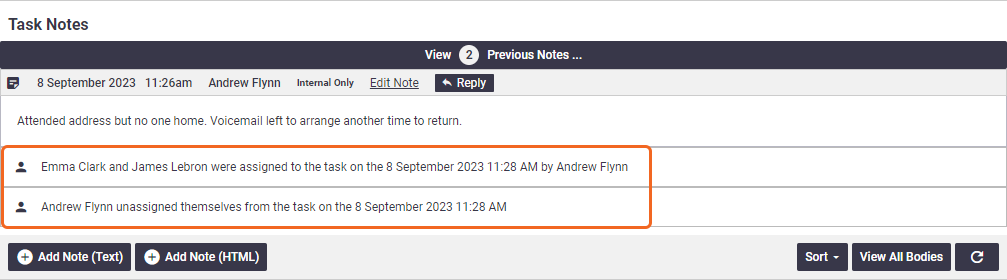
|
The Task Notes section can also include a history of resources being assigned and unassigned and can be useful to see a timeline of resource history.
Enable this in Site Administration in Task Settings (Show Assigned Resource Details in Task Notes). |
 |
Checklists and other tabs
| Checklists, documents/photos, compliance forms, schedules and assets are all stored within the task for easy reference. | 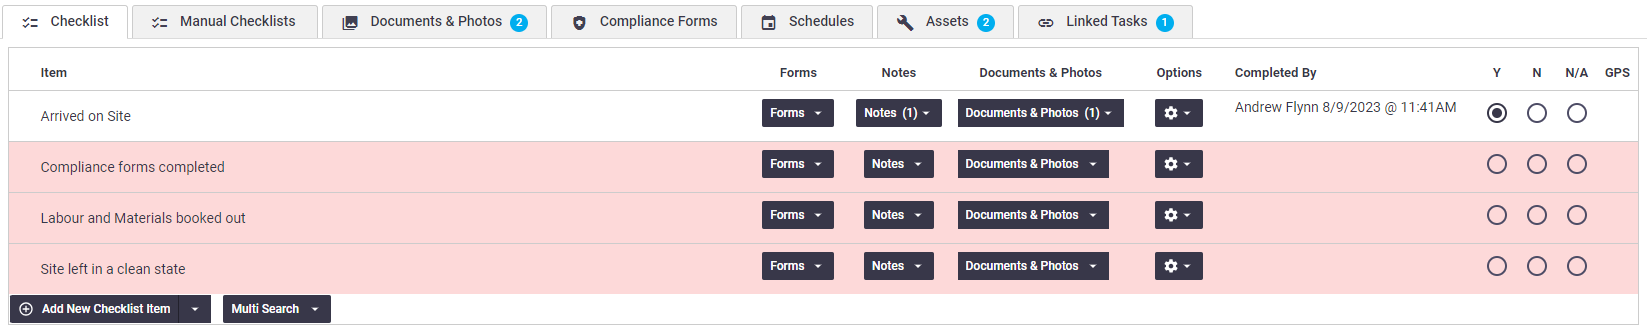 |
Checklist
Checklists are a series of items that require a response (Yes, No, N/A). Checklists can be automatically or manually added to tasks and quotes.
Manual Checklists
Provides a pre-defined list of checklists that can be manually added to the task as required.
Assets
Link assets such as equipment, vehicles or machinery for the purpose of tracking their service history.
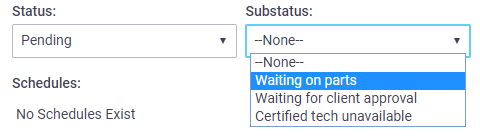
Task status
The task status field is used to flag the status or progress of a job so users can easily see where jobs are at. The four main statuses are:
|
Status
|
Description
|
|---|---|
| Not Started | Default status indicates work has not started. |
| In Progress | Set this status when commencing work to indicate the work is underway. |
| Pending | Set this status when work is on hold for some reason. You can use a substatus to provide the reason (see next section). |
| Completed | Set this status to indicate the work is complete and ready for invoicing, or archiving. |
Substatus
A list of customised substatuses can be set up and linked to a main status to provide additional information on the status or progress of a job. For example, if the main status is 'Pending', related substatuses could be 'Waiting on parts', 'Waiting for client approval', or whatever reasons make sense for your business.
Once substatuses are set up, you will be able to select one after setting the main status.
Substatus settings are unique to your business and are set up in Site Administration. Please contact your Site Administrator for assistance. |
 |
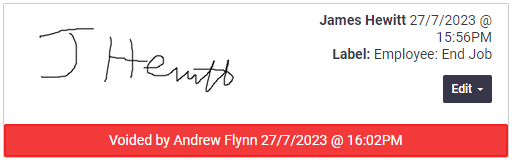
Signatures
| Employee or client signatures captured via AroFlo Field are displayed at the bottom of the worksheet. The signature image and date/time information stored within the task can be added to various layouts such as task sheets and invoices. | 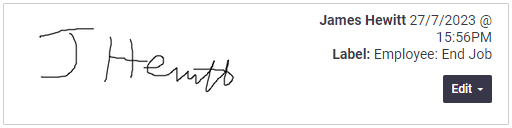 |
Edit signature details
|
Users with Management access can edit the print name, label or extra information on a signature:
|
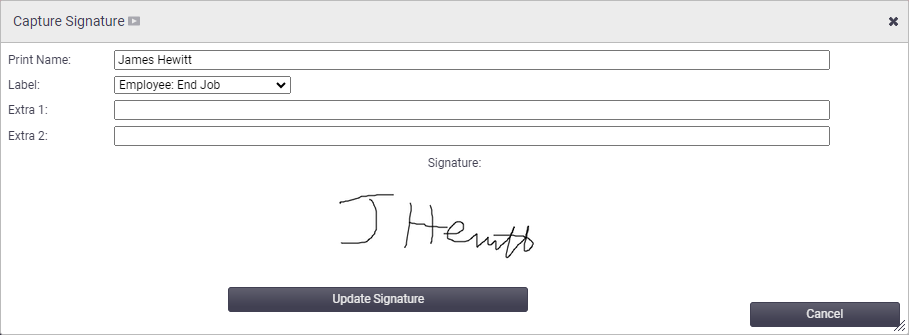 |
Voiding signatures
|
Captured signatures cannot be deleted, but a Management user can void the signature to disable it from being included in emails, layouts and reports.
To un-void a signature, click Edit, select Unvoid Signature and Save the task. |
 |
Print Options
|
Use the print options to email the task jobsheet and/or preview your layout. Layout options |
 |