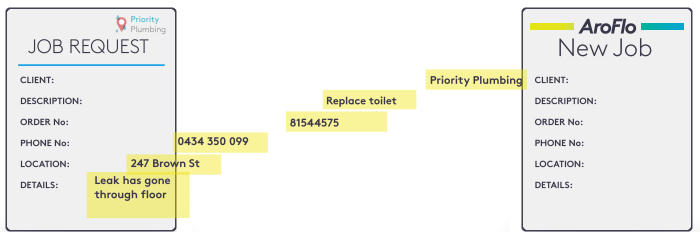
Client work order email imports can be uploaded by email directly into AroFlo. This feature is most useful if you have a client that regularly sends jobs via email - always using the same work order template.

In most cases, AroFlo can scan these emails and attachments for key information that's used to automatically create a task within AroFlo.
Depending on the layout format of the work order, the following data can be read and imported into a task:
| Client Order Number | Task Name | Task Type (or set a default) | Description of job | Contact Name | Contact Phone Number |
| Location | Location Phone Number | Sales Person | Business Unit | 3 notes |
Set up work order imports
AroFlo allows free* work order email imports as part of your initial site set-up.
- Work orders are set up at the client level, so once a work order has been set up, you can receive unlimited work order imports from that client.
- If your client changes the format of their work orders, please contact our Customer Service team. The import settings are unique to the original work order format and any changes will result in a new work order setup.
* AroFlo's Fair Use Policy applies.
Setting up work order imports yourself
Setting up work order imports is something we normally do for our clients, as it can be quite complex. If you do want to configure these yourself, see Configure Work Order Imports (Email Import to Create Task).
If you have a regular client work order that you would like to automate, please follow the steps below:
- Send us a support request for each Client Work Order Import.
Please include the following details:- The name of the client sending the work orders exactly as it appears in AroFlo.
- The domain where work orders come from (i.e. "@aroflo.com.au", "@hotmail.com").
- The user in AroFlo (user's name) that should be notified on import of success or failure.
- The default Task Type for jobs created on import.
- Which Business Unit the task should be assigned to (if you have multiple).
- Attach a minimum of 4 work order samples. These should include:
- Samples with different location details (if applicable).
- Samples with multiple pages.
- Any other attachments that are included in the emails.
- The body of the email that has the attachments.
A member of our Customer Service team will email you once the setup of the work order is complete. You will also receive the unique email address for your client to send future work orders to (using the format: yourcompanyname_wo@imports.aroflo.com) for importing into your AroFlo site.
Import limitations
- Work orders must be one of the following file types: PDF, CSV, TXT and RTF or part of the email body.
- AroFlo cannot read PDF files that have been generated from a scanned document.
- If the work order is in the body of an email, please contact our Customer Service team before attaching to a support request. These types of samples cannot be uploaded to our internal job system.
Web forms
If you are creating an email to send from your company's website to AroFlo to create a job, please use the following format for the email body. This will allow AroFlo to capture the maximum number of fields when importing.
Web form import limitations
- Please do not include the text in brackets.
- Please try to include ":" colons where possible.
- AroFlo cannot read or import any text in the email subject.
| Email body: |
|---|
| Task Description: (i.e. address - the task identifier in AroFlo) Task Type: Cust Order Number: Due Date: (please use a consistent format, ideally: yyyy-mm-dd (NOT American format)) Priority: (If you use this, please ensure the client uses the same priority descriptions you have set up in AroFlo) Contact Name: Contact Phone: Location: (job location - maybe same as task description) Location Phone: (Location contact) Job Description: (This can be as long as necessary) Note1: (These will be imported to the Task Notes area) Note2: Note3: |