The Task Actuals view allows you to create a progress claim for the job costs incurred against a project, its stages or tracking centres. These costs may exceed an original estimate.
Example scenario
AVC Services are managing a renovation project. The project is for an insurance provider and is due to flood damage.
Their client requires a claim to be submitted each month for job costs expended to date. This might be split into stages such as initial demolition, room refurbishments and roof repair.
A portion of the demolition works was completed in the first month, which resulted in a labour timesheet total of 40 hours at $80p/hr.
In this case, a claim can be created (using the Task Actuals calculation) to invoice for $3200 in the demolition stage. Additional markups or discounts could also be applied.
Claim grouping options
Depending on how you want to group costs within your claims, you can create invoices with the following methods:
- By Project (overall)
- By Stages
- By Tracking Centre
Learn more about each group option below.
It's highly recommended the chosen method is selected in the Project Progress Settings. This means that any future project invoices will be created using a consistent method.
The Project Progress Settings should also have the calculation method set to 'Task'.
Create an invoice
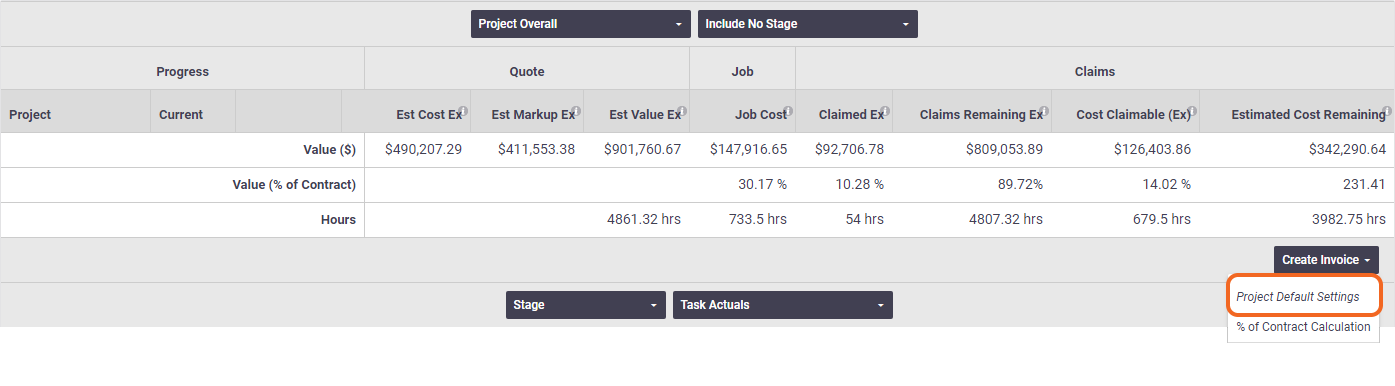
If you have set Project Progress Settings, click Create Invoice > Project Default Settings. The Project Invoice screen will appear.
To group costs differently to the default project settings, refer to the sections below.
| If you create an invoice and the settings differ from the project's default progress settings, you will need to confirm which settings you want to use for the invoice. | 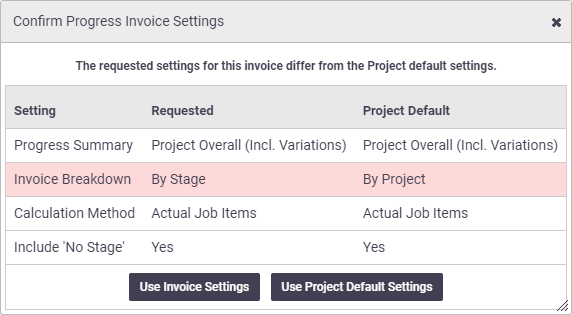 |
Group costs by project
Use this method to create a claim for the total value of costs incurred to date for the overall project.
- From the Progress tab, set the progress view to Project Overall.
- Select Task Actuals.
- Click Create Invoice > Task Actuals Calculation.
- The Create Project Invoice screen will appear. See below for further instructions.
Group costs by stages
Use this method to create a claim for the total value of costs incurred to date, grouped by stages.
For example, stages could be the phases of a renovation such as foundations, external, internal etc.
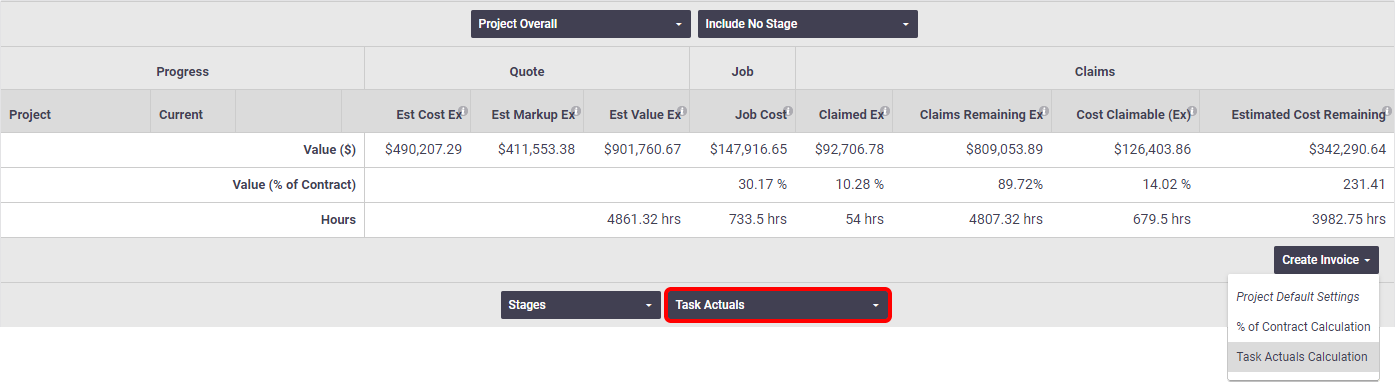
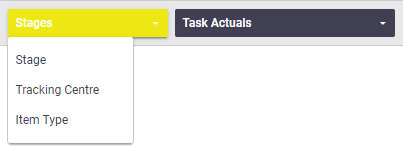
- From the Progress tab, click the Stage button to display the stages of the project.
- Set the view to show Task Actuals.
- Scroll down and click Create Invoice by Stage - Task Actuals Calculation (bottom right of screen).
- The Create Project Invoice screen will appear. See below for further instructions.
Group costs by tracking centre
Use this method to create a claim for the total value of costs incurred to date, grouped by tracking centres.
For example, you can set up tracking centres to group costs for each type of trade used during the renovation such as electrical, plumbing, carpentry, etc.
- From the Progress tab, click the Stage button and select Tracking Centre.
- Set the view to show Task Actuals.
- Scroll down and click Create Invoice by Tracking Centre - Task Actuals Calculation (bottom right of screen).
- The Create Project Invoice screen will appear. See below for further instructions.
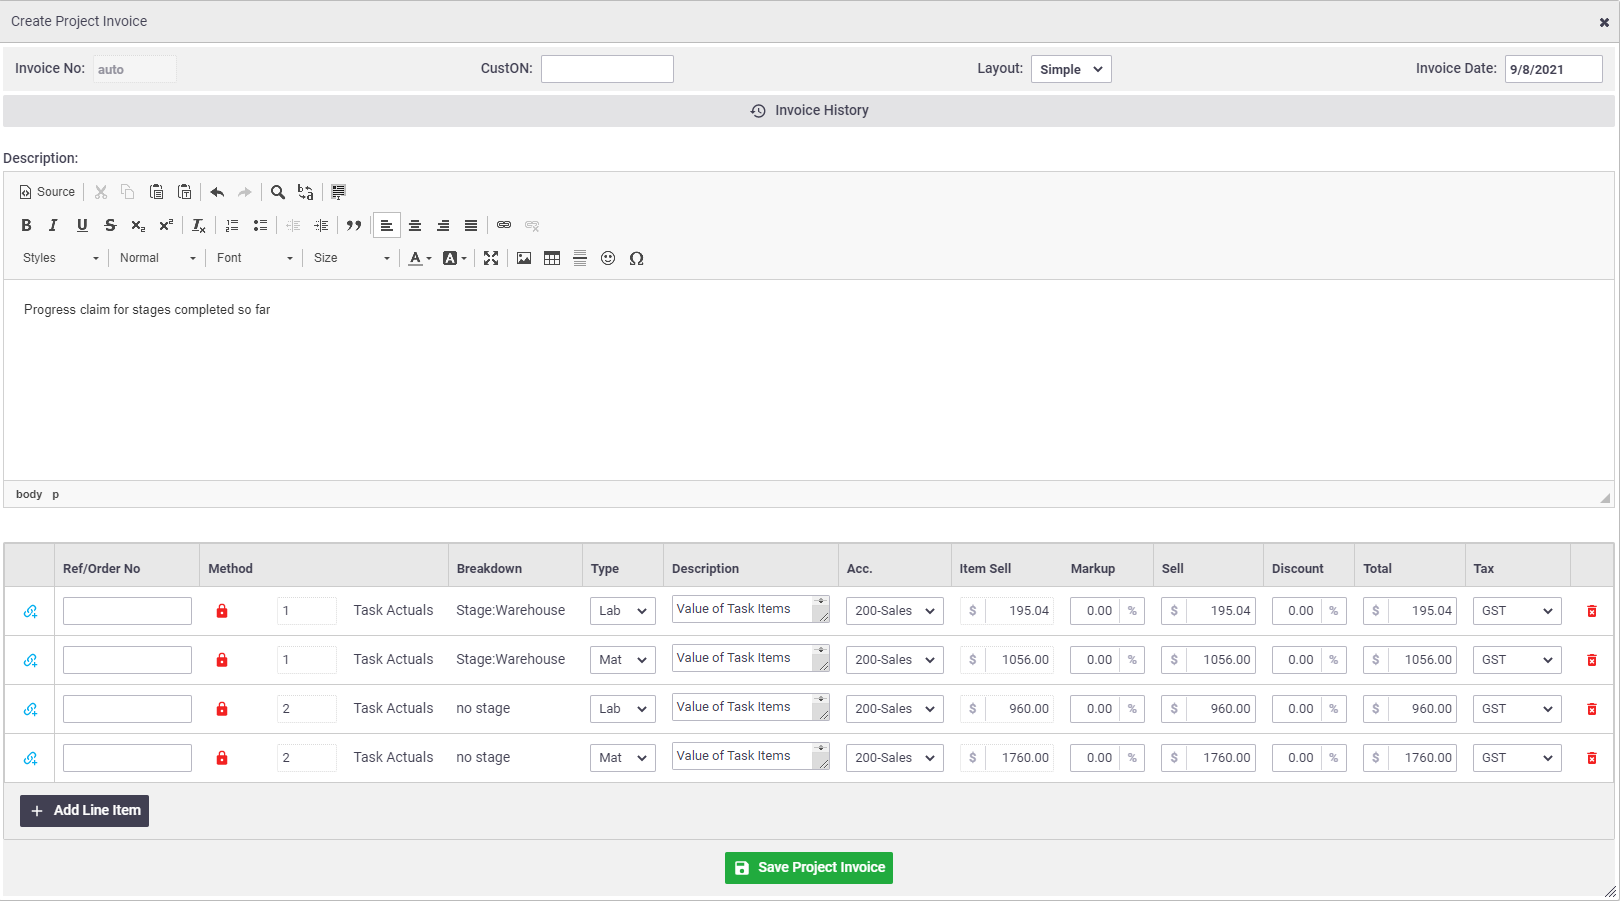
Create Project Invoice screen
This screen is used to build the key elements of the progress claim. It features an HTML editor so you can use various types of formatting in the invoice description such as coloured text, different fonts and bullet points.
The pre-filled line items are based on actual expenditure incurred since the last progress claim was raised.
You can edit the line item descriptions and values without affecting the original job costings recorded on tasks within the project.
Field |
Description |
|---|---|
| Invoice No. | Displays the invoice number once the invoice has been saved. |
| CustON | Displays the customer order number (if any) that was entered onto the original quote, task or project. |
| Layout | Choose either a Simple or Detailed layout from this dropdown. |
| Invoice Date | Automatically populates with the date of creation. This can be edited if needed. |
 Invoice History Invoice History
|
Expand to view previous invoices for this project. |
| Description | Enter a description for this invoice. |
Invoice line items
When creating an invoice from the Progress tab, the line items are automatically added based on the item type (labour, material, expense) and groupings selected. You can edit or delete these line items if needed, or add new line items against any stage or tracking centre. Any adjustment to these values will recalculate the line item.

Learn about Invoice Line Item fields
Field / Icon |
Description |
|---|---|
|
Displays an itemised view of the job cost items linked to this line item. This can either be for reference purposes or be used as a calculation for the overall line item. See next section. |
| Ref/Order No | Used to record a reference or order number (optional). |
|
Used to unlock the grouping. See next section. |
| Method | X Task Actuals This method uses the value of costs recorded since the previous invoice. The line item will be prepared based on the value of works carried out up to and including the day of the claim. The number in the box refers to how many items are linked to this grouping. |
| Breakdown | Displays the type of breakdown: overall project, stages, or tracking centres. |
| Type | Indicates the item type:
The Item Type cannot be changed once the line item has been added. |
| Description | Pre-filled item description based on the method and breakdown. This can be edited if needed. |
| Acc. | Select an account code from the drop-down list (used for accounting integration only). |
| Item Sell | Total sell value of labour, materials and expenses recorded on tasks. |
| Markup | Enter a markup % (if applicable). |
| Sell | Item Sell value + markup. If you enter a sell value, the markup % will update automatically. |
| Discount | Enter a discount % (if applicable). |
| Total | Sell value minus any discount %. |
| Tax | Select a tax code from the dropdown list (used for accounting integration only). |
|
Click to remove the line item. |
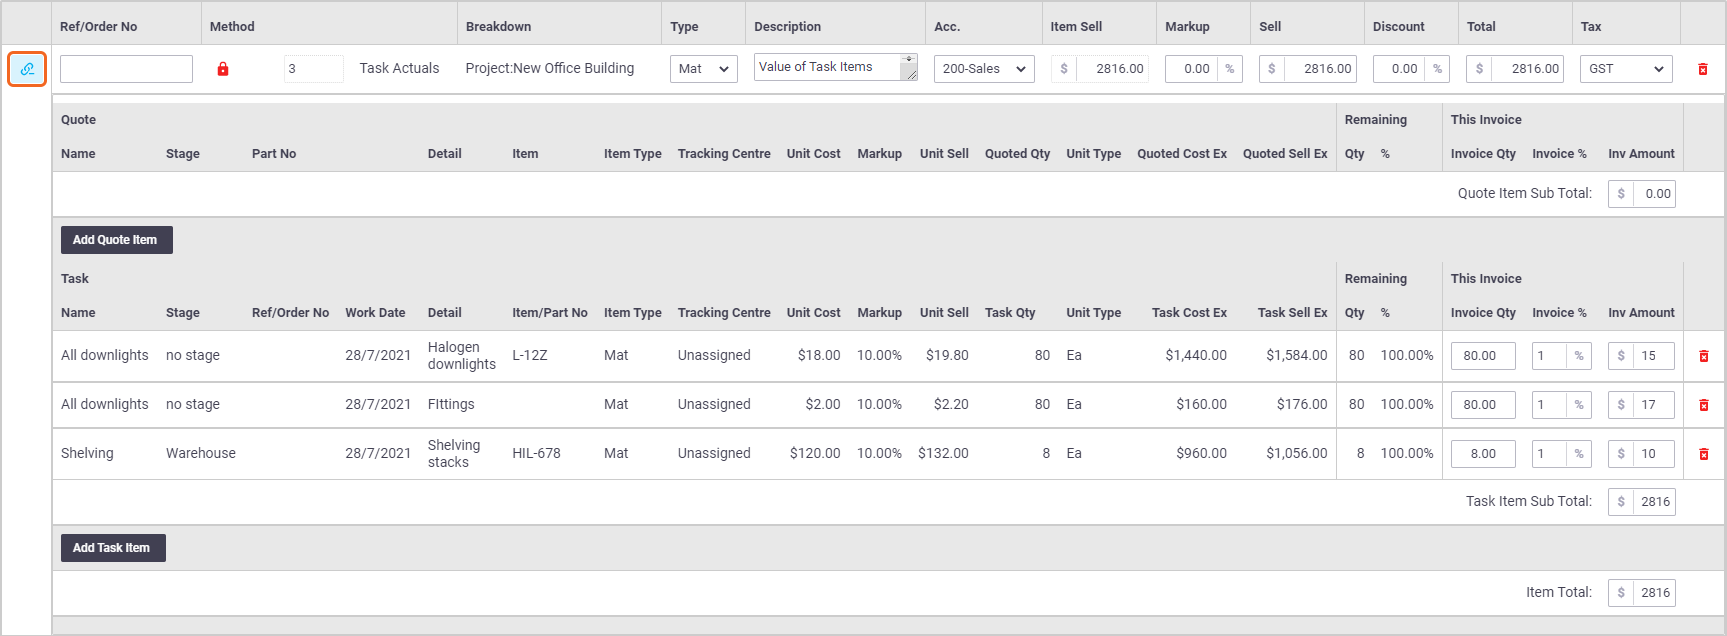
Linked Items
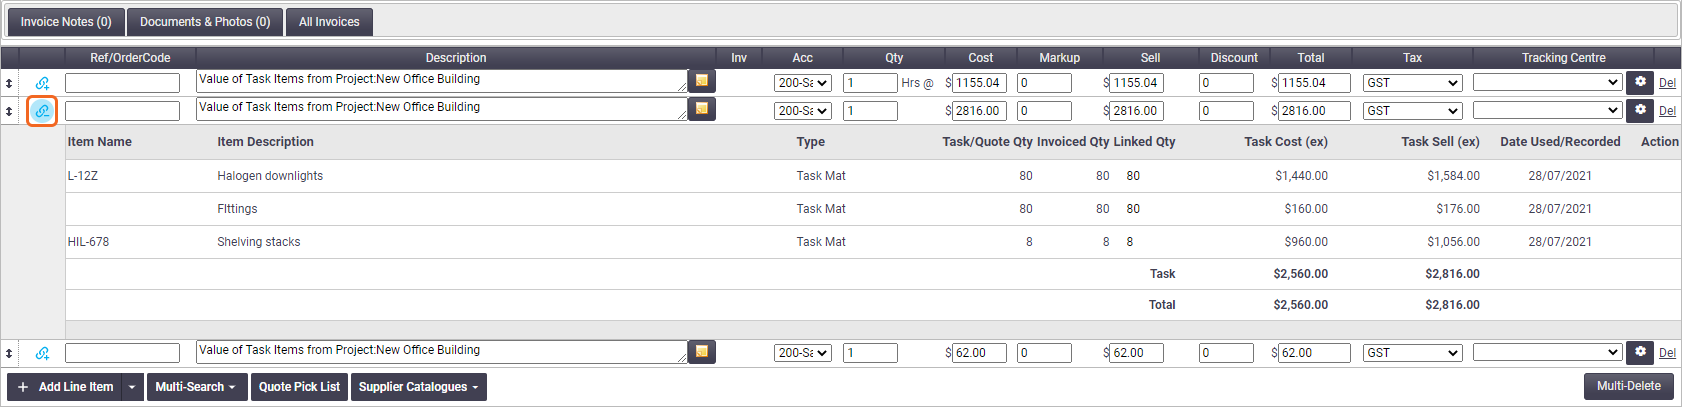
Click the link icon ![]() to display the relevant task items linked to this line item (e.g. material items for one stage), as well as their corresponding quantities.
to display the relevant task items linked to this line item (e.g. material items for one stage), as well as their corresponding quantities.
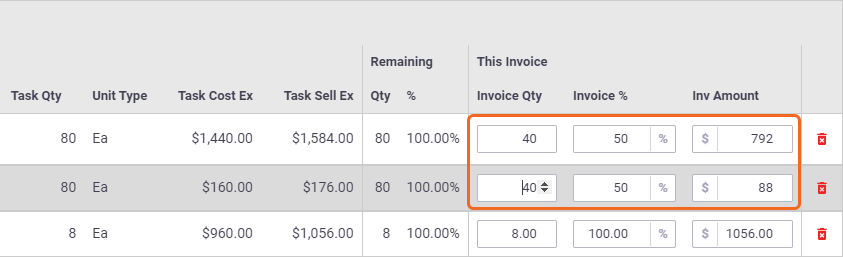
Editing Linked Items
|
From here, you can either edit an item's quantity, percentage, or the overall amount. Use case For example, you may wish to invoice for some items now and some at a later stage (see image).
Alternatively, to delete linked items, click the
Use the Add Task Item button to view and select items that have not yet been claimed. Task items can only be invoiced once.
If your project contains linked quotes, you can also link quote items using Add Quote Item.
Alternatively, you might want to create a brand new overall line item using Add Line Item (see below) and then link your quoted items to this line item. |
 |
I want to show all job costs for a stage
Using this method groups items based on the item type (labour, material, expense), as well as by the Breakdown you selected above (Project, Stages, or Tracking Centres). If you want all items under the one grouping (e.g. all task items for one stage), you can achieve this by deleting the necessary overall line items (e.g. labour task items for one stage) and then adding the task items to the overall line item you're working on (e.g. material task items for one stage) using Add Task Item. Alternatively, you can create a new overall line item (or several) and add your task items to this grouping. See Add Line Item, below.

Once finished, the Task Item Sub Total and Quote Item Sub Total (if used) will show you an updated figure which is used for the overall line item.
Unlike the Contract % Calculation method, the values for your linked items will affect the overall line item and there is no Use Sum of Items option.

Learn about Task Item fields
|
Field
|
Description
|
|---|---|
| Task | |
| Name | The name of the task where the item was recorded. |
| Stage | The project stage in which the item sits. |
| Ref/Order No |
For labour items: the name of the resource For expense items: the type of expense |
| Work Date | The date on which the task item was recorded. |
| Detail |
For material items: the name of the item For labour items: the work type, e.g. Normal Time For expense items: the expense description |
| Item/Part No | Used to record a reference or order number (optional). |
| Item Type | Either material (Mat), labour (Lab) or expense (Exp). |
| Tracking Centre | An optional way of tracking costs. See Tracking Centres. |
| Unit Cost | Cost per item as per the task |
| Markup | Markup entered on the task |
| Unit Sell | Task Sell value + markup. |
| Task Qty | The quantity of the item as per the task |
| Unit Type | The unit type that item is consumed/sold, e.g. each for material items or hrs for labour entries. |
| Task Cost Ex | Unit Cost x quantity. |
| Task Sell Ex | Unit Sell x quantity. |
| Remaining | |
| Qty | Quantity not yet invoiced |
| % | Quantity not yet invoiced shown as a percentage |
| This Invoice | |
| Invoice Qty | Quantity being invoiced for this invoice |
| Invoice % | Quantity being invoiced for this invoice shown as a percentage |
| Inv Amount | Amount being invoiced for this invoice |
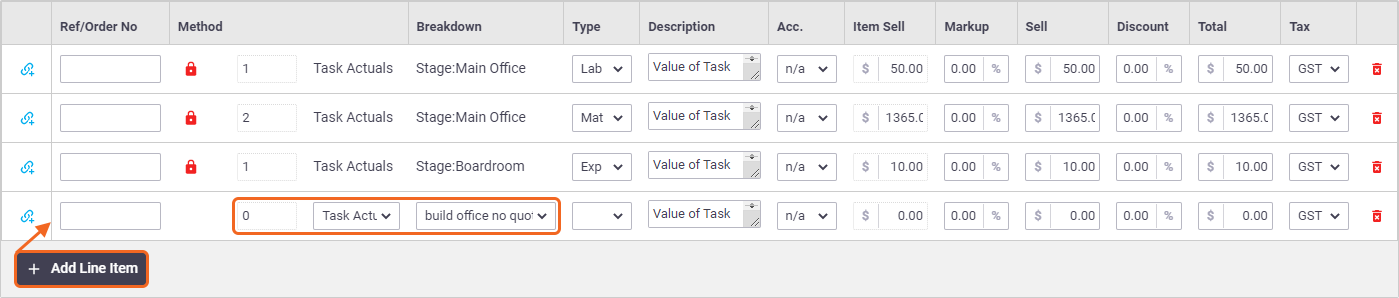
Add Line Item
You can also add line items if you wish to create your own groupings, e.g. if you want to create a separate line item for variations:
- Click Add Line Item
- (Optional) enter a Ref/Order No
- Select the Method of calculation (Task Actuals or Contract %)
- If using Contract %, enter a value for the percentage
- Select the Breakdown of this line item, e.g. entire Project or select a stage or tracking centre
- (Optional) edit the pre-filled Description
- Click the link icon
 to add Task and/or Quote items to this grouping. This will bring up a search window displaying items used on Tasks/Quoted items that are yet to be invoiced.
 - Double-click each item you want to add to the grouping.
- Close the search window.
- Edit each item's quantity, percentage, or overall amount, if applicable.
- Click Use Sum of Items if you want to update the values on the overall line item (Contract % only).
Things to note when linking Task/Quote items
- If using Contract %, this is an optional step as the overall amount will still be calculated without linked items being attached.
- Only relevant items from the selected Breakdown will be displayed
- Linked items can only be added to an overall line item once, i.e. if items have already been added to a line item above, they cannot be added to another line item unless you first delete the linked item from the grouping it's sitting in, or delete the entire grouping.
- If using Task Actuals, the item total will be the amount of your linked Task items. If using Contract %, you'll have the Use Sum of Items option to update the overall line item's value.
Finalise Invoice
Once you've finished editing your line items and/or linked line items, click Save Project Invoice to be taken to the Invoice Worksheet.
Your invoice line items will display with linked items, similar to how this displayed on the create project invoice screen.
You're able to edit the overall line item, e.g. edit description, order code, or discount, however, the linked line items will be read-only and cannot be modified.
From here, you can choose a suitable layout for printing or emailing to your customer.
AroFlo provides a range of project elements and tables which can be added to an invoice layout to provide more detailed cost information.