|
To start enjoying the benefits of AroFlo, you need to get your clients and suppliers into the system. You can do this yourself quickly and easily using AroFlo's Getting Started Assistant, Import Assistant or bulk import features. Alternatively, you can also send the file to us. Simply login to AroFlo and follow the below instructions. |
 |
 |
Export clients and suppliers from your system
The first step is to export your clients and suppliers, so they can be imported into AroFlo.
If you would like to manually export, clean up and then import data from your accounting package, you can use the following tabs to assist with the export instructions:
...
 Select the application with your clients and suppliers
Xero
|
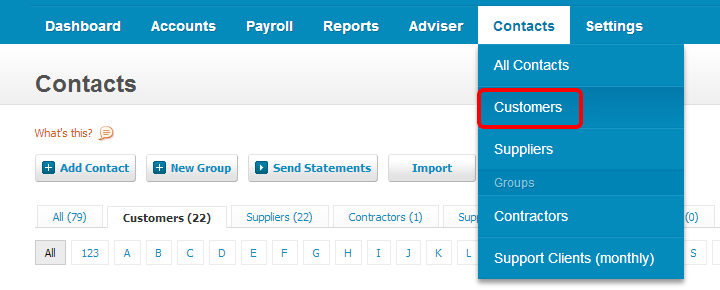
Click here to see the Xero support page for instructions To export customer contacts from Xero, refer to the Xero instructions above. Please note the steps below.
|
 |
 |
Identify your contacts as 'Client' or 'Supplier'
If you have exported all of your contacts to one file, you will need to add a column called 'Client/Supplier' and use it to identify each contact as either a Client or a Supplier. This will ensure that we import your contacts correctly into AroFlo; if no distinction is made, all your contacts will be imported as Clients.
MYOB AccountRight
|
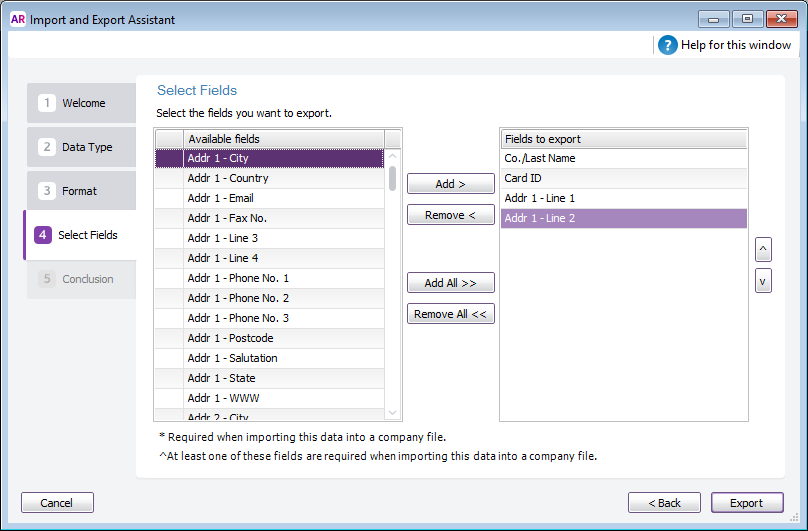
Click here to see the MYOB support page for full instructions Be sure to also:
|
 |
 |
Format data
The TXT file type that MYOB gives you by default will need to be formatted into usable, delimited data and saved as a CSV file for upload into AroFlo.
If you have data that you don't want to import (e.g. if you've used the address field to record notes about a client), please contact Customer Service.
Looking for MYOB Essentials?
MYOB Essentials does not allow exporting of contacts. Please contact Customer Service for assistance.
Reckon Accounts or Hosted
To export all customer contacts from Reckon Accounts or Reckon Hosted, follow these steps:
- In the top menu, click Reports > Customers & Receivables > Customer Contact List.
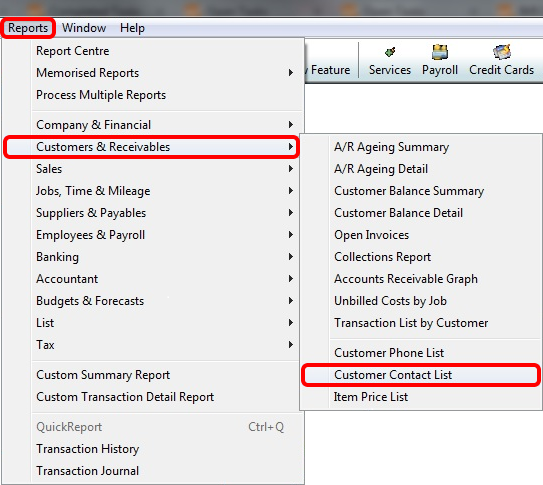
- Click Modify Report.
- Select ALL options.
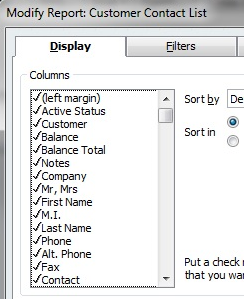
A quick way to select all options is to hold the down arrow and the space bar on your keyboard until all unchecked items are checked.
- Click OK.
- Click Hide Header > Export.
- If you have Microsoft Excel installed, click a new Excel workbook. If you don't have Excel, click a comma separated values (.csv) file.
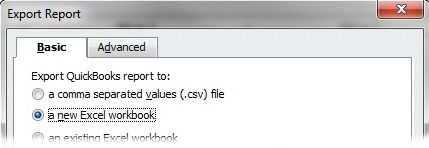
- Click Export. Excel, or a text editor, opens and displays the report.
- Save the file in a location that you will remember.
Repeat this process to export your suppliers list, but in Step 1, select Suppliers & Payables.
Other applications
Export data from another source
If you need to export client and supplier data from another source, export your data as a .CSV or .XLS file from that application.
Use our templates
You can use our templates to prepare your data for uploading via AroFlo's bulk import tool.
If your data is complex, use our import templates and send it to us.
We recommend that you only include active clients and suppliers. This will ensure users have current client and supplier information from the start.
What information do I need to export?
The client and supplier fields listed below can be imported into AroFlo:
- Any headings in your file do not have to match the field name we have in AroFlo. (E.g. Your file may have 'given name' and AroFlo has 'first name')
- If a field you require is not shown, you can add custom fields in AroFlo before starting your import.
AroFlo comes with a pre-built Training Client and Training Supplier so you can see a completed client or supplier card for reference.
| Field | Definition |
|---|---|
| Client / Supplier Name | Company/Business name. *This is a required field |
| Primary Contact First Name | First name of your contact person at that business. *This is a required field |
| Primary Contact Last Name | Last name of your contact person at that business. *This is a required field |
| EIN | Client's EIN |
| Client Note | A generic message which appears on the client card e.g. 'Ensure invoices are sent to accounts' |
| Client Short Name | Short name for client (max. 6 characters) |
| Primary contact person's email address | |
| Fax | Client's primary fax number |
| Mobile (Cell) Phone | Primary contact person's cell phone number |
| Parent Client | Name of the Parent Client (if applicable) n.b. this client will be added as a Child Client |
| Phone | Primary contact person's phone number |
| Terms Note | Information relating to client's trading terms |
| Transaction Terms | Transaction terms for this client as per Site Admin (e.g. 30 Days) Import values Check how AroFlo formats this data by going to Create > Client. Check the 'Terms' drop-down menu to see the options available. |
| Website | Client's primary website |
| City | Client's location suburb |
| Company Address | Client's location street address (No. and street) |
| Company Location Name | Client's location name (e.g. Level 8 Building 1) |
| Country | Client's location country |
| Postcode | Client's location postcode |
| State | Client's location state |
| GPS - Latitude | GPS Coordinates - Latitude |
| GPS - Longitude | GPS Coordinates - Longitude |
| Is Individual? | A checkbox to specify if your client is an individual (e.g. domestic work for a home owner) Import values The Individual field can have the values '1', 'yes', 'y', 't', 'true', 'on', 'checked', 'filled', or 'individual'. |
| Mailing Address | Client's mailing street address (No. and street or PO Box) |
| Mailing City | Client's mailing suburb |
| Mailing Country | Client's mailing country |
| Mailing Location Name | Client's mailing location name (e.g. Level 8 Building 1) |
| Mailing Postcode | Client's mailing postcode |
| Mailing State | Client's mailing state |
Prepare your data
Once you have exported a .CSV or .XLS file:
- Remove any duplicate or obsolete records, and any blank columns or rows within the data.
- Check that your data has the following mandatory fields, each in its own column:
- Client Name (this is a Company name)
- Primary Contact First Name
- Primary Contact Last Name
- Review the format of any Transaction Terms in your file to make sure they match how AroFlo describes them. For example, use '30 Days' not '30', 'thirty' or another format. You can check on how AroFlo formats this data by going to Create > Client. Check the 'Terms' dropdown menu to see the options available.
You can create your own Transaction Terms in AroFlo before importing your data. Just go to Site Administration > Settings, and search on Transaction Terms.
Other things to consider
Will you need extra fields? (Custom Fields)
If you have data that doesn't fit into the fields we provide, you can add custom fields in AroFlo, before starting your import. For example, you may have data like 'Customer Type' (VIP/Gold/Silver) or an internal reference number. If required, please also consider this additional information.
Do you have clients with multiple work sites or suppliers with multiple branches?
AroFlo can store multiple locations (such as work sites or branches) for a single client or supplier. You can also have multiple contacts for a single client or supplier.
This information can be included in your export files; however, you must ensure the client or supplier is referenced against each location or contact.
If you have any questions or require assistance with preparing your data, please contact our Customer Service Team.
Using Import Assistant
|
Follow the steps below to use the Import Assistant in order to import client and supplier contacts directly from your linked accounting package or through a CSV or XLS file.
|
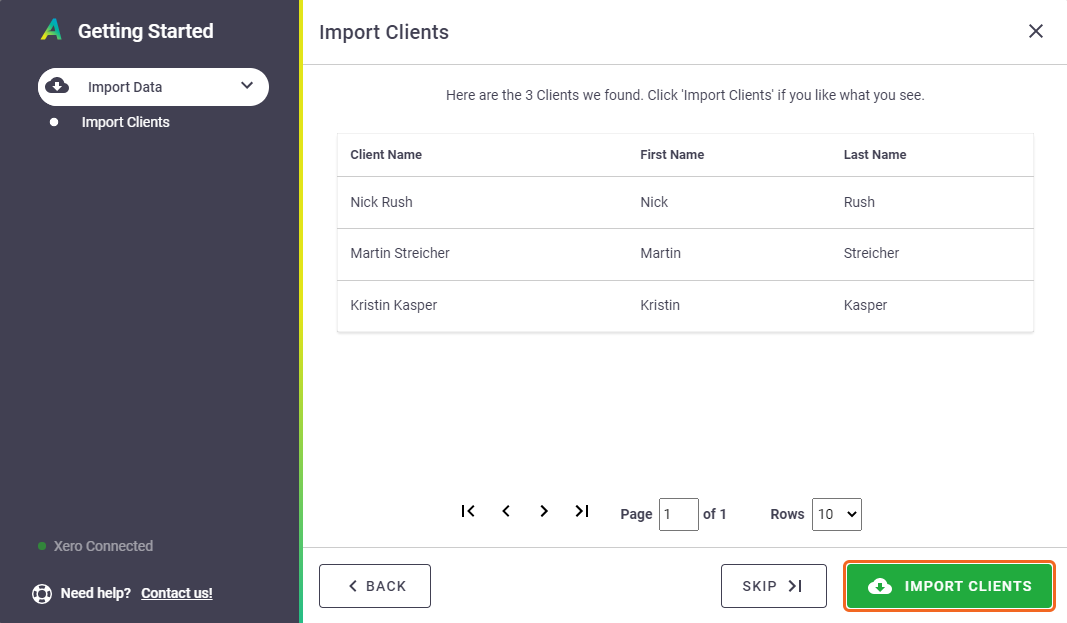 |
 |
Upload your file
|
If you're using an accounting package not supported by Import Assistant, follow these steps to upload your file to AroFlo:
|
 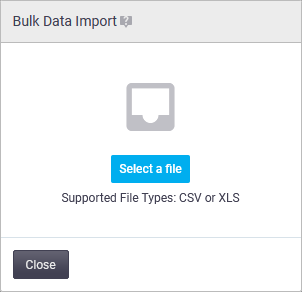 |
  |
Map the columns
|
Next, you will need to match the columns in your file to the fields available in AroFlo. On this window we can use an existing mapping template, or start a new template. If your file came from Xero or Quickbooks, you can use our preset mapping templates. Otherwise anyone can start a new template. Use the tabs below to learn more. |
 |
 |
...
 Select the application used to export your file.
Xero
If your .CSV file came from Xero, click Use Template on the Xero - Default Template.

To review the mapping between an existing mapping template and the file you've uploaded, click the ![]() (expand) icon. The pre-set mapping will display. You can change these if you need to by clicking Use Template and following the instructions in the 'Other Applications' tab.
(expand) icon. The pre-set mapping will display. You can change these if you need to by clicking Use Template and following the instructions in the 'Other Applications' tab.
Quickbooks Online
If your .CSV file came from QuickBooks Online, click Use Template on the Quickbooks - Default Template.

Please check the .CSV or .XLS file that was uploaded. QuickBooks is known to insert a blank column between each column that has data. If this has occurred please remove all the blank columns in your file and upload the file once more.
To review the mapping between an existing mapping template and the file you've uploaded, click the ![]() (expand) icon. The pre-set mapping will display. You can change these if you need to by clicking Use Template and following the instructions in the 'Other Applications' tab.
(expand) icon. The pre-set mapping will display. You can change these if you need to by clicking Use Template and following the instructions in the 'Other Applications' tab.
Other applications
Mapping data using a new template
Click Start A New Template.

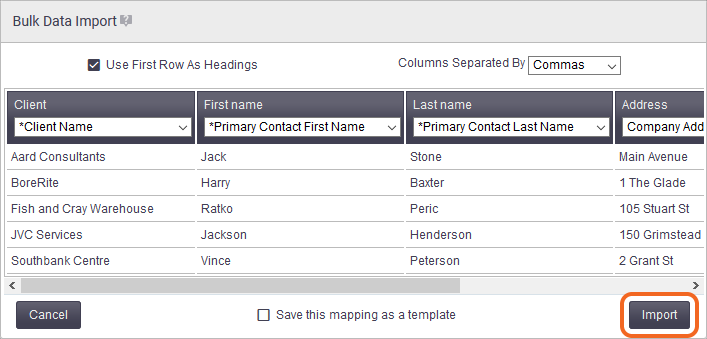
For each column, click the down arrow and select the AroFlo field name that most closely matches the column found in your spreadsheet. In the example shown, we're telling AroFlo that Column 4 contains the 'Postcode' and column 5 contains the 'Country'.

Data appearing under the dark grey column headers will be imported.
- To switch a dark grey column header off, click the arrow beside the field and select -- not mapped --. You can do this for any field other than the mandatory fields (marked with an asterisk).
- To switch a light grey column header on, click the arrow beside the field and select the most suitable mapping category.
If you plan to upload the file format to another business unit, you can save the current mapping to use again. Tick the Save this mapping as a template box at the bottom of the window and enter a name for the template.
Can't find a similar AroFlo field?
If you found columns in your file which don't match the fields we provide, you can always stop the process and add custom fields in AroFlo. See the previous section 'Prepare your data' to learn more.
Notes about mapping custom fields
- If you're using custom fields but don't include them in your upload, or don't map the fields, the custom fields will still be added to your entries but with blank values.
- Column mapping for custom fields cannot be saved using the 'Save this mapping as a template' option. You can still save and use mapping templates but the custom fields will need to be mapped individually each time you use the bulk upload feature.
Import your data
|
Now that you've mapped your data, it's ready to be imported.
The import process cannot be undone once you've clicked Import. If you need to reverse your changes after a bulk import, please contact our Customer Service team for assistance. A charge for this service may be incurred. |
 |
 |
View import results
|
Once your data has been imported, the results window appears:
After closing the results window, you may need to refresh your browser to view the Imported data in AroFlo. |
 |
||||||
 |